AAXA Technologies M4 Скачать руководство пользователя страница 42

Keystone Adjustments FAQ

How to Correct Keystone
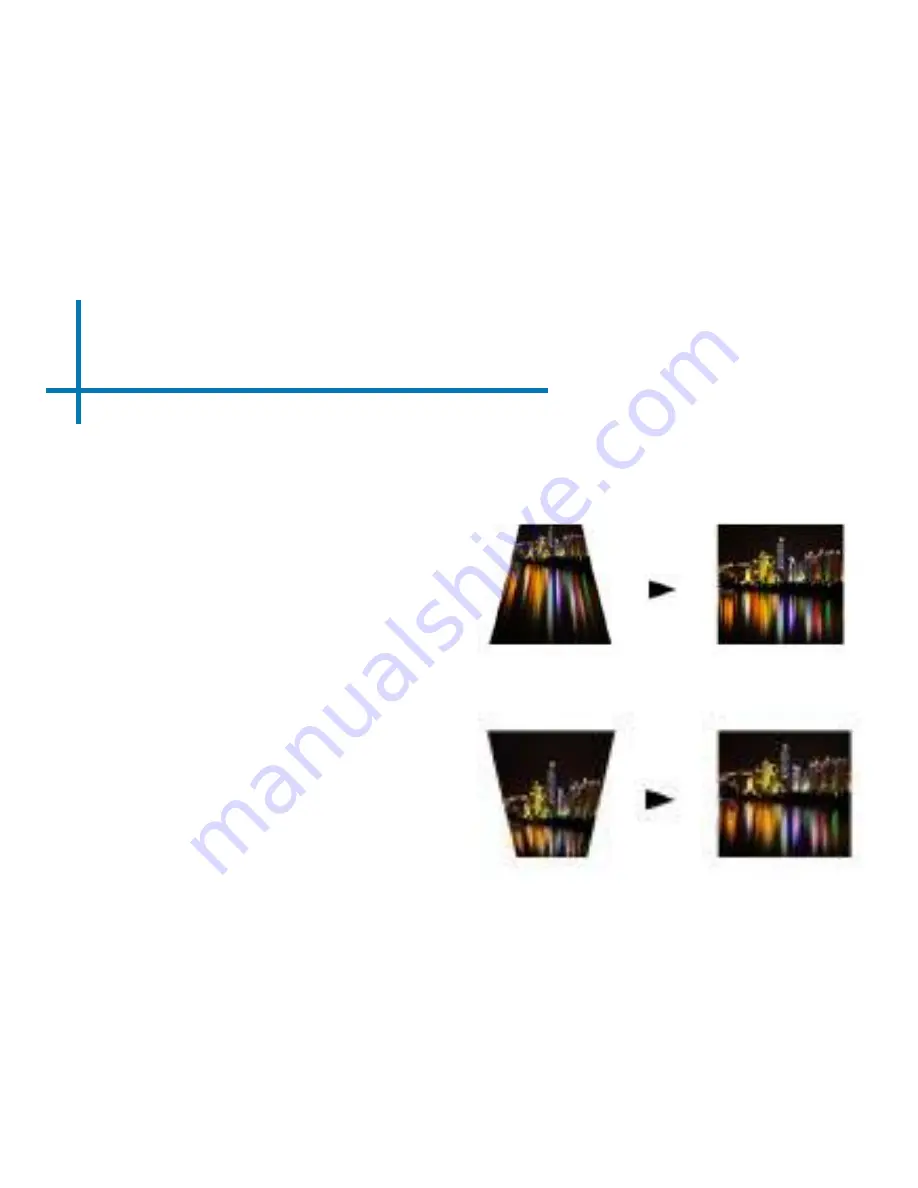
• 

If the image looks trapezoidal 

with the base larger (as pictured 

right), 

adjustment can be made 

using the M4 remote provided.

• 

If the image looks trapezoidal with 

the top larger (as pictured right), 

adjustment can be made using the
M4 remote provided.

Keystone  adjustments  are  made  automatically.  Adjustments  can  be 
made manually via changing the option in the settings menu.

**Please refer to page 3 for reference to keystone buttons on the remote.

40

Содержание M4

Страница 1: ...aaxa TECHNOLOGIES User Guide M4 Pico Projector ...

Страница 2: ...w from ventilation holes as this may cause the projector to overheat Keep the projector battery or charger away from any heat sources Caution for Battery Use Do not pierce or puncture the battery with sharp objects Do not heat the product or expose it to high temperature Do not wet it or place it in any liquid Caution for Headphone Use Prolonged use at high volume may impair your hearing High volu...

Страница 3: ...e Keypad Accessories Main menu Video Player Menu Video FAQ Photo Viewer Menu Photo FAQ Music Player Menu Music FAQ Setup Menu Keystone Adjustments Connecting to Speaker or Headphones Chapter 2 Getting Started Powering On OFF FocusAdjustment Throw Distance Battery Pack Information Connecting to a Computer VGA Connecting to a Computer HDMI Connecting to HDMI Video DTV Setup 10 12 14 17 18 20 22 23 2...

Страница 4: ...2 Chapter 1 Main Unit Front Back Power Button M4 at a Glance Power Switch Focus Wheel Component Port MicroSD Card Slot HDMI Input USB TV Antenna 3 5mm Audio DC Adapter VGA ...

Страница 5: ...s Keystone Adjustment Keystone Adjustment Main Menu Navigation Volume Adjustment Volume Adjustment On Off Both the keypad and remote can be used to navigate through the menus The Main Menu Navigation on the remote functions exactly the same as the directional pad on the M4 unit for all modes except DTV mode In DTV mode the remote control is necessary to perform the scan feature ...

Страница 6: ... various circumstances the actual accessories may be different from those shown in the pictures above PWR Gamma MENU U UP EXIT VOL OK VOL I U D DOWN R L VGA Menu AV Menu Internal Battery pre installed Remote Power Adapter ...

Страница 7: ...ition There are two idle modes for the projector Off and Standby The Off mode complete turns off the projector The Standby mode allows the projector to be turned on with the remote control The standby mode consumes a little battery power when left in this mode 1 To fully power off the projector switch the On Off switch on the side of the projector to the Off position 2 To put the projector in Stan...

Страница 8: ...AL SCREEN SIZE 16 9 Aspect Ratio Throw Distance Chart Adjust the focus wheel left and right until the image becomes clear Screen Size Inch 102 96 89 82 75 68 61 55 48 41 34 27 21 Distance Meters 3 2 8 2 6 2 4 2 2 2 1 8 1 6 1 4 1 2 1 0 8 0 6 Throw Ratio 1 360 ...

Страница 9: ...ess to the battery receptacle on the PCBA Please note that the battery pack is pre installed in the M4 The instructions below is how to remove the battery unit if replacement is needed 3 Remove the battery and replace with new battery unit using previous instructions in reverse order Battery Pack Installation ...

Страница 10: ...omputer via VGA Connect the large end of the 8 VGA Cord to your computer s VGA Adapter Step 1 Step 2 Step 3 In the Main Menu Select VGA icon Select INPUT icon to your M4 VGA Cord Connect the large end of the VGAAdapter ...

Страница 11: ...ot all systems are the same Press function F5 to instruct the computer to enable multiple displays You can also press Windows P to toggle through display settings NOTE different operating sys tems may differ Step 5 1 Right click on computer desk top and select Properties 2 Display Properties window will pop up 3 Click on the Settings Tab 4 If a secondary monitor is grayed out click on it and check...

Страница 12: ... Computer via HDMI Connect one end of the 10 HDMI Cord to your computer s HDMI Adapter HDMI Cord Step 1 Step 2 Step 3 Select INPUT icon In the Main Menu Connect one end of the Select HDMI icon to your M4 s HDMIAdapter ...

Страница 13: ...ot all systems are the same Press function F5 to instruct the computer to enable multiple displays You can also press Windows P to toggle through display settings NOTE different operating sys tems may differ Step 5 1 Right click on computer desk top and select Properties 2 Display Properties window will pop up 3 Click on the Settings Tab 4 If a secondary monitor is grayed out click on it and check...

Страница 14: ...Connecting to HDMI Video Connect one end of the HDMI to your devices Step 1 Step 2 HDMI Adapter Connect one end of the HDMI 14 to your M4 s HDMI Adapter 12 ...

Страница 15: ...M4 can connect to many media devices including iPod iPhone iPad VHS players DVD players smart phones cameras video game consoles and other peripherals with ease Step 4 Turn on your multimedia device If available select 1280x720 or 1920x1080 Smart phones will require video out capabilities to be able to be displayed with the M4 13 ...

Страница 16: ...Step 1 to your M4 s Antenna Adapter Antenna Cable Connect the cable end of the Please follow the instructions on the following pages on how to set up channels Setting up DTV 14 ...

Страница 17: ...Icon Step 2 In the Main Menu Please follow the instructions on the following page to set up channels Setting up DTV Cont Upon first selection of the Digital TV Source a Please Run Channel Auto Scan window will appear 15 ...

Страница 18: ...s The M4 features DTV capability which enables the display of ATSC North American digital TV signals that are broadcast through the air or through analog cable TV To setup DTV first connect either an external antenna or analog cable TV wire We recommend a large antenna as DTV broadcast signals are notoriously hard to receive After connecting the antenna run Channel Scan through the remote control ...

Страница 19: ...to the projector s speaker adapter 3 5 mm cord Speaker Adapter Step 1 Step 2 CAUTION for Headphone Use Prolonged use at high volume may impair hearing Ensure the power and volume on your speaker or headphones is turned on Step 3 Place the headphones on and enjoy 17 ...

Страница 20: ... of this manual to read about the supported file formats How to access your Micro SD Card Once your SD Card has been inserted After selecting the media content choose the SD card selection You can now access the data on your SD card through the onboard media player slot on the front of the M4 as shown in picture you can navigate to any media content in the main menu 18 ...

Страница 21: ...dio Pictures and Ebooks Select the appropriate menu for the type of file you wish to view Return Brings you back to the main menu you have on your SD Card in the C drive Use the directional buttons to navigate to different folders or files File Menu System The M4 will show all folders and files 19 ...

Страница 22: ...e the drive until it cannot go in any further How to access your USB Drive Once your USB Drive has been in serted you can navigate to any media content in the main menu After selecting the media content choose the USB selection You can now access the data on your USB drive through the onboard media player 20 ...

Страница 23: ...s Audio Pictures and Ebooks Select the appropriate menu for the type of file you wish to view Return Brings you back to the main menu you have on your USB Drive Use the directional buttons to navigate to different folders or files File Menu System The M4 will show all folders and files 21 ...

Страница 24: ...utton located in the middle of the keypad or remote To go back to the previous page while in a submenu press the back on the far right just underneath the directional keypad The M4 features a built in PMP Portable Media Player function This function allows the projector to play videos pictures music files and text To access the main menu simply turn on the projector 22 ...

Страница 25: ...ile you wish to play Previewing Files Press the directional keys to highlight the item of interest Wait 2 3 seconds and a preview of the video will show on the screen Select the video icon The M4 will show all folders and files you have on your USB or microSD Drives Use the directional buttons to navigate to different folders or files 23 ...

Страница 26: ...e option you wish to choose Move selection left Move selection right Confirm selection Play Video Rewind Video Fastforward Video Previous video Next Video Stop Video Repeat Video To open the vide player menu press OK on projector To close the video player menu hit back on projector Section Repeat 24 ...

Страница 27: ... selection on video player menu to repeat and confirm the selection 5 The video will now loop after playback is finished How do I preview a video 1 Choose the video option from the main menu 2 Navigate using either remote or onboard buttons to the file you wish to preview 3 Highlight the file Do not select the file just highlight it 4 Wait for 3 4 seconds 5 A preview screen will pop up on the top ...

Страница 28: ...e you wish to play Previewing Files Press the directional keys to highlight the item of interest Wait 2 3 seconds and a preview of the picture will show on the screen Select the photo icon The M4 will show all folders and files you have on your USB or SD Drives Use the directional buttons to navigate to different folders or files 26 ...

Страница 29: ...tion you wish to choose Move selection left Move selection right Confirm selection Start Slideshow Previous Photo Next Photo Stop Slideshow Repeat Photo Stop Music Show Photo Playlist Show Info To open the vide player menu press OK on projector To close the video player menu hit back on projector 27 ...

Страница 30: ...eshow will not play 6 NOTE Selecting repeat will loop slideshow How do I manually control the slideshow 1 After selecting the photo you wish to be displayed you can press play to start the slideshow as outlined in the previous FAQ 2 To manually control the slideshow you must stop the slideshow with the stop button 3 You may use either the controls on your remote or on top of the projector itself t...

Страница 31: ...h file you wish to play Previewing Files Press the directional keys to highlight the item of interest Wait 2 3 seconds and a preview of the audio will show on the screen Select the Audio icon The M4 will show all folders and files you have on your USB or SD Drives Use the directional buttons to navigate to different folders or files 29 ...

Страница 32: ...to highlight the option you wish to choose Move selection left Move selection right Confirm selection Play Pause Rewind Fastforward Previous Track Next Track Stop Playback Repeat Track Mute Sound To open the music menu press OK on projector To close the music menu hit back on projector 30 ...

Страница 33: ...g playlist 1 Insert your media device either mi croSD card or USB into computer 2 Make a new folder on media device folder name will be the name of the playlist 3 Transfer songs from computer to the new folder name accordingly 4 Remove media device from computer and insert into projector 5 Navigate to Audio section then choose appropriate media device 6 Navigate to your playlist folder 7 Start at ...

Страница 34: ...ode Zoom Mode DLC Projection Brightness Keystone Color Range Slideshow time Battery Capacity Audio Setup 32 Menu Language Transparent Restore Default Software Update USB CEC Equalizer Audio Only AVC Within the settings menu there are three more submenus that allow you to customize your M4 to the settings youwant ...

Страница 35: ...ected movies and pictures will be displayed in 4 3 Available selections include Auto 4 3 16 9 16 10 Zoom 1 Zoom 2 The Projection function allows the user to choose the image orientation The modes are Front Rear Invert Front Invert Rear In other words it allows the user to flip the image both vertically and horizontally to accommodate for rear projection and ceiling mounted projection For example a...

Страница 36: ...ching Most vivid colors LED life is at the maximum Fan noise is at a minimum ii Standard Good mix of color quality and brightness LED life is at the standard iii Bright Good for presentations Employs color mixing overlap technology to improve brightness Slightly decreases LED life expectancy Fan noise is increased iv Brightest Good for presentations Employs color mixing overlap technology to gener...

Страница 37: ...user to manually adjust the color mix Color Mode Slideshow Time Please see Keystone adjustment on page FILL THIS IN The picture mode allows the user to select between different picture modes Dynamic Standard Mild and Custom The differences in each mode is a combination of changes in Contrast Brightness Color Sharpness and Tint A fifth mode User allows the user to manually adjust these settings Pic...

Страница 38: ...ector Auto Volume AVC Sets the projector to auto detect for the volume The projector will auto detect the appropriate sound mode Equalizer The equalizer allows the user to adjust the dynamic audio output range There are four pre defined settings and also a user programmable option 36 ...

Страница 39: ...settings screen 37 By choosing this function the user can restore the default settings Selectable menu languages include English Spanish French and Chinese Additional language options may be available through reflash Please contact AAXA Technologies if another language support is required ...

Страница 40: ...omatically Option Two Self Boot Insert the USB stick with the firmware into the USB port Turn off the projector by using the On Off power switch on the side Then turn the projector back on by switching the power switch on the side to On The red and green lights on the side of the projector should begin flashing DO NOT REMOVE THE USB STICK After several minutes the red and green lights should becom...

Страница 41: ...r the image before it reaches the projection lens The result is a squared image even at an angle What is Keystoning Keystoning occurs when a projector is aligned non perpendicularly to a screen or when the projection screen has an angled surface The image that results from one of these misalignments will look trapezoidal rather than square 39 ...

Страница 42: ...sing the M4 remote provided If the image looks trapezoidal with the top larger as pictured right adjustment can be made using the M4 remote provided Keystone adjustments are made automatically Adjustments can be made manually via changing the option in the settings menu Please refer to page 3 for reference to keystone buttons on the remote 40 ...

Страница 43: ...es and on an evern plane with the screen No Sync No Signal Troubleshooting Be sure to setup the computer to enable a video signal output On some laptops this is done by pressing and holding Function F5 key If using the M4 as an external monitor on Windows based systems this can be done by selecting extend my desktop to this monitor The native resolution of the M4 projector is 1280x800 Depending on...

Страница 44: ...r button needs to be depressed for a full 3 seconds try holding the power button until the optical engine turns on NO PICTURE FILE NOT SUPPORTED Possible Causes Solution The video source is not properly connected or selected Check the video source signal to ensure that it is properly connected Select the current input source by choosing the input desired from the main menu Incorrect file extension...

Страница 45: ... 800 Lumens Plugged In 400 Lumens Battery 1280x800 WXGA 1920x1080 1080P 2000 1 Manual Focus 15 200 inches Triple RGB LEDs with Vibrant Color Technology Life 20 000hrs Composite A V VGA mini VGA HDMI mini HDMI 2 0 W dual stereo speakers 3 5 mm audio jack MicroSD Card Slot 32GB maximum USB Host Reader Memory Sticks ATSC Air Cable Requires Antenna 5 6 x 8 2 x 2 9 inches 2 5 lbs 43 ...

Страница 46: ...Please direct all customer service inquiries to AAXA Technologies Inc 1541 Parkway Loop Tustin CA 92780 714 957 1999 info aaxatech com ...

Отзывы: