background image

 Phone Parts

41-001158-05 Rev 03 – 04.2012

3

Phone Parts

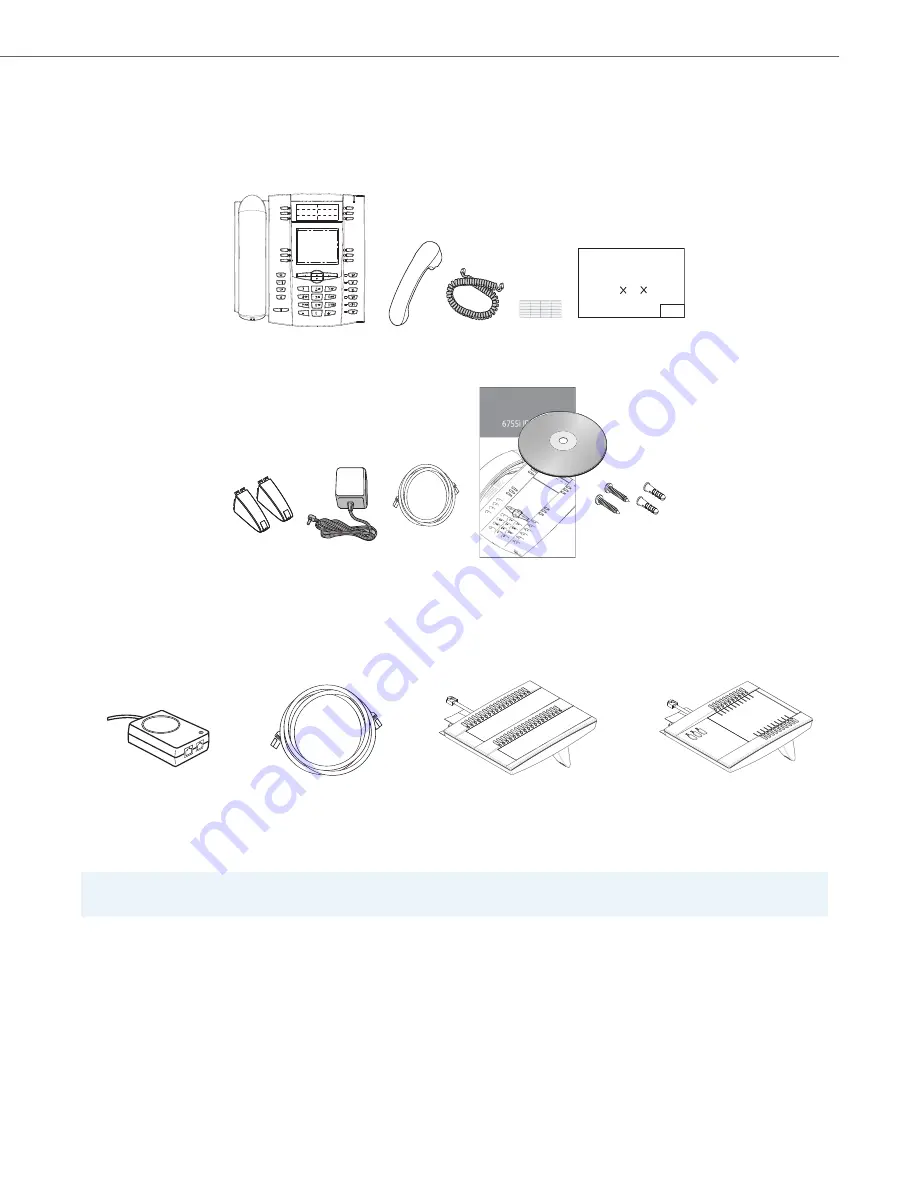
When you unpack your phone, you should ensure that you have all of the following items. If any part is missing, contact 
the supplier of your phone.

Optional Accessories (Not Included)

A PoE (Power over Ethernet) inline power injector supplies 48v power to the 6755i through the Ethernet Cable on pins 4 & 
5 and 7 & 8.

The Model M670i Expansion Module and Model M675i Expansion Module attach to the right side of the 6755i phone. 
Model M670i provides 36 additional softkeys for the phone. Model M675i provides 60 additional softkeys. For more infor-
mation about the expansion modules, see the section, 

Model M670i and M675i Expansion Modules 

on page 

page 20.

WARNING:

Do not use this PoE inline power injector to power other devices.

Wall Mount

Drilling Template

asdassa
asdadsda

Telephone

Handset

Power 

Ethernet 

Handset

Telephone Base
Desk Legs

6755i Installation Guide

Wall Mount 
Drilling Template

Adapter

Cable

Screws and
Anchors for
Wall Mounting

Cord

Programmable
Key Card

(or CD)

Additional Ethernet Cable

PoE (Power over Ethernet)
Inline Power Injector

(category 5/5e straight
through cable)

Model M670i Expansion Module

Model M675i Expansion Module

Содержание 6755i

Страница 1: ...Aastra Model 6755i IP Phone Installation Guide 41 001158 05 Rev 03 04 2012 ...

Страница 2: ...be translate or reduce to electronic medium or machine readable form or language derive source code without the express written consent of the Seller and its Suppliers or dis seminate or otherwise disclose the Software to third parties All Software furnished hereunder whether or not part of firmware including all copies thereof are and shall remain the property of Seller and its Suppliers and are ...

Страница 3: ...r 8 Connecting a Handset or Headset 10 Desk or Wall Installation 11 Inserting the Key Card on your Phone 14 Accessing Your Options via the Phone UI 15 Accessing Your Options via the Aastra Web UI 15 Other Phone Features 17 Set Audio 17 Adjusting the Volume 17 Status Lights LEDs 18 Call Timer 18 Line Call Appearance Keys 18 Using a Headset with your Telephone 19 Model M670i and M675i Expansion Modu...

Страница 4: ...3 04 2012 Limited Warranty 25 Exclusions 25 Warranty Repair Services 25 After Warranty Service 25 Limited Warranty Australia Only 26 Repair Notice 26 Exclusions 26 Warranty Repair Services 27 After Warranty Service 27 Index Index 1 ...

Страница 5: ...adapters Enhanced busy lamp fields Set paging Availability of feature dependant on your phone system or service provider Requirements The 6755i IP Phone requires the following environment SIP based IP PBX system or network installed and running with a SIP account created for the 6755i phone Access to a Trivial File Transfer Protocol TFTP File Transfer Protocol FTP Hypertext Transfer Protocol HTTP ...

Страница 6: ... your system This guide complements the Aastra SIP IP Phone Administrator Guide and the Aastra Model 6755i IP Phone User Guide Aastra SIP IP Phone Administrator Guide is designed for network administrators system administrators developers and partners who need information on installing this product on an IP network Aastra Model 6755i IP Phone User Guide explains the most commonly used IP telephone...

Страница 7: ...36 additional softkeys for the phone Model M675i provides 60 additional softkeys For more infor mation about the expansion modules see the section Model M670i and M675i Expansion Modules on page page 20 WARNING Do not use this PoE inline power injector to power other devices Wall Mount DrillingTemplate asdassa asdadsda Telephone Handset Power Ethernet Handset Telephone Base Desk Legs 6755i Install...

Страница 8: ...hone Keys Key Panel 6755i Handset Four 4 Line Call Appearance Keys High Quality Speakerphone Speakerphone Headset Key Message Waiting Lamp Mute Key Goodbye Key Navigation Keys Options Key Keypad Hold Key LCD Screen Redial Key Volume Control Softkeys ...

Страница 9: ...y Connects you to a line or call The Aastra 6755iIP phone supports up to 4 line hold keys Handsfree key Activates Handsfree for making and receiving calls without lifting the hand set When the audio mode option is set this key is used to switch between a headset and the handsfree speakerphone See Other Phone Features on page 17 for more information Mute key Mutes the microphone so that your caller...

Страница 10: ...es enhanced features and services such as XML applications and voice mail provided by third parties 2 DIRECTORY Displays up to 200 names and phone numbers stored in alphabetical order 3 CALLERS LIST Accesses the last 200 calls received 4 INTERCOM Accesses another extension on the network 5 NONE No assigned function 6 NONE No assigned function Note For more information about programming keys 1 thro...

Страница 11: ... Connection Located at the top of the phone are two fully switched 10 100 Mbps Ethernet cable ports The port marked with LAN is used to connect the phone to the network as well as provide power to your phone if required See the section Connecting to the Network and to Power on page 8 for more information Shared Network Connection To connect a network device such as a computer to the phone connect ...

Страница 12: ... 802 3af compliant in line power the phone is powered through the network 1 On the top of your phone connect the Ethernet cable provided with your phone into the network port marked with LAN 2 Plug the other end of the Ethernet cable directly into the network jack on the wall Ethernet Cable Network Jack if Inline power provided To Network ...

Страница 13: ...twork jack marked as indicated in the illustration below 3 OnthePoEpowersupply connectanadditionalEthernetcableintothenetworkportasindicatedintheillustrationbelow 4 Plug the other end of the Ethernet Cable into the network jack on the wall 5 Plug the PoE power injector into a power outlet Note You should connect the power supply to a surge protector or power bar All Ethernet cables used must be mi...

Страница 14: ... it clicks into place Then route the handset cord through the groove as shown in the illustration below Attach the hand set to the other end of the handset cord Headset Optional Turn the phone over and locate the headset jack marked f Insert the headset cord into the jack until it clicks into place Then route the headset cord through the groove as shown in the above illustration To Handset To Head...

Страница 15: ...are three pair of leg slots on each corner of the phone each leg uses two pairs 1 2 or 2 3 giving two leg positions designating different viewing angles Furthermore the legs can be reversed which offer two additional viewing angles 2 For a higher viewing angle use the second and third slots from the top 3 For a lower viewing angle use the first and second slots from the top 4 Push the stand toward...

Страница 16: ... in Note You may wish to purchase a short Ethernet cable from a local supplier for a wall installation Also if 802 3af compliant in line power is not provided on your network and you are installing the 6755i on a wall using a PoE in line power injector you may also wish to use an equivalent flat Ethernet cable rather than the one provided 3 In the handset cradle there is a small clip that sits flu...

Страница 17: ... the legs on the clip are sticking up 6 Placethehandsetintothephone scradle insertingthelegsontheclipintothesquareholeonthehandset Thisallows the handset to rest in the cradle in a vertical position without slipping off when the phone is installed on the wall Remove clip turn 180 degrees and reinsert clip Clip Square Hole on Handset ...

Страница 18: ...tic lens from the top front panel of the telephone by gently pressing down on the lens and sliding upward 2 Place the card into the programmable key card slot on the top front panel of the telephone using the indentation of the plastic for alignment 3 With one hand holding the label card in place gently slide the clear plastic lens into the slots at the top of the pro grammable key panel ...

Страница 19: ...ugh the list or press the number corresponding to the Option 3 Press the Show softkey the 4button or press the digit number of the corresponding option to select an option 4 Use the softkeys to change a selected option 5 Press the Done softkey at any time to exit the option and save the change 6 Press the Cancel softkey the 3 button or the Goodbye key at any time to exit without saving changes Aas...

Страница 20: ... For more information about using the side menu options in the Aastra Web UI see the Aastra Model 6755i IP Phone IP Phone User Guide or the Aastra SIP IP Phone Administrator Guide 2 At the prompt enter your username and password and click OK Note For a user the default user name is user and the password field is left blank The Network Status window displays for the IP phone you are accessing 3 You...

Страница 21: ...irst when the button is pressed By pressing the button again you can switch back and forth between the handsfree speakerphone and the headset At anytime lifting the handset switches back to the handset from either the handsfree speakerphone or the headset Headset Speaker Incoming calls are sent to the headset first when the button is pressed By pressing the button again you can switch back and for...

Страница 22: ...appearance button you connect to the line or a call it represents The line call appearance light indicates the status of that line or call When the phone is taken off hook the phone will automatically select a line for you For more information about the Line Call Appearance keys see the Aastra Model 6755i IP Phone User Guide Speaker LED Status Description ON solid Indicates a call is on Handsfree ...

Страница 23: ...when using any headset Making and Receiving Calls using a Headset Note For best headset performance Aastra recommends non amplified headset equipped with modular connector 1 Ensure that you have selected a headset audio mode by accessing the Options menu See the section Other Phone Features on page 17 for detailed information 2 Plug the headset into jack 3 Press the key to obtain dial tone or answ...

Страница 24: ...M675i The M675i provides 10 softkeys in each column totaling 20 keys on the keypad The M675i also provides 3 keys at the bottom left of the unit These keys represent Page 1 Page 2 and Page 3 of the LCD display The M675i has 20 keys available on each page totaling 60 softkeys Each key provides an LED for indicating call status The M675i provides an LCD for displaying key labels The expansion module...

Страница 25: ...RJ 45 port on the back of your phone as indicated in the illustration below 4 Connect the other end of the RJ 45 cable to the RJ 45 port on the back of the expansion module as indicated in the illustration above 5 Line up the screw holes on the connector plate with the screw holes on the back of the phone 6 Insert the two screws included with your expansion module into the connector plate holes an...

Страница 26: ...o an IP phone providing an additional 108 softkeys with M670is and an additional 180 softkeys with M675is You connect the additional modules to the right side of an existing module The following figure illustrates the addition of multiple M675i modules on the 6755i IP Phone For more information about setting the softkeys see the Aastra Model 6755i IP Phone User Guide ...

Страница 27: ... inline power injector to provide power over Ethernet locally to your phone See the section Connecting to the Network and to Power on page 8 for details Why can I only see 4 options when the installer or user guide says there are more The telephone screen will only show 4 options at a time To see more press the down arrow button 2 Can I turn the backlight for the screen on and off Yes You can use ...

Страница 28: ... hard keys programmable up to 6 functions located at the top of the front panel These are keys that you can set to perform specific functions and access enhanced services provided by third parties for example XML applica tions Refer to your Aastra Model 6755i IP Phone User Guide for more information ...

Страница 29: ...ges and or long distance charges which result from unauthorized and or unlawful use Aastra shall not be liable for any incidental or consequential damages including but not limited to loss damage or expense directly or indirectly arising from the customer s use of or inability to use this product either separately or in com bination with other equipment This paragraph however shall not apply to co...

Страница 30: ...urchase date is to be provided with all products returned for warranty repairs Exclusions Aastra does not warrant its products to be compatible with the equipment of any particular telephone company This warranty does not extend to damage to products resulting from improper installation or operation alteration accident neglect abuse misuse fire or natural causes such as storms or floods after the ...

Страница 31: ...ply of equivalent goods or ii the repair of the goods or iii the payment of the cost of replacing the goods or of acquiring equivalent goods or iv the payment of the cost of having the goods repaired 1 2 Clause 1 1 is not intended to have the effect of excluding restricting or modifying a the application of all or any of the provisions of Part 5 4 of Schedule 2 to the Competition and Consumer Act ...

Страница 32: ...eadset making and receiving calls with 19 headset speaker mode 17 I indicator light 18 Inline Power Not Provided 9 Inline Power Provided 8 Install on the Desk 11 Install on the Wall 12 Installation 5 Installation and Setup 7 Intercom key 6 K Key Description 4 L lights or LEDs MWI 18 speaker 18 status 18 M M670i 20 M675i 20 microphone volume headset 17 MWI message waiting indicator 18 O Optional Ac...

Страница 33: ...and or unlawful use While every effort has been made to ensure accuracy Aastra Telecom Inc will not be liable for technical or editorial errors or omissions contained within this documentation The information contained in this documentation is subject to change without notice Copyright 2012 Aastra Technologies Limited www aastra com ...

Отзывы: