A&D GX-203A Скачать руководство пользователя страница 77


75

Method of reading density number 

When flow unit is mL/*, up to 10 densities can be registered. 

To  register  a  new  density,  read  the  unconfigured  density  number 

and then register according to the procedure of the setting method 

of calculation time. 


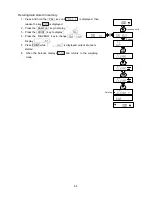
Continuing to hold down the PRINT key in weighing display 

  displays                .


Blinking              is the current density number and                  is the set density 

value.


The density number can be changed by following key operation 


The setting range is F01

F10. 

RE-ZERO(+) key 

Change density number.


MODE(-) key 

Change density number.


PRINT key 

Read the density of the selected density   


number and return to weighing display.


CAL key 

Return to the weighing display without   


reading the density of the selected density number. 


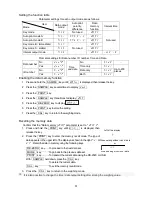
14-2  Flow Measurement Setting 


Flow value range by models 

Model 

Flow value range 

0.001g model  0.01~100 
0.01g model 

0.1~1000 

0.1g model 

1~5000 


Depending on the sample to measure the flow rate, the above values may not apply. 


Estimated flow rate value and calculating time (Ct) depending on your model 


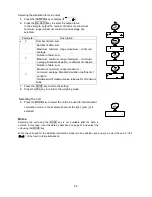
Calculation time automatic setting mode 

  By setting "Calculation time automatic mode" of Function table "Application Function 

ap fnc

 " to "

1

 ", 

  the optimal Ct is automatically set for the flow rate being measured. So, it is unnecessary to manually 

  set Ct. 


Weighing display

Содержание GX-203A

Страница 1: ...ance 1WMPD4003475 series GX 203A GX 303A GX 403A GX 603A GX 1003A GX 1603A GX 2002A GX 3002A GX 4002A GX 6002A GX 10002A GX 6001A GX 10001A series GF 203A GF 303A GF 403A GF 603A GF 1003A GF 1603A GF...

Страница 2: ...ated into any language in any form by any means without the written permission of A D Company Ltd The contents of this manual and the specifications of the instrument covered by this manual are subjec...

Страница 3: ...Detection Function 25 7 Response Adjustment Self Check Function 26 7 1 Response Adjustment 26 7 2 Self Check Function Automatic Setting Of Minimum Weight Value 27 8 Calibration 28 8 1 Automatic Self...

Страница 4: ...Statistical Calculation Mode 65 13 1 How To Use The Statistic Calculation 65 13 2 Statistical Calculation Mode Example Of Use 70 14 Flow Measurement 72 14 1 How To Use Flow Measurement 73 14 2 Flow Me...

Страница 5: ...3 Other Display 97 22 4 Asking For Repair 97 23 Specififations 98 23 1 GX A series 0 001g models 98 23 2 GX A series 0 01g models 99 23 3 GX A series 0 1g models 100 23 4 GF A series 0 001g models 101...

Страница 6: ...low Rate Display The balance is equipped with a data memory function which can record weighing value calibration result and multiple unit mass mass per sample in counting mode Up to 200 items are stor...

Страница 7: ...an radiate radio frequency energy This equipment has been tested and has been found to comply with the limits of a Class A computing device pursuant to Subpart J of Part 15 of FCC rules These rules ar...

Страница 8: ......

Страница 9: ...onal accessories may be bundled GX A GF A 0 001g models Pan support receptor Main unit Display Bubble spirit level Main unit rear side USB interface RS 232Cinterface AC adapter jack AC adapter plug Ma...

Страница 10: ...e Display Bubble spirit level Pan support receptor Main unit Main unit rear side Keys AC adapter Leveling foot Main unit cover USB interface RS 232Cinterface AC adapter jack AC adapter plug AX KO5465...

Страница 11: ...best operating temperature is about 20 2 at about 45 60 RH relative humidity Install the balance where it is free of dust The weighing table should be solid and free from vibration drafts and as leve...

Страница 12: ...m with repeatability remove the breeze break Or wipe the clear plates with a moistened cloth use an accessory DC static eliminator GXA 25 AD 1683 or apply an anti static spray This balance uses a stro...

Страница 13: ...before each weighing to prevent possible errors Take into consideration the affect of air buoyancy on a sample when more accuracy is required Keep the balance interior free of dust and foreign materia...

Страница 14: ...indicator Interal output mode active indicator Number of statistical data Statistical calculation mode Displays the weight data relative to the weighing capacity in percentage in the weighing mode Ca...

Страница 15: ...ay OFF In the weighing mode turns the minimum weighing value on and off In the counting or percent mode enters the sample storing mode Enters the function table mode Switches the weighing units stored...

Страница 16: ...g Troy Ounce OZt 31 1034768 g Metric Carat ct 0 2 g Momme mom 3 75 g Pennyweight dwt 1 55517384 g Grain UK GN 0 06479891 g Tael HKgeneral Singapore TL 37 7994 g Tael HK jewelry 37 429 g Tael Taiwan 37...

Страница 17: ...28 0 00005 Tael Taiwan 5 86 8 53 11 20 16 53 29 33 43 20 0 00005 Tael China 7 04 10 24 13 44 19 84 35 20 51 84 0 00005 Tola India 18 8 27 4 36 0 53 1 94 3 138 8 0 0001 Messghal 46 9 68 2 89 6 132 2 23...

Страница 18: ...e 13Lb 10 69oz 22Lb 7 79oz 0 01oz Troy Ounce 199 327 0 005 Metric Carat 31000 51000 0 5 Momme 1653 2720 0 05 Pennyweight 3986 6558 0 1 Grain UK 95680 157410 2 Tael HK general Singapore 164 0 269 0 0 0...

Страница 19: ...selection mode 4 Specify a unit or mode in the order to be displayed using the following keys SAMPLE key To sequentially display the units RE ZERO key To specify a unit or mode The stabilization indic...

Страница 20: ...zation indicator appears when the unit is specified 5 Press the SAMPLE key to display 1Unit pC5 6 Press the RE ZERO key to specify the unit of pc The stabilization indicator appears when the unit is s...

Страница 21: ...on the pan or in the container Wait for the stabilization indicator to be displayed Read the value Remove the sample and container from the pan Notes Press the SAMPLE key to turn on or off the minimu...

Страница 22: ...et amount tare quantity up to the maximum display of each model is displayed and when the maximum display is exceeded E is displayed to indicate that the weighing range is exceeded When in excess in n...

Страница 23: ...de 3 To select the number of samples press the SAMPLE key several times It may be set to 5 10 25 50 or 100 Note A greater number of samples will yield more accurate counting result 4 Place a container...

Страница 24: ...Try to add the same number of samples as displayed 12 Remove all the samples used in ACAI and proceed with the counting operation using the improved unit mass Note ACAI will not function on the unit...

Страница 25: ...he balance displays 100 00 The decimal point position depends on the reference value The reference mass stored even if the AC adapter is removed is maintained in non volatile memory Note If the balanc...

Страница 26: ...n animal even when the display of the weighing data fluctuates The hold function allows the average weight of the animal to be displayed To use the hold function set the function in the function table...

Страница 27: ...eater than expected When designing automatic systems and the like it is recommended that you minimize the impact level as much as possible while checking the shock indicator Impact level display is fr...

Страница 28: ...d 2 7 1 Response Adjustment Response adjustment can be changed by the following method 1 Press and hold the MODE key until RESPONSE is displayed and then release the key 2 Press the MODE key to select...

Страница 29: ...ere are no problems in the balance the display blinks If is displayed blinking there is a possibility that a fatal fault has occurred in the balance Please request repair SAMPLE key It is possible to...

Страница 30: ...ting environment or the set time and interval time GX A series Calibration test using the internal mass Using the internal mass adjust the balance with a single touch Calibration test using an externa...

Страница 31: ...ion report or stores the data in memory In the auto calibration mode either the temperature change the setting time or the interval time can be set with the function setting For the setting time the t...

Страница 32: ...set to 1 or 2 the balance displays glp and outputs the calibration report using the RS 232C interface or stores the data in memory Refer to 11 3 GLP Report and Data memory data of the function table...

Страница 33: ...emoved the data is maintained in non volatile memory CAL key To cancel the operation and return to Cal 0 Step5 Confirm that there is nothing on the pan and press the PRINT key The balance measures the...

Страница 34: ...alibration weight selection mode or The last four digits blinking value adjustment mode RE ZERO key To select the calibration weight or adjust the value In the value adjustment mode 9999 digits appear...

Страница 35: ...orrection of internal mass value can not be executed at factory setting Refer to 9 Function Switch And Initialization or the following setting method and enable changing of the function setting and co...

Страница 36: ...cted 8 When adjustment of the internal mass value is completed is displayed and calibration is performed automatically with the adjusted internal weight 9 is displayed and you are returned to the weig...

Страница 37: ...ple since there is deviation of 0 06g at 2000g the correction amount for the GX 6002A is 0 015g 5kg because the correction target is 5000g Setting procedure 1 Press and hold the SAMPLE key to display...

Страница 38: ...ta to control the communications interface etc A function selection switch is provided to protect those parameters and it can be used to select change prohibited or changeable usable By setting to cha...

Страница 39: ...nges to the function table No function Calibration using an external weight 0 To inhibit calibration using an external weight 1 To permit calibration using an external weight No function No funciton T...

Страница 40: ...settings Note Be sure to calibrate the balance after initialization Step1 Press the ON OFF key to turn off the display Step2 While pressing and holding the PRINT key and the SAMPLE key press the ON OF...

Страница 41: ...ed cancels the new parameter and displays the next class When a class is displayed exits the function table mode and returns to the weighing mode Setting procedure Step 1 Press and hold the SAMPLE key...

Страница 42: ...4 times Setting value every 1 minute Setting value Interval time Step7 Step8 Step9 Step10 Setting value Store the weighing data Setting item Data memory function Press twice Step5 Setting item Data m...

Страница 43: ...rox 10 42Hz Output frequency approx 20 83hz Turns on the weighingmode display when AC adapter is connected Turns off the display after 10 minutes of inacticity Minimum display Buzzar Stores tare value...

Страница 44: ...limits Digital input reference value Weighing input reference value See 10 5 comparator Function Cp HH Cp Hi Cp ll Cp ref Cp lo Second upper limit Lower limit Upper limit Second lower limit Reference...

Страница 45: ...rence between reference value and displayed value Displayed only when 5 step comparator is set Displayed only when 5 step comparator is set Note Digit is a unit of minimum weighing value Factory setti...

Страница 46: ...n data memory funciton is ON Time Date output 0 1 2 3 No output Time only Date only Time and date 0 1 No output ID number Output ID number ID number output Refer to 10 4 Clock And Calender Funtion 0 1...

Страница 47: ...400bps 4800bps 9600bps 19200bps 38400bps 7 bit EVEN 7 bit ODD 8 bit None Crlf Terminator CR LF CR DP format KF format MT format NU format CSV format No limited Limited for one second Quick USB ALL Qui...

Страница 48: ...asureing mode Density measurement of a soil Density measurement of a liquid Minimum Weighing Warning Function Minimum weighing comparison Minimum weighing value input Application function 2 3 Applicat...

Страница 49: ...8 6 Correcting The Intenal Mass Value Of The GX A series Manual Password lock Lock function OFF Administrator password input Cfnc 0 1 2 ON Operator 1 password input Operator 10 password input Refer t...

Страница 50: ...uch as an animal When the weighing data is over the weighing range from zero and the display fluctuation is within the stabilization range for a fixed period of averaging time the processing indicator...

Страница 51: ...for a certain amount of time approximately 10 minutes while the power is on Minimum display When weighing with rough precision the minimum display can be turned off without key operation This is usef...

Страница 52: ...me is correct and the date does not need to be confirmed press the CAL key and go to step 8 Setting the time Step5 Set the time in 24 hour format using the following keys RE ZERO key To increase the v...

Страница 53: ...peration Step8 The balance displays the next menu Cp fnc of the function table Press the CAL key to exit the clock and calendar function and return to the weighing mode Note Do not enter invalid value...

Страница 54: ...methods for each value Refer to the function setting Cp fnc By setting the function setting Cp beep it is also possible to sound an internal buzzer depending on the result of the comparison 3 step com...

Страница 55: ...ress the PRINT key The current setting of the upper limit value is displayed with all of the digits blinking When the current setting is not to be changed press the PRINT or CAL key to go to step 12 W...

Страница 56: ...ey Register the upper limit value Step13 When finished Cp lo is displayed Replace a sample of the weight of the upper limit from the balance Step14 When Cp lo is displayed press the PRINT key to check...

Страница 57: ...several reports at the same time Refer to 12 Data Memory for details The ID number is used to identify the balance when the balance is used for maintenance manegement The ID number is maintained in n...

Страница 58: ...5 6 7 8 9 A B C D E F G H J K L M I Space 0 1 2 3 4 5 6 7 8 9 A B C D E F G H J K L M I N O P Q R S T U V W X Y Z Space 0 1 2 3 4 5 6 7 8 9 A B C D E F G H J K L M I N O P Q R S T U V W X Y Z Space 0...

Страница 59: ...rrect time and date in Clock of the function table Calibration report using the internal mass This is the GLP report when the balance is calibrated using the internal mass Manufacturer Model Serial nu...

Страница 60: ...IGNATURE TERM TERM TERM TERM Space ASCII 20h Terminator CR LF or CR Carriage return ASCII 0Dh Line feed ASCII 0Ah Calibration weight Remarks Signature TERM TERM TERM TERM TERM TERM TERM TERM TERM TERM...

Страница 61: ...56789 TERM ID LAB 0123 TERM DATE 2017 12 31 TERM START TERM TIME 12 34 56 TERM TERM WT 12 3456 g TERM WT 12 3461 g TERM WT 12 3462 g TERM WT 12 3463 g TERM WT 12 3451 g TERM WT 12 3453 g TERM WT 12 34...

Страница 62: ...sets For the unit mass storage method refer to 5 2 Counting Mode Storing the weighing data Note 1 Set the Data memory data parameter to data 2 Refer to 10 Function Table 2 Specify the Time Date output...

Страница 63: ...ress the SAMPLE key three times to display data 5 Press the RE ZERO key to display 6 Press the PRINT key to store the setting 7 Press the CAL key to return to the weighing mode Recalling the memory da...

Страница 64: ...Press the PRINT key to display with blinking 4 Press the RE ZERO key to display with blinking 5 Press the PRINT key to delete all data 6 The balance displays end and returns to the weighing mode 12 2...

Страница 65: ...ed The output format conforms to GLP output Step5 When output at one time is completed displays after is displayed Step6 If the saved history is deleted all at once please proceed to How to delete his...

Страница 66: ...elease the key is displayed 2 Press the SAMPLE key to display 3 Press the PRINT key to display 4 Press the RE ZERO key to change Display 5 Press PRINT while is displayed output at once is started 6 Wh...

Страница 67: ...f variation are obtained by the equation below Standard deviation Standard deviation Coefficient of variation CV Average Maximum value Average Relative error of maximum value Average Minimum value Ave...

Страница 68: ...um minimum average Standard deviation coefficient of variation Relative error of maximum value relative error of minimum value 7 Press the PRINT key to store the setting 8 Press the CAL key to return...

Страница 69: ...and the weight data and includes the weight data to statistical calculation in the weighing mode Output is not in the data format specified in the function table because of the data number added Outp...

Страница 70: ...Relative error of minimum value 3 Deleting the latest data When the wrong data is entered it can be deleted and excluded from statistical calculation Only the latest data can be deleted 1 In the weigh...

Страница 71: ...and the number of data will be 0 zero 1 In the weighing mode press the MODE key to display 2 Press the PRINT key to display 3 Press the RE ZERO key to display 4 Press the PRINT key to delete the stat...

Страница 72: ...s displayed then release the key 2 Select the application function Press the SAMPLE key several times to display 1ap fnc Then press the PRINT key to display 1 3 Change the application function paramet...

Страница 73: ...and press the PRINT key The balance displays Storing the weight value of formula 2 The weight value data is output when the peripheral output equipment is connected 5 When there are some more formulae...

Страница 74: ...changes according to the calculation time Ct The relationship between calculation time Ct and flow update timing is as follows Calculation Time Ct Display update Calculation Time Ct Display update Cal...

Страница 75: ...he flow rate unit go to 5 If you want store the setting go to 7 If you want to cancel the flow function press the RE ZERO key and return to Setting of flow rate unit 5 Press the SAMPLE key to display...

Страница 76: ...esolution of the flow rate calculation result can be set The larger the number the more precision will be calculated RE ZERO key Change the resolution PRINT key Store setting value If the flow rate un...

Страница 77: ...T key Read the density of the selected density number and return to weighing display CAL key Return to the weighing display without reading the density of the selected density number 14 2 Flow Measure...

Страница 78: ...Response priority Ct setting Accuracy priority 1sec 2sec 5sec 10sec 20sec 30sec 1min 2min 5min 10min 0 1 0 2 0 5 1 2 5 10 20 50 100 200 500 1000 Example When measuring the flow rate of 20 ml min Set t...

Страница 79: ...Long press Display ON OFF Short press Display OFF ON RE ZERO key 1 Gross zero In the g display the range of the minimum scale is 0 Clear a tare value With nothing on the weighing pan press the ON OFF...

Страница 80: ...3 Press the RE ZERO key to display the tare value is set updated NET is displayed on the display 4 Place the object 5 Press the PRINT key it will output in the order of NET object GROSS total amount...

Страница 81: ...played even if the minimum weighing warning function is ON Also a value greater than weighing capacity cannot be set as minimum weighing value There are two kinds of warning display as follows Excludi...

Страница 82: ...ration RE ZERO key Change the value of the blinking digit MODE key Change the value of the blinking digit SAMPLE key Move the blinking digit PRINT key Store the set value and proceed to the next item...

Страница 83: ...ution Do not apply excessive force to the underhook When not in use do not open the cover to prevent dust from getting into the balance Do not push the underhook upward The weighing pan pan support an...

Страница 84: ...coefficient Confirming the coefficient 4 The current coefficient is displayed with the first digit blinking When it is not to be changed press the CAL key and proceed to step 6 When it is to be change...

Страница 85: ...1 Register the density mode Density mode cannot be used at the factory setting Please refer to 10 Function Table Unit registration and register the gravimeter mode Density mode is selected as one of...

Страница 86: ...MPLE key 3 Transfer the sample from the weighing pan in air to the weighing pan in liquid and wait for the display to stabilize If outputting the mass of the sample press the PRINT key Next press the...

Страница 87: ...the water temperature and density 0 1 2 3 4 5 6 7 8 9 0 0 99984 0 99990 0 99994 0 99996 0 99997 0 99996 0 99994 0 99990 0 99985 0 99978 10 0 99970 0 99961 0 99949 0 99938 0 99924 0 99910 0 99894 0 998...

Страница 88: ...mm below the liquid level 3 Move the sample to the pan in liquid If the weight value is stored or output press the PRINT key to store it after a stable weight value is displayed Press the SAMPLE key t...

Страница 89: ...ange is 0 01 3 to 99 99 3 every 0 01 3 RE ZERO Key The key to set the value of the blinking digit MODE key The key to select the blinking digit to change the value SAMPLE key Move the blinking digit P...

Страница 90: ...E SAMPLE PRINT and RE ZERO keys At factory setting the password function is not used The management of the password function is performed in Password function of the Function table 20 1 Using Password...

Страница 91: ...omatically after no operation for ten minutes MODE key Character SAMPLE key Character 5 PRINT key Character p RE ZERO key Character CAL key Back key CAL key long press Delete password 9 Input four cha...

Страница 92: ...lete the password 1 10 1 Press and hold the CAL key to display and blink the when setting the password 2 Press the PRINT key to display 3 Press the RE ZERO to change 4 Press the PRINT when to delete t...

Страница 93: ...SAMPLE key Character 5 PRINT key Character p RE ZERO key Character CAL key Back key 4 When the password is correct the balance displays weighing value after full segment display When the password is i...

Страница 94: ...operation of the balance by the self diagnosis function Refer to 6 2 Self diagnosis Function Fatal faults are indicated by messages Check the balance performance using an external weight Be sure to pl...

Страница 95: ...ontainer been allowed to equalize to the ambient temperature Refer to 2 3 During Use Is the sample charged with static electricity Refer to 2 3 During Use This occurs especially with 0 001g models whe...

Страница 96: ...ncing the balance Refer to 2 3 During Use To return to the weighing mode press the CAL key Out of the setting range The data to be stored is out of the setting range Malfunction of the internal memory...

Страница 97: ...dding samples will shift the balance to the counting mode But for accurate counting be sure to add samples Clock battery error The clock backup battery has been depleted Press any key and set the time...

Страница 98: ...d Timeout error If the timeout parameter is set to t Up1 the balance did not receive the next character of a command within the time limit of one second Confirm the communication Excess characters err...

Страница 99: ...ating environment Advise The balance can be used while this indicator is blinking We recommend that you perform automatic self calibration for precision weighing 22 4 Asking For Repair If the balance...

Страница 100: ...cent mode Minimum 100 mass 0 100g Minimum 100 display 0 01 0 1 1 Depends on the reference mass stored Carat Weighing capacity 8100ct 5500ct 3100ct 2100ct 1600ct 1100ct Minimum display 0 05ct Monme Wei...

Страница 101: ...mode Minimum 100 mass 1 00g Minimum 100 display 0 01 0 1 1 Depends on the reference mass stored Carat Weighing capacity 50100ct 31000ct 21000ct 16000ct 11000ct Minimum display 0 05ct Monme Weighing c...

Страница 102: ...mass 10 0g Minimum 100 display 0 01 0 1 1 Depends on the reference mass stored Carat Weighing capacity 50100ct 31000ct Minimum display 0 5ct Monme Weighing capacity 2720mom 1653mom Minimum display 0...

Страница 103: ...nting mode Minimum unit mass 0 001g Number of samples 5 10 25 50 or 100 pieces Percent mode Minimum 100 mass 0 100g Minimum 100 display 0 01 0 1 1 Depends on the reference mass stored Carat Weighing c...

Страница 104: ...imes second or 20 times second Counting mode Minimum unit mass 0 01g Number of samples 5 10 25 50 or 100 pieces Percent mode Minimum 100 mass 1 00g Minimum 100 display 0 01 0 1 1 Depends on the refere...

Страница 105: ...or 20 times second Counting mode Minimum unit mass 0 1g Number of samples 5 10 25 50 or 100 pieces Percent mode Minimum 100 mass 10 0g Minimum 100 display 0 01 0 1 1 Depends on the reference mass stor...

Страница 106: ...F 1003A GF 1603A 1 Opening width when transparent plate is removed 2 Inside dimension 3 Weighing pan size 4 Height from the weighing pan to the lid of the breeze break 5 Opening height when transparen...

Страница 107: ...GX 4002A GX 6002A GX 10002A GX 6001A GX 10001A GF 2002A GF 3002A GF 4002A GF 6002A GF 10002A GF 6001A GF 10001A 3 Weighing pan size 6 Position under the floor weighing platform 7 DC jack protruding di...

Страница 108: ...kit Unit that enables easy weighing of the sample s weight in air and in water GXA 23 PRINT Foot switch input for PRINT External contact input terminal that can operate PRINT and RE ZERO key Foot swit...

Страница 109: ...Therefore it is possible to store data in an environment where a computer can not be used The stored data can be read to a personal computer using USB As the AD 1687 is recognized as USB memory speci...

Страница 110: ...108 MEMO...

Страница 111: ......

Страница 112: ...550420 Fax 44 1235 550485 A D AUSTRALASIA PTY LTD 32 Dew Street Thebarton South Australia 5031 AUSTRALIA Telephone 61 8 8301 8100 Fax 61 8 8352 7409 A D KOREA Limited 36 2 8 150 749 Manhattan Building...

Отзывы: