background image

1  Device Specifications 

1.1 

Structure and Dimensions 

1.1.1  Structure 

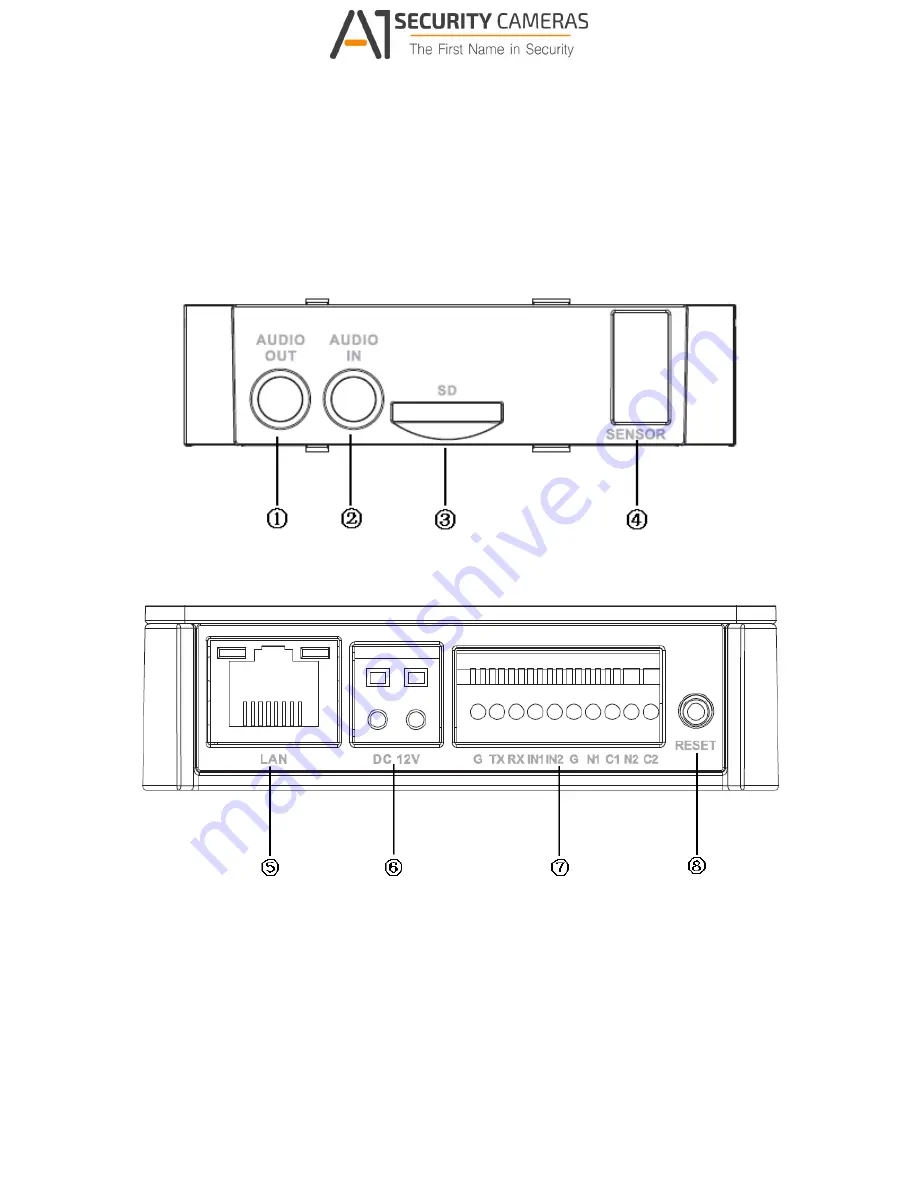
The following figures show the ports of the main unit. 

Figure 1-1 Ports of the main unit (1) 

Figure 1-2 Ports of the main unit (2)

­

The following table shows the detailed information of the ports.

­

                    Available from A1 Security Cameras 

    www.a1securitycameras.com email: [email protected]

Содержание speco O2PH2

Страница 1: ...Quick Start Guide 2MP Pinhole ATM IP Camera O2PH2 Available from A1 Security Cameras www a1securitycameras com email sales a1securitycameras com Version 1 0 0...

Страница 2: ...ctromagnetic radiation Otherwise it may result in CMOS sensor failure Do not block any ventilation openings Do not allow water and liquid intrusion into the camera 3 Operation and Daily Maintenance Pl...

Страница 3: ...on 2 FCC compliance This equipment has been tested and found to comply with the limits for a digital device pursuant to part 15 of the FCC Rules These limits are designed to provide reasonable protect...

Страница 4: ...Accessory Name Amount Main Unit 1 Lens Unit 1 Quick Start Guide 1 Installation Accessories Bag 1 CD 1 Available from A1 Security Cameras www a1securitycameras com email sales a1securitycameras com iii...

Страница 5: ...s 3 1 2 Bidirectional Audio 3 1 2 1 Device end to PC end 3 1 2 2 PC end to Device end 4 1 3 Alarm Setup 4 2 Device Installation 5 3 IP Scanner 6 3 1 Operation 6 4 Web Operation 7 4 1 Login and Main In...

Страница 6: ...wing figures show the ports of the main unit Figure 1 1 Ports of the main unit 1 Figure 1 2 Ports of the main unit 2 The following table shows the detailed information of the ports Available from A1 S...

Страница 7: ...s and outputs Refer to Table 1 2 for more details 8 Reset Button Continuously press the button for over 5 seconds to restore the device to factory default settings Table 1 2 Description of I O Port na...

Страница 8: ...Device end to PC end Device Connection First connect a microphone to the audio input port of the device Then connect a speaker to the audio output port of the PC Log in to the web viewer s live view p...

Страница 9: ...of th he device Log in to the web viewer s live view page and t then click the microphone button on the top right corn ner to enable the bidirectional audio function 1 3 Alarm Setup Figure 1 5 Alarm...

Страница 10: ...he device will be installed 2 Drill holes according to the positions on the installation template 3 Take out the expansion bolts and insert them into the holes that have been drilled 4 Tighten the 3 s...

Страница 11: ...en the fixing ring 3 IP Scanner IP Scanner can search for the device on the local network Please note that only devices that are on the same subnet can be discovered The device is set to DHCP mode by...

Страница 12: ...camera address in the address bar or double click th Figure 3 1 4 Web Operation This device supports viewing and man nagement via a web browser on a PC 4 1 Login and Main Interfac ce Open the browser...

Страница 13: ...IP address here Figure 4 1 IP address The login interface is shown as below w See Figure 4 2 Please input your user name and pa assword Default user name is admin and pass sword is 1234 Note For secur...

Отзывы: