


Chapter 2 Installation
6253M Mainboard
CHAPTER 2 INSTALLATION
2-1 INSTALLATION PROCEDURE
Before installing the computer, please prepare all components such as CPU, DRAM;
peripherals such as hard disk, keyboard, CD-ROM and accessories such as cables.
Then, install the system as following:
Plug CPU/ heat sink (refer to Pentium
II/III & Celeron
TM
installation
guide,
Appendix A
), and DRAM modules on the mainboard.
Set DIP switch & jumpers based on your configuration.
Plug add-on cards into PCI/ISA slots, if needed.
Connect cables to peripheral devices, especially for power supply.
Make sure all components and devices are well connected, turn on the
power and setup System BIOS based on your configuration.
Install peripheral devices, add-on card drivers and test them.
If all of above procedures are running successfully, turn the power off
and screw the chassis cover to the chassis, and then connect external
devices which are cabled to the system.
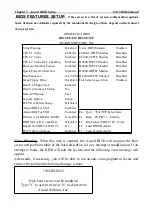
2-2 CPU INSTALLATION
The mainboard has built-in VID (Voltage Identify) function to automatically detect
CPU voltages. Thus you do not have to set the CPU voltage setting.
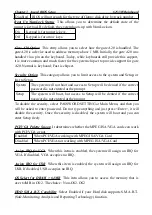
2-2-1 CPU Core/Bus Freq. Ratio :
SW1 1-1
1-2
1-3
1-4
3.0x
ON
ON
OFF OFF
3.5x
ON
ON
ON
OFF
4.0x
OFF
OFF
OFF
OFF
4.5x
OFF
OFF
ON
OFF
5.0x
OFF
ON
OFF
OFF
5.5x OFF ON
ON
OFF
6.0x ON
OFF OFF ON
6.5x ON
OFF ON
ON
7.0x ON
ON
OFF ON
7.5x ON
ON
ON
ON
8.0x OFF OFF OFF ON


