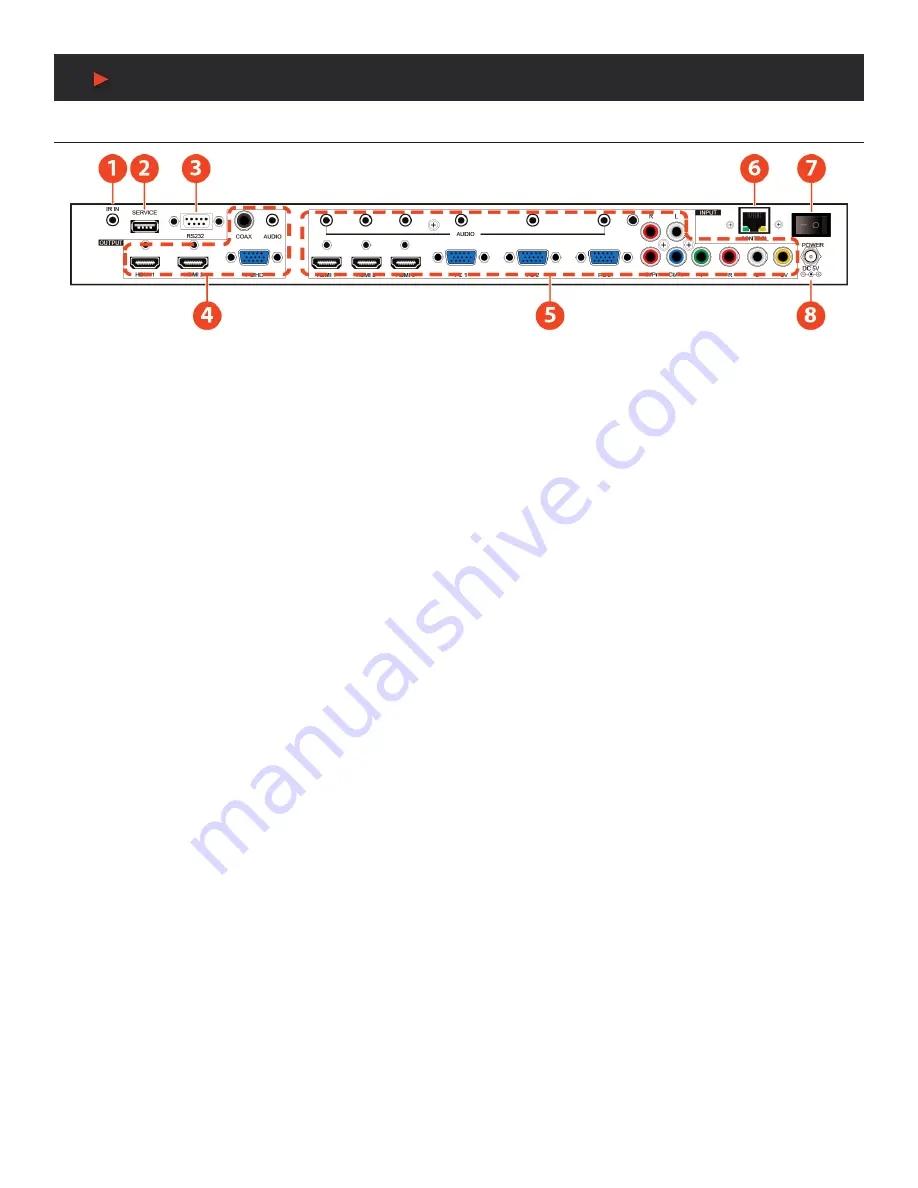
A-Neuvideo ANI-8MFS Скачать руководство пользователя страница 6

4

BACK PANEL 


BACK PANEL

q


IR IN: 

Connect the supplied IR extender to receive the IR signal from the included IR remote. Ensure that the remote is within the 

direct line-of-sight of the IR extender.

w


SERVICE:

 Reserved for manufacturer use only.

e

 RS-232:

 Connect to a PC/Laptop or RS-232 control system to use RS-232 commands to control the device.

r


OUTPUT:

• 

1. HDMI 1~2:

 Connect to an HDMI display or AV Receiver for video and/or audio output.

• 

2. PC/HD:

 Connect to a monitor/display for video output. For HD (Component) output, use the supplied D-Sub 9pin to 3-RCA adaptor 

cable for HD resolutions from 480p~1080p.

NOTE:

 When the selected HDMI input source signal has HDCP content the VGA/Component output will not display any image.

• 

3. COAX:

 Connect to an amplifier or active speakers for audio output in digital format.

NOTE:

 When the input audio source signal is in bitstream format and the AUDIO SOURCE setting is set to AUTO in the OSD menu, 

the coaxial output will bypass the input audio signal including compatible surround sound formats.

• 

4. AUDIO:

 Connect to an amplifier or active speakers for audio output in stereo format.

t


INPUT:

• 

1. HDMI 1~3:

 Connect to HDMI sources such as Blu-ray/DVD player for both video and audio signal conversion.

• 

2. PC 1~3:

 Connect to a PC/Laptop source for video signal input with a 15-pin D-Sub cable.

• 

3. 3.5mm MINI-JACKS: 

Connect to source’s L/R output with 3.5mm mini-jack for audio signal conversion.

NOTE:

 For HDMI signals you can select in the OSD Menu whether you require audio from the HDMI (AUTO) or from the analog 

audio inputs (EXT)

•  4. YCbCr/YPbPr + L/R: 

Connect to source equipment such as a DVD player for both video and audio signal conversion.

•  5. CV + L/R:

 Connect to a composite video source such as a video/DVD player for both video and audio signal conversion.

y


CONTROL:

 This port is the link for Telnet or WebGUI controls, connect to an active Ethernet link with an RJ45 terminated cable

u


POWER:

 Switch this power toggle to turn on and activate the device or turn off to shut it down.

i


DC 5V:

 Connect the power adaptor included in the package to the device and plug it into an AC wall outlet for power supply.

A


NEU

VIDEO

Содержание ANI-8MFS

Страница 1: ...AUDIO VIDEO MANUFACTURER ANI 8MFS 8 INPUT MULTI FORMAT SCALER SWITCH w VOLUME CONTROL MIRRORED HDMI VGA OUTPUT INSTRUCTION MANUAL A NeuVideo com Frisco Texas 75034 469 277 7606...

Страница 2: ...on 12 This unit should be installed in a cool dry place away from sources of excessive heat vibration dust moisture and cold Do not use the unit near stoves heat registers radiators or other heat prod...

Страница 3: ...ns to reduce the risk of fire electrical shock and injury to persons To prevent fire or shock hazard do not expose the unit to rain moisture or install this product near water Never spill liquid of an...

Страница 4: ...D sub Component Video Composite Video 6 3 5mm Stereo Audio 4 RCA Stereo Audio IR Extender 3 5mm RS 232 9 pin D sub IP Control RJ45 USB Service Output Ports 2 HDMI VGA 15 pin D sub Coaxial Audio 3 5mm...

Страница 5: ...ded in the package e INPUT LEDS Press these buttons to switch directly to the required source An LED will illuminate to indicate the selected input source r MENU Press this button to enter the On scre...

Страница 6: ...ut audio signal including compatible surround sound formats 4 AUDIO Connect to an amplifier or active speakers for audio output in stereo format t INPUT 1 HDMI 1 3 Connect to HDMI sources such as Blu...

Страница 7: ...s button to exit the menu or the current selection in the OSD menu t OK Press OK to confirm the selection or press the arrow buttons to navigate the OSD menu When the OSD menu is not active use the LE...

Страница 8: ...07F 82 HDMI 1 807F 88 HDMI 2 807F 89 HDMI 3 807F 8A PC 1 807F 8C PC 2 807F 8D PC 3 807F 8E CV 807F 90 COMP 807F 92 EXIT 807F C2 MENU 807F 99 UP 807F 9A DOWN 807F 9E LEFT 807F 9C RIGHT 807F 98 OK 807F...

Страница 9: ...280x720 60 1280x800 60 1280x1024 60 1440x900 60 1400x1050 60 1680x1050 60 1600x1200 60 1920x1080 60 1920x1200 60 1280x720p 60 1920x1080i 60 1920x1080p 60 720x576p 50 1920x1080i 50 1920x1080p 50 SIZE O...

Страница 10: ...ET TIMING SHIFT OFF ON COLOR CONTRAST 0 60 30 BRIGHTNESS 0 60 30 COLOR R 0 1023 512 G 0 1023 512 B 0 1023 512 R OFFSET 0 1023 512 G OFFSET 0 1023 512 B OFFSET 0 1023 512 HUE 0 60 30 SATURATION 0 60 30...

Страница 11: ...f the selected HDMI input port is connected to a DVI source audio signal from the 3 5mm phonejack on top of the selected HDMI input port will be used When AUDIO SOURCE sets to EXT only the audio signa...

Страница 12: ...as above S CONTRAST 0 60 Sets the numerical equivalent for CONTRAST setting 0 60 R CONTRAST Reports the numerical equivalent for CONTRAST setting S BRIGHTNESS 0 60 Sets the numerical equivalent for th...

Страница 13: ...valent for the FREE RUN COLOR setting as above S RESET 1 Sets the numerical equivalent for RESET PORT 0 8 0 LAST MEMORY 1 HDMI 1 2 HDMI 2 3 HDMI 3 4 YPbPr 5 VIDEO 6 PC 1 7 PC 2 8 PC 3 ST Checks the FI...

Страница 14: ...8MFS Remote Control Console PIN Assignment PIN Assignment 1 NC 1 NC 2 Tx 2 Rx 3 Rx 3 Tx 4 NC 4 NC 5 GND 5 GND 6 NC 6 NC 7 NC 7 NC 8 NC 8 NC 9 NC 9 NC Baud Rate 19200bps Data bit 8 bits Parity None Flo...

Страница 15: ...n Run type cmd then press Enter Under Mac OS X go to Go Applications Utilities Terminal See below for reference Once in the CLI Command Line Interface type TELNET along with the IP address of the unit...

Страница 16: ...type device s IP address on the web address entry bar The browser will bring up the control page of the Scaler see below for reference NOTE The IP address can be obtained from the OSD menu under Infor...

Страница 17: ...SVGA 56 60 72 75 X X XGA 60 70 75 X X SXGA 60 75 X X UXGA 60 X X 1280x800 60 X X 1680x1050RB 60 X X 1920x1080 60 X X 1920x1200 60 RB X X OUTput ResolutionS RESOLUTION PC HD HDMI 480p 576p HD HD 720p...

Страница 18: ...16 CONNECTION DIAGRAM CONNECTION DIAGRAM A NEUVIDEO...

Страница 19: ...THIS PAGE IS INTENTIONALLY LEFT BLANK...

Страница 20: ...offices within the State of Texas United States of America A NeuVideo makes no representation that materials pertaining to the Product are appropriate or available for use in other locations other th...

Отзывы: