5
BACK PANEL
BACK PANEL
q
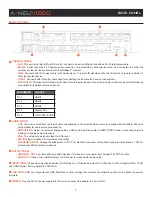
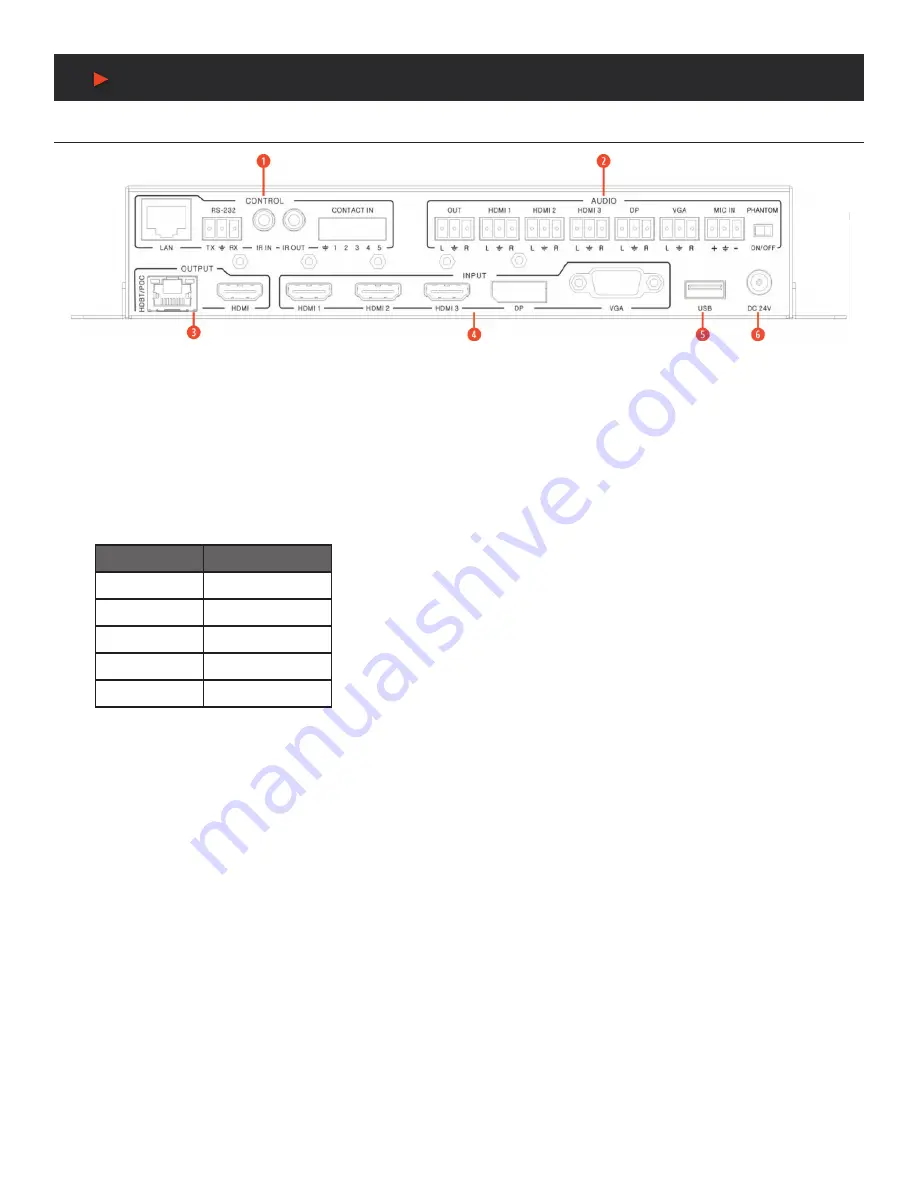
CONTROL PORTS:
•
LAN:
This port is the link for Web GUI control; connect to an active Ethernet link with an RJ-45 terminated cable.
•
RS-232:
Serial control port, 3P captive screw connector, connects with a control device (such as a computer) to control the
switcher or other device connected with the HDBaseT
™
receiver.
•
IR IN:
Connects with IR receiver cable (with carrier wave), to receive IR signals sent by the IR remote or remote controller of
other input/output device.
•
IR OUT:
Connects with IR emitter cable used for controlling the local source device or the switcher.
•
CONTACT IN:
This input control reserving for direct source input selection. Connect ground pin (mark as on panel) with following
pin number for individual source selection.
PIN NUMBER
SOURCE
Pin 1
HDMI1
Pin 2
HDMI2
Pin 3
HDMI3
Pin 4
Display Port
Pin 5
VGA/YPbPr/CVBS
w
AUDIO PORTS:
•
OUT:
The audio comes from the input audio corresponding to the selected video source and mixed with MIC audio. Connects
with amplifier for audio source broadcasting.
•
HDMI1/2/3/DP:
Select the external analog audio on OSD and insert the audio to HDMI1/2/3/DP video source then output to
display and analog audio output port.
•
VGA:
The external analog audio input for VGA input.
•
MIC IN:
Plug microphone in for audio source output.
•
PHANTOM ON/OFF:
Arrange the slide switch to “OFF” for electrets condenser microphone/ dynamic microphones or “ON” for
professional 48V phantom microphone.
e
OUTPUT PORTS
•
HDBASET
™
OUT:
Connects with compatible Receiver for video and / or audio output. Support 24V POC function.
•
HDMI OUT:
Connect to an HDMI display or AV Receiver for video and/or audio output.
r
INPUT PORTS:
These video input ports include (3) HDMI inputs, (1) Display Port input & (1) VGA input. VGA port support VGA, YPbPr
and CVBS format. Factory default is VGA format.
t
USB PORT:
USB port connects with USB flash disk or other storage that contains the software update file to update the system
firmware.
y
POWER:
Plug the 24V DC power supply into the unit and connect the adaptor to an AC outlet.
A
NEU
VIDEO
Содержание ANI-5MFS
Страница 19: ...THIS PAGE IS INTENTIONALLY LEFT BLANK...


