background image

6

• 

Ensure that you have removed foreign objects such as 

nails and screws from the work before commencing 

sanding.

• 

Rags, cloths, cord, string and the like should never be left 

around the work area.

• 

Use safety equipment including safety goggles or 

shield, ear protection, dust mask and protective clothing 

including safety gloves.

Wear goggles
Wear earmuffs
Wear a breathing mask

The tool must be used only for its prescribed purpose.
Any use other than those mentioned in this Manual will 

be considered a case of misuse. The user and not the 

manufacturer shall be liable for any damage or injury 

resulting from such cases of misuse.
The manufacturer shall not be liable for any changes made 

to the tool nor for any damage resulting from such changes.
Even when the tool is used as prescribed 
it is not possible to eliminate all residual risk factors. The 

following hazards may arise in connection with the tool’s 

construction and design:

• 

Damage to the lungs if an effective dust mask is not 

worn.

• 

Damage to hearing if effective earmuffs are not worn.

Contents of carton

•  1 x 80 Grit sanding belts (1 fitted on product) 
•  Dust canister 
•  Inversion stand and 2 x clamps
•  Dust extraction adaptor

Assembly

The sander is packed fully assembled.

Unpacking

Due to modern mass production techniques, it is unlikely 

that your 909 Power Tool is faulty or that a part is missing. 

If you find anything wrong, do not operate the tool until the 

parts have been replaced or the fault has been rectified. 

Failure to do so could result in serious personal injury.

Содержание TS900

Страница 1: ...Black Cyan Magenta Yellow Code TS900 IM Date 110304 Edition 05 Op AB INSTRUCTION MANUAL TS900 900W BELT SANDER ...

Страница 2: ...ription of symbols 3 Specifications 3 General safety rules 4 Additional safety rules for sanders 5 Contents of carton 6 Assembly 6 Unpacking 6 Know your product 7 Switching on and off 8 Adjusting the speed 8 Attaching a sanding belt 8 Selecting the right grade of sanding belt 9 Sanding 9 Dust canister 9 General inspection 10 Cleaning 10 ...

Страница 3: ...satisfy your expectations It has been manufactured under stringent 909 Quality Standards to meet superior performance criteria You will find your new tool easy and safe to operate and with proper care it will give you many years of dependable service CAUTION Carefully read through this entire Instruction Manual before using your new 909 Power Tool Take special care to heed the Cautions and Warning...

Страница 4: ...tension cord suitable for outdoor use Use of a cord suitable for outdoor use reduces the risk of electric shock f To reduce the risk of electric shock the manufacturer recommends the use of a residual current device with a rated residual current of 30mA or less at all times 3 Personal safety a Stay alert watch what you are doing and use common sense when operating a power tool Do not use a power t...

Страница 5: ...tion 5 Service a Have your power tool serviced by a qualified repair person using only identical replacement parts This will ensure that the safety of the power tool is maintained Additional safety rules for sanders Before connecting a tool to a power source mains switch power point receptacle outlet etc be sure that the voltage supply is the same as that specified on the nameplate of the tool A p...

Страница 6: ... for any changes made to the tool nor for any damage resulting from such changes Even when the tool is used as prescribed it is not possible to eliminate all residual risk factors The following hazards may arise in connection with the tool s construction and design Damage to the lungs if an effective dust mask is not worn Damage to hearing if effective earmuffs are not worn Contents of carton 1 x ...

Страница 7: ...on 5 On Off trigger switch 6 Drive roller 7 Belt tension lever 8 Front belt roller 9 Drive belt cover 10 Tracking adjustment knob 11 Dust extraction port 12 Variable speed control knob 13 Dust extraction adaptor 14 Inversion nest 15 Inversion clamps 3 13 7 5 1 4 2 8 10 12 14 15 11 9 6 ...

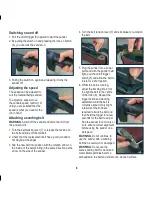
Страница 8: ...rrow on the inside of the belt pointing in the same direction as the arrow on the side of the sander 4 Turn the belt tension lever 7 anti clockwise to re tension the belt 5 Plug the sander into a power point and with the sander held tight pull the on off trigger switch 5 and allow the belt to rotate for a short period 6 Whilst the belt is running adjust the tracking knob 10 to align the belt to th...

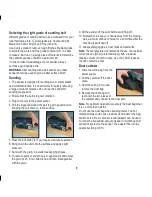
Страница 9: ...onto the surface and apply slight pressure 7 Sand with the grain in parallel overlapping strokes 8 To remove paint or smooth very rough wood sand across the grain at 45 in two directions and then finish parallel with the grain 9 Lift the sander off the work before switching off 10 Remember to keep your hands away from the moving belt as it will continue to move for a short time after the machine i...

Страница 10: ...the extension cord if necessary Cleaning 1 Keep the tool s air vents unclogged and clean at all times 2 Remove dust and dirt regularly Cleaning is best done with a soft brush or a rag 3 If the body of the sander needs cleaning wipe it with a soft damp cloth A mild detergent can be used but nothing like alcohol petrol or other cleaning agent 4 Never use caustic agents to clean plastic parts WARNING...

Страница 11: ......

Отзывы: