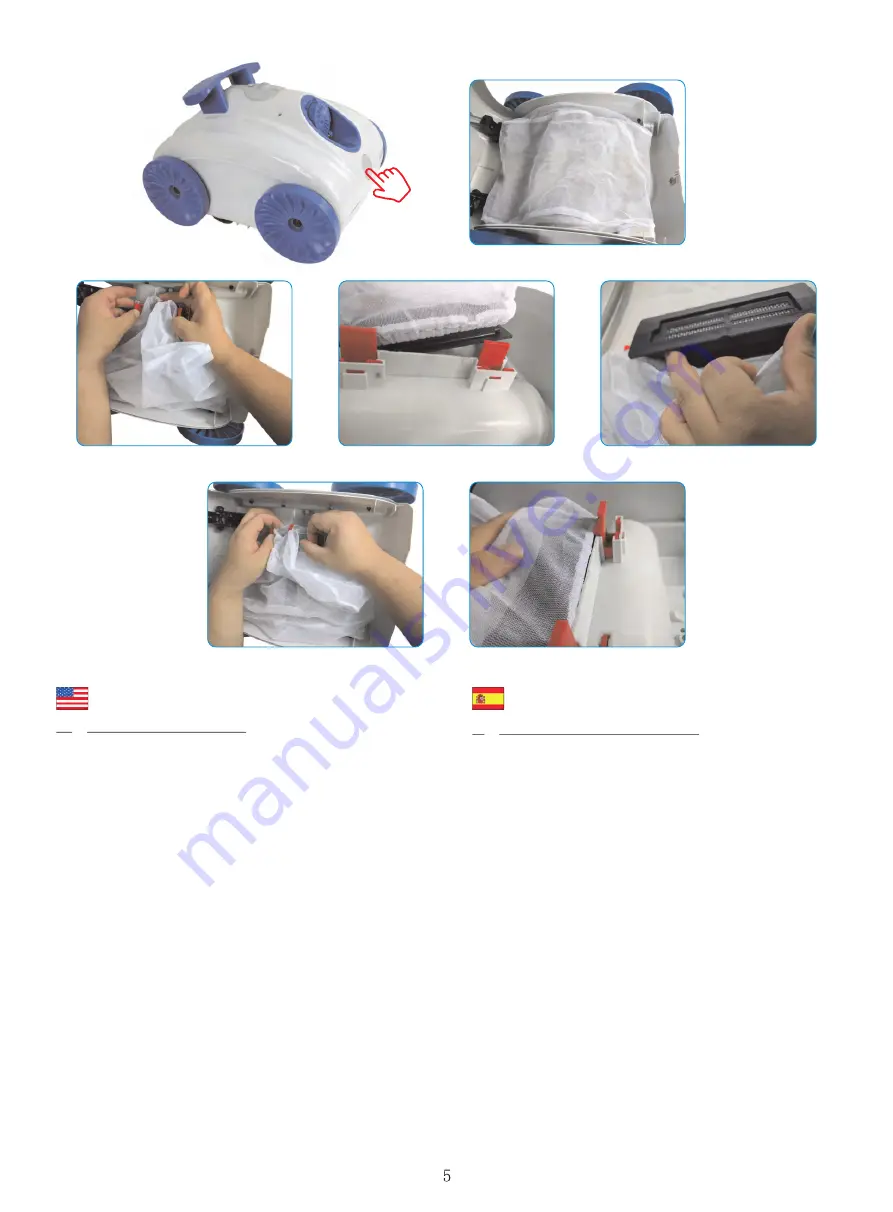
6. Cleaning the Filter Bag
1. Press in the button at the front of the cleaner and
lift up the top shell (
Fig 6.1
). Continue to lift up the
shell until you hear a “click” and the shell stays in
place (
Fig 6.2
).
2. Pull back the red tabs on one side (
Fig 6.3
) and
completely lift up bag frame on that side (
Fig 6.4
).
Repeat for opposite side.
3. Pull off the elastic band on the bag from frame (
Fig
6.5
).
4. Dump out the debris inside the bag. Use a hose to
spray water and clean the bag.
5. Wrap elastic band of bag back onto the frame.
Align the red ribbon with the tab of the black plastic
frame.
6. Pull back the red tabs and push the frame back
into the opening (
Fig 6.6
). The frame is all the way
in when the tabs are sitting on top of the frame (
Fig
6.7
).
6. Limpiando la Bolsa del Filtro
1. Presione el botón al frente del limpiador y levante
la carcasa superior (
Fig. 6.1
). Siga levantando la
carcasa hasta que escuche un “clic” y ésta se
mantenga fija (
Fig. 6.2
).
2. Hale las pestañas rojas del costado(
Fig. 6.3
) y
levantar completamente el marco de la bolsa en
ese lado (
Fig. 6.4
). Repita para el lado opuesto.
3. Remueva la cinta elástica del marco en la bolsa
(
Fig. 6.5
).
4. Deseche los restos dentro de la bolsa. Utilice una
manguera para rociar agua y limpiar la bolsa.
5. Envuelva la banda elástica de la bolsa de vuelta al
marco. Alinee el listón rojo con la pestaña del
marco plástico negro.
6. Hale las pestañas rojas y empuje el marco de
regreso a la abertura (
Fig. 6.6
). el marco está
totalmente dentro cuando las pestañas están
descansando sobre el mismo marco (
Fig. 6.7
).
6.1
6.2
6.3
6.4
6.5
6.6
6.7
Содержание 5200-J2X
Страница 7: ...8 Troubleshooting 8 Solución de Problemas ...
Страница 8: ......
Страница 9: ......
Страница 10: ...8 Dépannage 8 Probleemoplossing 8 Fehlerbehebung ...


