background image


8

e

6 R3000iR Q

uick

 S

taRt

 G

uide

B

est

 f

IlteRIng

 P

RaCtICes

Threat Class Groups

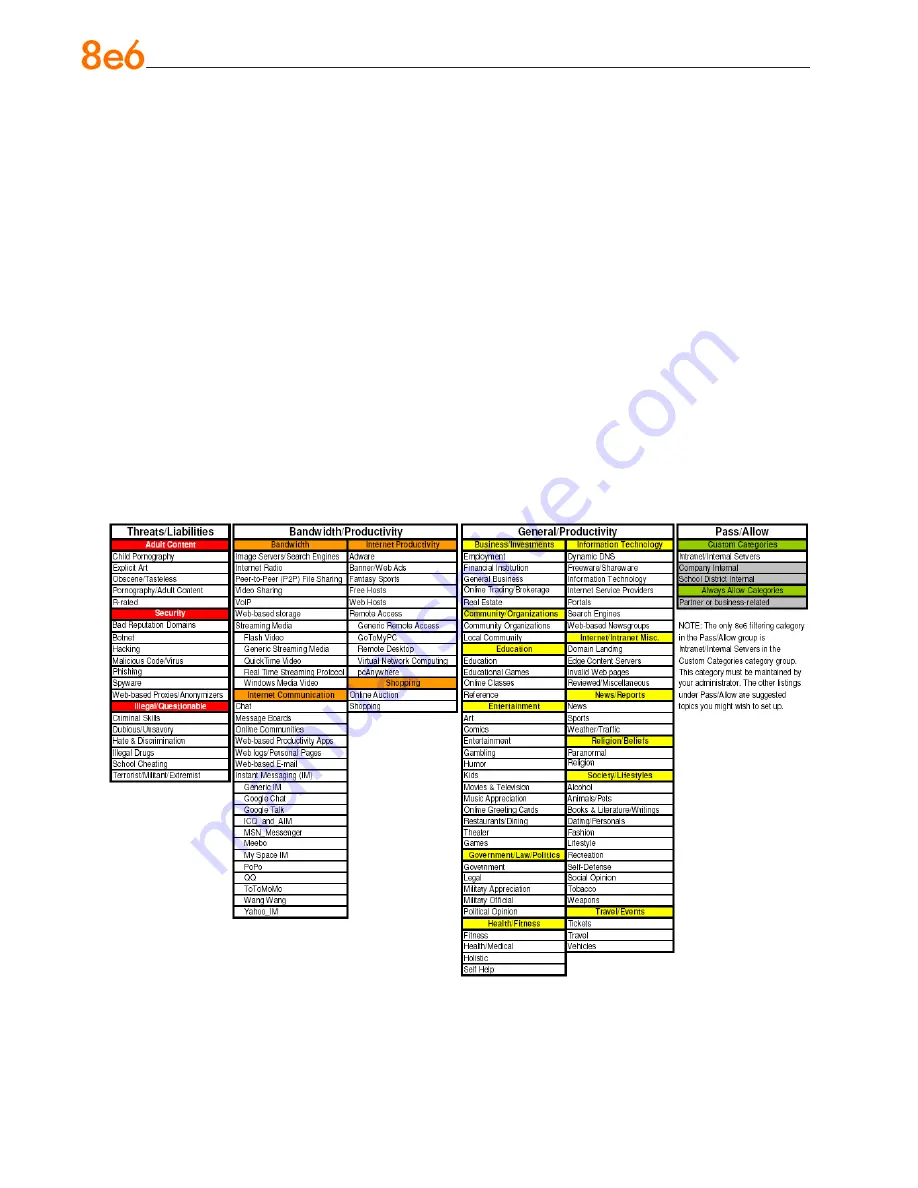
8e6’s filtering library currently consists of 103 library filtering categories, each placed in 

one of the 20 filtering category groups defined in the interface: Adult Content, Bandwidth, 

Business/Investments, Community/Organizations, Education, Entertainment, Govern

-

ment/Law/Politics, Health/Fitness, Illegal/Questionable, Information Technology, Internet 

Communication, Internet Productivity, Internet/Intranet Misc., News/Reports, Religion/

Beliefs, Security, Shopping, Society/Lifestyles, Travel/Events, and Custom Categories.

Outside of the interface, we have also grouped these library categories into four Threat 

Class Groups, based on the type of security level that best defines them:

Threats/Liabilities

Bandwidth/Productivity

General/Productivity

Pass/Allow

Please review the Filtering Scenarios sub-section for information on configuring the 

R3000 to fulfill the filtering scenarios assigned to each of the four Threat Class Groups.

Содержание Enterprise Filter R3000IR

Страница 1: ...GUIDE R3000 Internet Filter QUICK START Model R3000IR MSA 002 003 R3000 Release 2 1 10 ER Release 4 1 20 Updated 12 01 08...

Страница 2: ...herein The information in this documentation is subject to change without notice The R3000IR product has been tested and found to comply with the limits for a Class A digital device pursuant to part 1...

Страница 3: ...Start Setup Procedures 21 Step 1B Console Setup Procedures 29 Step 2 Test the R3000 Console Connection 41 Step 3 Test Filtering or Mobile Client Console Connection 42 Step 4 Set Library Updates 43 St...

Страница 4: ...iv 8e6 R3000IR Quick Start Guide LED Indicators and Buttons 73 Diagrams and Descriptions 73 Regulatory Specifications and Disclaimers 74 Declaration of the Manufacturer or Importer 74 Index 77...

Страница 5: ...ns and fields for ease of use when configuring and maintaining the server as well as managing user and group filtering profiles The ER is comprised of the server and client application Once the ER ser...

Страница 6: ...uick start steps have been completed Best Filtering Practices This section includes a chart of library categories orga nized into Threat Class Groups accompanied by filtering scenarios and directions...

Страница 7: ...tion to be consid ered WARNING The warning icon is followed by information alerting you to a potential situation that may cause damage to property or equipment CAUTION The caution icon is followed by...

Страница 8: ...mestic US 1 888 786 7999 International 1 714 282 6111 8e6 Taiwan Taipei Local 2397 0300 Domestic Taiwan 02 2397 0300 International 886 2 2397 0300 Procedures When calling 8e6 Technologies regarding a...

Страница 9: ...ication User Guide and ER User Guide The latest version of the R3000IR user guides can be obtained from our Web site For the R3000 User Guide go to http www 8e6 com docs ir_r3000_r2 pdf For the R3000...

Страница 10: ...shock Isolated from strong electromagnetic fields and noise caused by electrical devices such as elevators copy machines air conditioners large fans large electric motors radio and TV transmitters and...

Страница 11: ...power supply will not overload any circuits Con sideration should be given to the connection of the equipment to the supply circuit and the effect that overloading of the circuits might have on overc...

Страница 12: ...id personal injury and property damage please carefully follow all the safety steps listed below Before installing the chassis rails Close the chassis using the chassis cover Unplug the AC power cord...

Страница 13: ...f the inner rail 4 Attach an inner rail to each side of the chassis and secure the inner rail to the chas sis by inserting three Type G screws through the holes on each side of the chassis and the inn...

Страница 14: ...e note that the brackets are marked with Up Front Arrows front and Up Rear arrows rear 2 Secure the front short bracket marked with the Up Front arrows to the outer rail with two Type G screws See the...

Страница 15: ...hassis may not slide into the rack smoothly or easily when installed the first time Some adjustment to the slide assemblies might be needed for easy installation 8 You will need to release the safety...

Страница 16: ...8 to 33 Determine the placement of each component in the rack before you install the rails Install the heaviest server components on the bottom of the rack first and then work up 1 In the package loca...

Страница 17: ...ews and Type I washers as shown below See the previous page for descriptions of Type H and Type I hardware components 4 Attach the rear long bracket to the rear end of the rack and secure it to the ra...

Страница 18: ...de 5 Measure the depth of your rack and adjust the length of the rails accordingly Then secure the rails to the chassis with Type G screws 6 Slide the inner rails which are attached to the chassis int...

Страница 19: ...ake sure that all the components are securely fastened to the chassis to prevent components fall ing off from the chassis The rack assembly should be properly grounded to avoid electric shock The rack...

Страница 20: ...ountries Power Supply Precautions Warning Use a regulating uninterruptible power supply UPS to protect the server from power surges voltage spikes and to keep the server operating in case of a power f...

Страница 21: ...at and even fire CAUTION There are no user serviceable components inside the chassis The chassis should only be opened by qualified service personnel Never disassemble tamper with or attempt to repair...

Страница 22: ...s Warning Heed the following safety precautions to protect yourself from harm and the server from damage CAUTION Dangerous voltages associated with the 100 240 V AC power supply are present inside the...

Страница 23: ...if the battery on the motherboard is installed upside down which will reverse its polarities CAUTION DANGER OF EXPLOSION IF BATTERY IS INCORRECTLY REPLACED REPLACE ONLY WITH THE SAME OR EQUIVALENT TY...

Страница 24: ...up procedures R3000IR with AC power cord either one of two options PC monitor with AC power cord and keyboard or PC laptop computer with HyperTerminal and serial port cable and USB DB9 se rial adapter...

Страница 25: ...the front panel see Fig 2 Once the R3000IR is powered up proceed to the Login screen instructions Serial Console Setup A Using the serial port cable and USB DB9 serial adapter if necessary connect the...

Страница 26: ...going to Start Programs Accessories Communica tions HyperTerminal B In the Connection Description dialog box enter any session Name and then click OK to open the Connect To dialog box C At the Connect...

Страница 27: ...6 R3000IR Quick Start Guide 23 D Specify the following session settings Bits per second 9600 Data bits 8 Parity None Stop bits 1 Flow control Hardware E Click OK to connect to the HyperTerminal sessio...

Страница 28: ...e Properties dialog box displaying the Connect To and Settings tabs G Click the Settings tab and at the Emulation menu select VT100 H Click OK to close the dialog box and to go to the login screen NOT...

Страница 29: ...A At the login prompt type in menu B Press the Enter key to display the Password prompt C At the Password prompt type in the following s3tup r3k D Press Enter to display the Quick Start menu screen Q...

Страница 30: ...AN1 Configure network interface LAN2 Configure default gateway Configure DNS servers Configure host name Time Zone regional setting NOTE See the Network screens for Operation Mode LAN Settings and Re...

Страница 31: ...ration Mode specified in screen 3 Change filter mode Management and Blocking Interface specified in screen 4 or 5 Configure network interface LAN1 or LAN2 Capturing Interface specified in screen 4 or...

Страница 32: ...ny time by returning to the specific screen of the Quick Start procedures Log Off Disconnect the Peripherals A After completing the Quick Start setup procedures return to the Quick Start menu screen a...

Страница 33: ...link for LAN or High Speed Internet and choose Properties Windows 2000 right click the My Network Places icon and select Properties Right click the correct Local Area Connection and choose Properties...

Страница 34: ...e a CAT 5E coupler this can be used if the crossover cable is not long enough for your setup Plug one end of the CAT 5E crossover cable into the R3000 and the other end into the coupler Plug a standar...

Страница 35: ...type in cmd type in command if using Windows ME 3 Click OK 4 In the cmd exe window type in ping 1 2 3 4 5 Press Enter on your keyboard If you receive a reply the unit is up Network Setup When the R30...

Страница 36: ...Filtering to open the R3000 Introductory Window NOTE This window must be left open throughout your session The Introductory Window displays minimized when the login dialog box of the R3000 Administra...

Страница 37: ...8e6 R3000IR Quick Start Guide 33 D Click OK to go to the main screen of the R3000 Administrator console...

Страница 38: ...LAN settings the R3000 will use on your network Select NTP servers the R3000 will use for time synchronization with Internet clocks Indicate the region in which the R3000 is geographically located NOT...

Страница 39: ...e Client B In the Listening Device frame select the device for listening to traffic For the invisible mode LAN1 is generally used as the default listening device For the router or firewall mode Select...

Страница 40: ...6 Technologies to recognize your account for library updates This name needs to be a valid DNS entry B Enter the LAN1 IP address and specify the subnet for LAN 1 the R3000 s first Ether net Network In...

Страница 41: ...esolve the domain name requested by users from the LAN if the first DNS isn t working F Enter the Gateway IP address for the default router or firewall that is the main gateway for the entire network...

Страница 42: ...ng Delete NOTE If you need to find another NTP server to use most university Web sites provide these servers for public usage A In the NTP Server field enter the IP address of the primary NTP server y...

Страница 43: ...selections in the Regional Setting window A At the Region pull down menu select your country from the available choices B At the Location pull down menu select the time zone for the specified region...

Страница 44: ...Reboot from the pop up menu to display the Reboot window ii Click the Reboot button iii From the time you click Reboot you have approximately 2 minutes to perform sub steps B through E while the R3000...

Страница 45: ...C Click Go You should be prompted to log into the Administrator console giving the Username and Password If you can access the R3000 Administrator console the R3000 is functioning on your network and...

Страница 46: ...l support Test the Mobile Client Console Connection If this R3000 has been set up in the Mobile mode you do not need to test filtering In stead once you have accessed the R3000 Administrator console y...

Страница 47: ...A Open an Internet browser window and go to http www 8e6 com activate B After reading through the online End User License Agreement click Accept to go to Step 2 of the activation process C Enter your...

Страница 48: ...form a complete library update to ensure you have the latest library updates To download the latest library updates go to the R3000 Administrator console A Click the Library button at the top of the s...

Страница 49: ...pdate activity NOTE You will be notified in the log when the library has been completely updated by the message Full URL Library Update has completed If this message does not yet display click View Lo...

Страница 50: ...consult Chapter 2 Group screen in the Global Administra tor Section of the R3000 User Guide Refer to Chapter 1 System screen for information on how to give end users access to acceptable HTTPS sites...

Страница 51: ...istrator console You will now need to log in to the ER Administrator con sole and make some changes to settings in screens Log in to the ER Administrator Console A In the R3000IR console see Step 1B N...

Страница 52: ...Administrator console Change User Name and Password A Set up a new administrator user name and password by clicking on the Network pull down menu and choosing Administrators to display the Add Edit De...

Страница 53: ...S to activate monitoring C Enter the Master Administrator s E Mail Address D Click Choice one and enter an e mail address of an individual in your organization that you would like notified if the ER d...

Страница 54: ...fox 1 5 or Safari 2 0 Web browser Pop up blocking software disabled if installed High speed connection to ER server Go to the ER server and apply the latest software to the server following the proced...

Страница 55: ...x x represents the IP address of the ER server and then click Go to access the login window of the ER client B Enter your Username and Password and then click LOGIN to access the main screen of the cl...

Страница 56: ...box E Enter the Username F Enter the Password and Confirm Password G Select the User Type Admin or Sub Admin H Click Save to close the dialog box and to add the username to the user list I Exit the cl...

Страница 57: ...be able to report on IP addresses To implement user names in ER reporting please consult the ER Administrator User Guide Refer to the ER Web Client User Guide for information on generating reports NOT...

Страница 58: ...ation Technology Internet Communication Internet Productivity Internet Intranet Misc News Reports Religion Beliefs Security Shopping Society Lifestyles Travel Events and Custom Categories Outside of t...

Страница 59: ...threaten your network organization Create a rule that blocks access to the Security category group and other categories con taining content that threaten your organization and then apply this rule to...

Страница 60: ...ress or include verbiage of your choice that informs users of their Internet usage activities that triggered the page To customize pages go to SYSTEM System Customization Common Customization window a...

Страница 61: ...tion Create a custom category with contents tailored to safeguard your organization Block this category in appropriate profiles To set up a custom category and block it go to LIBRARY Library Category...

Страница 62: ...ss Options How to set up an Override Account Group profile 10 Exception URL bypass Use exception URLs to grant users access to URLs blocked at the root To grant users access to globally blocked URLs e...

Страница 63: ...yword Filter Control and extension options enabled or GROUP Group Global Group Global Group Profile Category tab and Filter Options tab URL Keyword Filter Control and extension options enabled In the...

Страница 64: ...a profile 3 Time Based Profiles Schedule a profile to be used at a specific time Set up one or more profiles for each user or group to be active at a scheduled time To set up Time Profiles go to GROU...

Страница 65: ...p IP member member profile Category Profile tab Warn column and Filter Options tab X Strikes Blocking enabled or GROUP Group Global Group Global Group Profile Category tab Warn column and Filter Optio...

Страница 66: ...ock Entertainment Games category To block game patterns go to SYSTEM System Control Filter window GROUP Group IP member member profile Category tab or GROUP Group Global Group Global Group Profile Cat...

Страница 67: ...the R3000 to filter HTTPS sites without having the R3000 communicate with IP addresses or hostnames of HTTPS servers Medium if you want the R3000 to communicate with HTTPS servers in order to get the...

Страница 68: ...a profile go to LIBRARY Library Category Groups category group category Search Engine Keywords GROUP Group IP member member Profile Filter Options tab Search Engine Keyword Filter Control enabled or...

Страница 69: ...STEM System Customization Common Customization window and other applicable customization windows In the R3000 User Guide index see How to customize pages 17 Real Time Probe information Monitor Interne...

Страница 70: ...sers before they access unacceptable content and may be locked out of the Internet Set HTTPS filtering at the high level configure Warning settings and enable X Strikes Blocking In the end user s prof...

Страница 71: ...e used at a specific time Set up one or more profiles for each user or group to be active at a scheduled time To set up and use time profiles go to GROUP Group IP member Time Profile window In the R30...

Страница 72: ...stom category that only includes content pertinent to your organization or region that should be blocked Apply this category to a profile To create a Custom Category and use it in a profile go to LIBR...

Страница 73: ...ng Level using exception URLs Enter the exception URLs in the applicable profile To set up the Exception URL bypass feature and let users bypass blocked URLs go to GROUP Group Global Group Minimum Fil...

Страница 74: ...option to allow the Mini mum Filtering Level to be bypassed with an Override Account and then set up the Override Account at the member level To set up an override account at the Global Group level go...

Страница 75: ...mode of the ER described in the ER Administrator User Guide and ER Web Client User Guide Administrator Console Expiration Screen On the Expiration screen the following message displays at the top of t...

Страница 76: ...on Mode Enabled displays above the ER Activity frame To the right of this note the Info button displays When this button is clicked an alert box opens with the message Evaluation Mode Max Data Storage...

Страница 77: ...or Key Button Key A Power F Reset B HDD Activity G Power C LAN 1 D LAN 2 E Overheat LED indicators alert you to the status of a feature on the unit while buttons let you per form a function on the uni...

Страница 78: ...cations Commission FCC Class A Notice USA This equipment has been tested and found to comply with the limits for a Class A digi tal device pursuant to part 15 of the FCC Rules These limits are designe...

Страница 79: ...8e6 R3000IR Quick Start Guide 75 Electromagnetic Compatibility Class A Notice Industry Canada Equipment Standard for Digital Equipment ICES 003 Bureau of Standards Metrology and Inspection BSMI Taiwan...

Страница 80: ...EN55022 2006 EN55024 1998 A2 2003 EN61000 3 2 2000 EN61000 3 3 2001 Product Name s Internet Appliance Product Model Number s MSA 002 003 Year in which conformity is declared 2008 All hardware compone...

Страница 81: ...rn X Strikes Quota pages 65 68 Custom Category blocked 57 Customize an 8e6 Supplied Category 68 Custom Lock Block Warn X Strikes Quota pages 56 E EMC 74 76 ER Client 51 72 ER Server Statistics 71 72 E...

Страница 82: ...Power Supply Precautions 16 Proxy Patterns 58 Q Quick Start menu 25 R Rack Setup Precautions 7 Real Time Probe information 65 reboot 34 39 40 Remote Access patterns 63 Reset admin console account 27 R...

Страница 83: ...Guide 79 U UL 74 URL exceptions 69 URL Keywords 56 64 W Warn strike 61 Warn strike with higher thresholds 66 Warn Feature with higher thresholds 66 Warn option with low filter settings 60 X X Strike o...

Страница 84: ...enue Orange CA 92865 4232 Tel 714 282 6111 or 888 786 7999 Fax 714 282 6116 Sales Technical Support 714 282 6117 General Office Satellite Office 8e6 Taiwan 7 Fl No 1 Sec 2 Ren Ai Rd Taipei 10055 Taiwa...

Отзывы: