background image

Assembly

Assembly

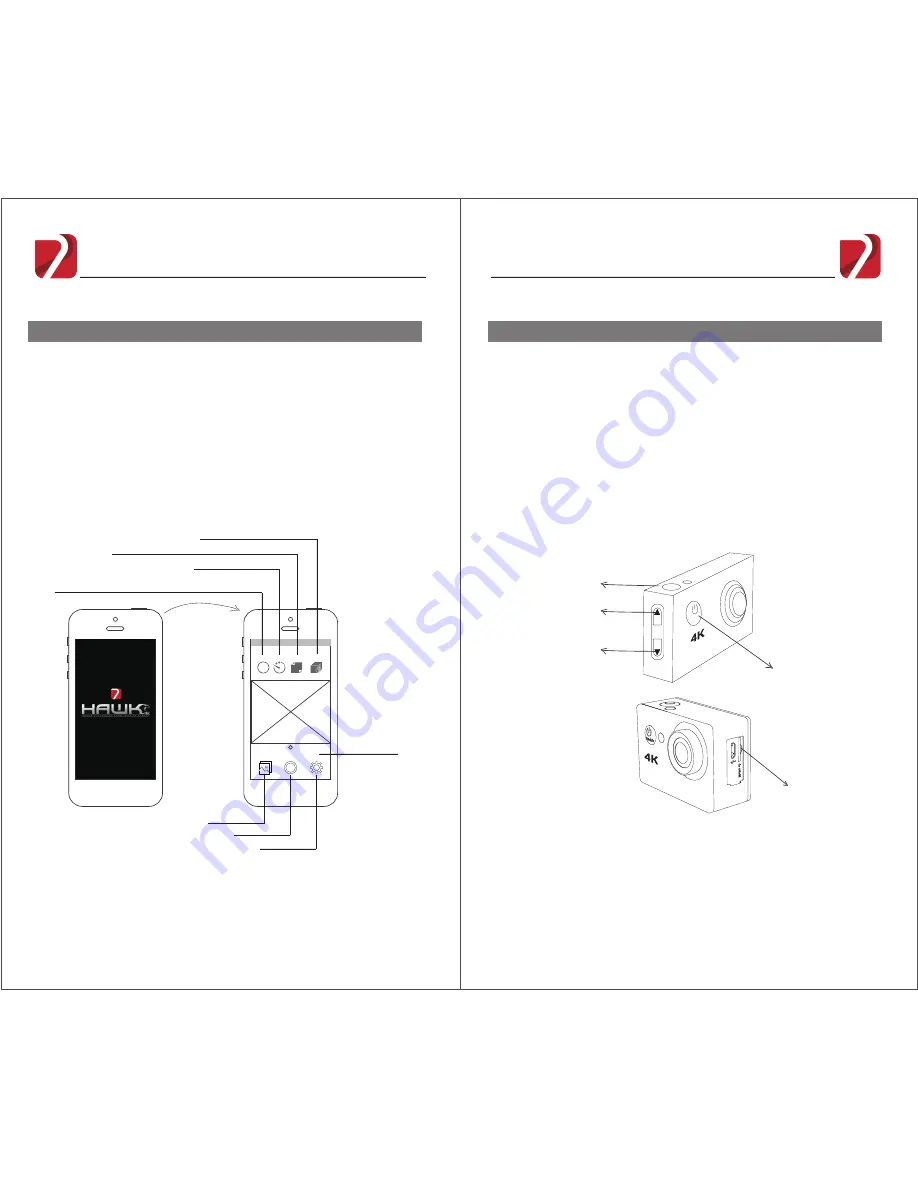
Diagram7:App Setting

Notes: Photos and videos are primarily stored in the camera SD card. You can either see the media on 
your mobile while it is connected to camera or download the files onto your mobile device.
7Hawk4K APP requires android 4.2 or later / IOS 7.1 or later.

Step 7. Camera APP (Diagram 7)

Resolutions and frames per second of video on your APP

Media Library

Shutter Button

Shooting Modes

APP Settings

Time delay for shooting

Time interval between every shoot in burst mode

How long burst shoot will last

Diagram 8:

Notes: Do not insert or take out the SD card while the camera is powered on.

Camera Setting (Diagram 8)

OK Button

Up Arrow

Down Arrow

 Power Button

MODE

OK

SD Card Slot

FHM

Burst   Photo   Video   Short video

Frame rate

Delay

Interval

Duration

Camera

Scan the 7Hawk4K App QR Code on the Hawk 4K box or simply Search 
“7Hawk4K” on the App Store (for iOS) or Google PlayStore (for Android) 
and dowload it on your mobile device.

Turn on the camera and connect your mobile device to the camera 
wifi.(Wifi name: 7Hawk4K;  Initial 

Code: 1234567890

)

Open mobile APP and a live video interface will show on the mobile.

(APP will not present the user interface unless connected to camera). 

Insert Micro SD/TF card into the camera ( supports maximum
64GB micro SD card).
Press and hold the power button to turn on the camera. The camera 
screen will show the WIFI name and the initial code.
Press the down arrow to close the wifi interface and enter the live video 
interface. Then press the up arrow to enter setting interface, where you 
can change the video resolution, display language, etc.
Press the power button once to exit setting interface.

Содержание Hawk 4K

Страница 1: ...www 7Sense Tech 7SenseTech 7SenseTech Register the Drone at FAA website as per US laws USER MANUAL Hawk 4K...

Страница 2: ...ntil the watch gets 8 GPS satellites and shows an icon of 4 It is highly recommended to stand at least 5 meters away from the drone when it takes off to avoid any injury that may arise from the moving...

Страница 3: ...down the spring button under the motor arm and slowly twist the arm till the end The arm will be locked in place with a click Unfold the rear arms before unfolding the front arms To fold the drone pu...

Страница 4: ...gimbal Step 5 Gimbal Camera Diagram 5 Match the opening of the gimbal board with the hole in the gimbal mount and drive in the screw slowly and steadily Diagram 5 Unscrew the camera strap from gimbal...

Страница 5: ...o Video Short video Frame rate Delay Interval Duration Camera Scan the 7Hawk4K App QR Code on the Hawk 4K box or simply Search 7Hawk4K on the App Store for iOS or Google PlayStore for Android and dowl...

Страница 6: ...s and hold the unlock button to check if the four motors are rotating properly Press the take off button once in the unlocking status and the drone will ascend to 5 meters and hover in place Press and...

Страница 7: ...once and start to move The drone will autonomously follow behind you after you go 5 meters away from the aircraft The aircraft will head to you wherever you go with camera targeting on you at all tim...

Страница 8: ...gonfly will autonomously ascend to 15 meters slowly fly back to the take off point and land If there is obstacle in the way of return home you can still make it hover and come back in other paths Retu...

Страница 9: ...terface Watch to GPS tracker Turn on the watch and GPS tracker Insert a needle into a hole on the tracker s back The blue LED will start to flash blue The tracker will get connected to the watch when...

Страница 10: ...____________________ ______________________________________________________ ______________________________________________________ ______________________________________________________ ______________...

Отзывы: