Quick Installation Guide
WHG713
Secure WLAN Controller
ENGLISH
Copyright ©
4IPNET, INC. All rights reserved.
②
System Overview
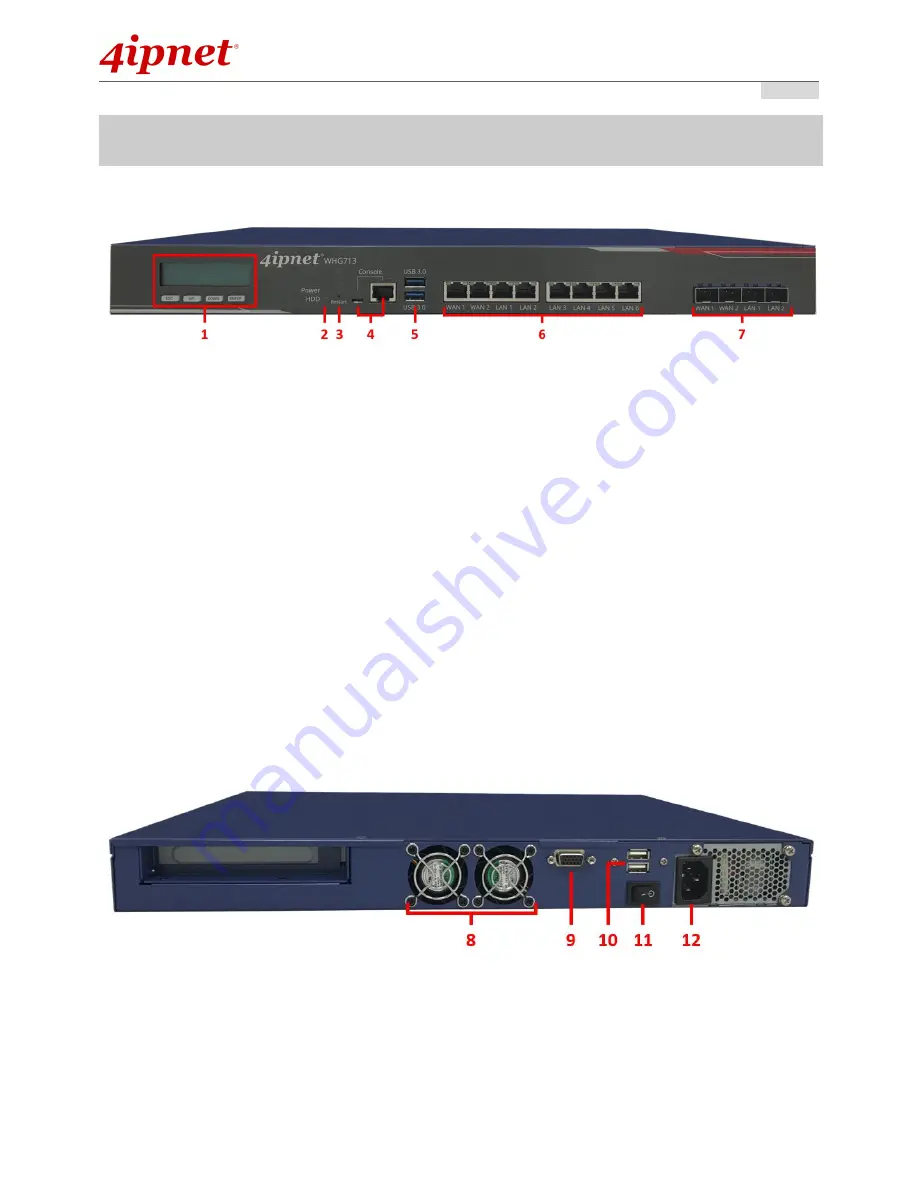
Front Panel
1.
LCD Display
: Allows network administrator to check important system settings such as network interface,
SZ configurations, etc. The navigation buttons from left to right are
“ESC”, “Up”, “Down”, and “Enter”.
2.
LED Indicators
: There are two kinds of LED,
Power
and
HDD (Hard Disk)
, to indicate the different
status of the system.
3.
Restart
: Press and hold the restart button for about 5 seconds and the system will restart.
4.
Console
: The system can be configured via a RJ-45 console port or a USB Type-C port. The
administrator can use a terminal emulation program such as Microsoft’s Hyper Terminal to login to the
configuration console interface to change admin password or monitor system status, etc.
5.
USB
: Reserved for future use.
6.
RJ45 Ethernet Ports
:
Two 10/100/1000 Base-T WAN ports (WAN1 / WAN2) are connected to the
external network, such as the ADSL Router from your ISP. The other six ports for the LAN connections
(LAN1 / LAN2 / LAN3 / LAN4 / LAN5 / LAN6).
7.
SFP Ports:
Two WAN SFP ports (WAN1 / WAN2) are connected to the external network such as the
ADSL Router from your ISP. The other two ports for the LAN connections (LAN1 / LAN2).
Rear Panel
8.
Device Cooling Fan:
Do not block the cooling fans. Leave enough open space for ventilation.
9.
VGA Connector:
For connection to a Monitor if needed.
10. USB:
Reserved for future use.
11. Power Switch:
For Powering the Device On/Off.
12. Power Supply Socket:
Connecting the power cord to the built-in power supply.
Содержание WHG713
Страница 1: ...WHG713 Secure WLAN Controller ...


