background image

Pg. 12

www.3xlogic.com | 877 3xLOGIC | [email protected]
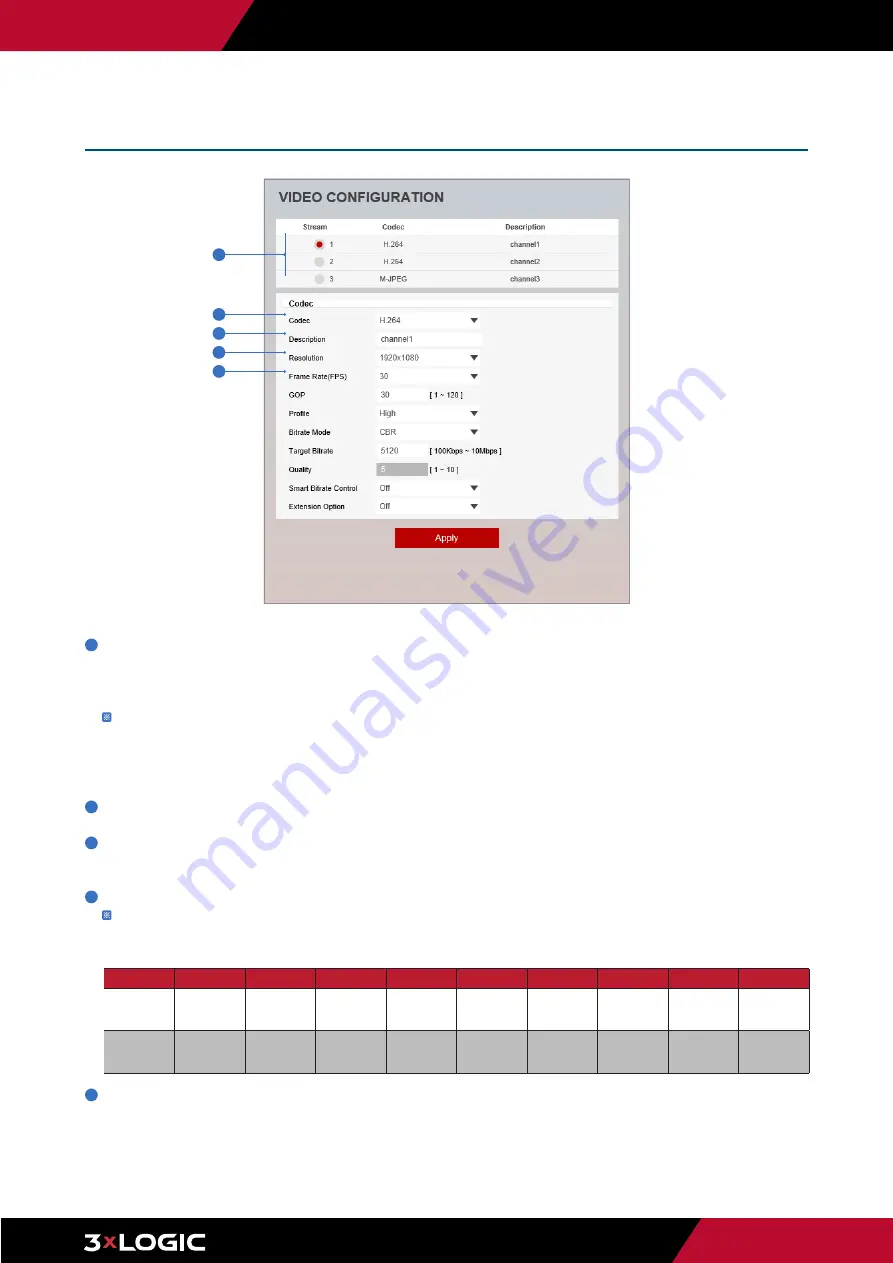
1

 Live Video Channel Setup -

 Each available video stream can be configured to a variety of settings using any combination of the 

available codecs and resolutions. The amount of available streams will differ depending on the camera model. Toggle the button for 

the stream you would like to edit. 


 Camera performance should always be considered when configuring  multiple channels / streams. Each active channel will   

  cause additional strain on the camera's CPU. H.265 (HEVC) codec with higher bitrates may cause the unstable live streaming    

  in the browser interface as well as within VIGIL Server / Client on older systems. See SB20008 for best practices on mitigating   

  performance issues on older sytems. 

2

 Codec - 

Choose the video codec. Subcategories will be changed automatically depending on the selected codec.

3


Description -

 Input a  description for the  selected channel / stream. Max. 30 alpha-numeric characters as well as special 

charcaters (including space) can be used.

4


Resolution -

 Select the video resolution.


 Available resolutions will depend on the selected codec as well as the camera model's lens.  

    Example of common resolutions are listed below. 


5


Frame Rate -

 Select the maximum Frame Rate (FPS).


Setup - Video & Audio Setup

Video Configuration 

2
3
4
5

1

Format

QSXGA

3.7m

3m

1080p/i

720p/i

SVGA

VGA

4CIF

CIF

NTSC

2592 x 1944 2560 x 1440 2304 x 1296 1920x1080 1280x720

800x600

640x480

704x576

704x480

352x288

252x240

PAL

2592 x 1944 2560 x 1440 2304 x 1296 1920x1080 1280x720

800x600

640x480

704x576

704x480

352x288

252x240

Содержание VISIX Gen III Series

Страница 1: ...3xLOGIC VISIX Gen III Cameras User Interface Guide Ver 1 0 2020 07 Simple Scalable Secure...

Страница 2: ...amera White Balance 26 Camera Image Enhancement 27 Camera Image Enhancement 27 Video Enhancement 28 Video Enhancement 28 Network Status 29 Network Status 29 Network Settings 30 Network Settings 30 Set...

Страница 3: ...equipment generates uses and can radiate radio frequency energy and if not installed and used in accordance with the instruction manual may cause harmful interference to radio communications Operation...

Страница 4: ...addition of a camera to Server varies between v11 systems and pre v11 systems See a below for instructions on v11 series and newer systems See b below for instructions on saving the camera to pre v11...

Страница 5: ...n this section Sub Stream Toggle this box to enable substream Quick Start Adding a VISIX Gen III Camera to VIGIL xi After the utility has auto filled the fields or you have manually entered the inform...

Страница 6: ...t refer to the steps in this section for details on viewing the camera s footage in VIGIL Server 1 2 3 4 5 1 2 3 4 5 Select Instant Replay from the Live Edge Controls to open the last 5 minutes of foo...

Страница 7: ...reset is required login to the camera s browser interface enter IP into a browser URL bar and login to the camera then navigate to Setup System Factory Reset To perform a basic camera retart Navigate...

Страница 8: ...ed on login to change the password See below for instructions 1 If the default password for the camera has not previously changed no camera image will be visible and the Setup button will be disabled...

Страница 9: ...1 Live video display 2 Setup button Click it to open the Setup page to setup and configure settings for the camera like Video Network Events System Settings etc See Setup section for more details 3 C...

Страница 10: ...efault home position Preset You can add PTZ presets by clicking the button when the camera is at the desired PTZ location Up to 255 presets can be saved Preset Tour You can add a Preset Tour by clicki...

Страница 11: ...menu related items and settings will be visible in the Details pane 2 Setup Menu A list of configurable settings and information Click a menu link to view related content Some settings are model depe...

Страница 12: ...best practices on mitigating performance issues on older sytems 2 Codec Choose the video codec Subcategories will be changed automatically depending on the selected codec 3 Description Input a descrip...

Страница 13: ...frames to a larger value 7 Pro le The pro le de nes the subset of bit stream features in H 264 H 265 HEVC stream including color reproduction and additional video compression H 264 Main High H 265 HEV...

Страница 14: ...0 is higher quality 11 Smart Stream Off Smart Stream RC Smart Stream ETC ATF Available options will depend on the camera model See the corresponding setup section for Smart RC and Smart ACF for more i...

Страница 15: ...ent time 2 User Text Output the TEXT entered by the user Supports a maximum of 30 characters 3 PTZ Display PTZ information This field is only visible on models with hardwired PTZ functionality 4 Click...

Страница 16: ...h usage 1 Stream Select the Stream to apply the ROI to ROI currently supports only H 264 H 265 HEVC The function is not supported iwith the MJPEG codec 2 Activation The Region of interest can be enabl...

Страница 17: ...lect the Audio Codec Currently only G 71 is supported 2 Volume Set the Audio Volume from 0 to 10 3 Sample Rate Select the Audio Sample Rate Currently only 8000 Hz is supported 4 Click Save to save set...

Страница 18: ...to apply Smart RC to Main stream and sub stream are available 2 Stream Quality Select the desired stream quality Low Medium High and Extreme are available 3 Dynamic GOP Select dynamic GOP to enable d...

Страница 19: ...e P frame limit to change to when the event trigger occurs 3 Bitrate Mode Set to the birate mode to change to when the event trigger occurs 4 Target Bitrate Set the Target Bitrate to be set when the e...

Страница 20: ...s that you want to hide on screen to protect privacy 1 Activation The Privacy mask function can be enabled or disabled here 2 Area Select an area designation Area1 Area16 and draw the privacy area 3 C...

Страница 21: ...information about available camera settings profiles 2 Click Add to add a new profile using the current camera settings Click Delete to delete selected item from the pro le list Click Apply to apply s...

Страница 22: ...ing this control sharpness of image can be adjusted to meet your preference 2 Click Save to save the current settings Click Cancel to return to the previous settings Click Default to return settings t...

Страница 23: ...Shutter Speed 1 8 1 15 1 30 1 60 1 120 1 125 1 700 1 1000 1 1600 1 2500 1 5000 1 7000 1 10000 1 30000 Iris Iris 0 Close 20 Open Bright Bright Adjust the brightness 0 dark 20 bright 2 Exposure Compens...

Страница 24: ...The sensitivity will be enhanced in dark light conditions but the image is black and white Schedule In this mode Day Night mode is converted in accordance with the scheduled time Schedule Day Night Ti...

Страница 25: ...Wide Dynamic Range The WDR function can be enabled or disabled 2 WDR Level Set the WDR level 3 BLC Back Light Compensation The BLC function can only be set when WDR is off 4 Click Save to save the cu...

Страница 26: ...saves the white balance value at the current state 2 White Balance Mode Select White Balance depending on the lighting conditions 3 RB Gain The R B gain can be set only when the White Balance Mode is...

Страница 27: ...ff Middle Low High Auto modes are available 2 Defog Fog compensation can be set Off Middle Low High 3 Stabilizer The Stabilizer function can be enabled or disabled 4 Click Save to save the current set...

Страница 28: ...m 1 Flickerless Enable to enhance images experiencing flickering 2 Click Save to save the current settings Click Cancel to return to the previous settings Click Default to return settings to the facto...

Страница 29: ...mation for the camera Settings are for reference only and cannot be configured from this screen 3xLOGIc recommends edting camera IP and network info from the 3xLOGIC Camera Setup Utility B or from Net...

Страница 30: ...s same as the IP address 4 Default Gateway Default the Gateway IP Address Format is same as the IP address 5 Preferred DNS Server De ne the DNS server IP address Format is same as the IP address 6 Alt...

Страница 31: ...3xlogic com 1 General Setting The Auto IP Setting function can be enabled or disabled here 2 Auto IP Settings Information Displays the unique id or Auto IP address 3 Click Apply to save new settings...

Страница 32: ...cation WS Usertoken Allows access with WS User Token of ONVIF authentication WS Usertoken Digest Allows access with WS User Token and Digest of ONVIF authentication 2 Discovery Mode The ONVIF discover...

Страница 33: ...NP function can be enabled or disabled here 2 Friendly Name Define the an easily identifable name for the device Supports a maximum of 30 characters and special characters cannot be used _ can be used...

Страница 34: ...is completed by entering User Name and Password registered in that DDNS site If you setup DDNS properly the IP address of your camera will be updated automatically whenever the IP address is changed o...

Страница 35: ...ver to store images For the path name English Alphabets numbers and special characters _ can be used 4 FTP Port De ne the FTP Server Port If no port is available it is impossible to access the FTP Ser...

Страница 36: ...ered with your email provider 6 Password Enter the Password to access the SMTP Server Fill out using the correct Password registered with your email provider 7 E Mail Sender De ne the e mail address o...

Страница 37: ...Activation Disable or activate the selected mode 5 Read Write name De ne Read name and Write name 6 Security Level Select one of no auth no priv auth no priv auth priv 7 Authentication Algorithm Selec...

Страница 38: ...data transfer performance 4 RTP Multicast Check RTP Multicast Start Stop To activate RTP Multicast 1 Click On button 2 Enter accessible RTP Multicast IP port for video stream control RTP packet TTL 3...

Страница 39: ...e custom action rule information added to the Action rules list 2 Click Add to add custom action rules Click Modify to modify a selected item from the action rules list Click Delete to delete a select...

Страница 40: ...tion Interval Select the interval to maintain event mode 3 Action1 Action5 Select the action to take if the event occurs Recording FTP Recipient SMTP Recipient and Relay Out are available 4 Click Save...

Страница 41: ...e to event is configured by setting the Image transfer rate and Pre Post alarm duration 2 Click Apply to save new settings Image Transfer Configuration Setup Trigger Action Setup Number of Image Pre a...

Страница 42: ...amera model 2 Mode Select monostable bistable for relay mode 3 Idle State Select whether the contact is normally opened or is closed 4 Duration The relay will remain trigger during the set time If bis...

Страница 43: ...ent Rule information for added event rules is displayed here 2 Click Add to add custom event rules Click Modify to modify a selected item from the event rules list Click Delete to delete a selected it...

Страница 44: ...ing 4 Schedule Set an activation time The event can only occur during the stated time period Always Manual Time available Manual mode will require the custom creation of a schedule 5 Week Time When ma...

Страница 45: ...GIC helpdesk 3xlogic com 1 Mode The Schedule function can be enabled or disabled here 2 Repeat Rule If desired set a recurring time the event occurs 3 Click Apply to save new settings Setup Event Setu...

Страница 46: ...up to four areas 3 Activation Enable or Disable motion detection 4 Sensitivity De ne the sensitivity of motion detection If a High value is selected it will detect very small motions while conversely...

Страница 47: ...om 1 Mode Select either Fahrenheit and Celsius 2 Threshold De ne the temperature at which the event trigger occurs 3 Temperature Indicates the current temperature of the IP camera 4 Click Apply to sav...

Страница 48: ...Setup Event Setup 1 2 1 Input Device Setup Select input device type from OFF N O N C 2 Click Apply to save new settings OFF NO NC Operation Ignore this input sensor The contact is normally open and cl...

Страница 49: ...Select the channel you want to record video from 2 Click Save to save the current settings 3 Recording List Display the information about the recording settings 4 Click Modify to modify the selected i...

Страница 50: ...type SD Card Disabled selection is not allowed 5 Continous If continous mode is turned on start continuous recording without any other setting This settings is indepedent of recording to a VIGIL Serve...

Страница 51: ...Click Play to view the selected item in list of recorded video Click Remove to delete the selected item in list of recorded video Click Download to download the selected item in list of recorded video...

Страница 52: ...Recording Video Viewer Play the recorded video 2 Recording Video Information Display the information about the recorded video 3 Click Replay to view the recorded video again Click Back to return to th...

Страница 53: ...77 3xLOGIC helpdesk 3xlogic com Display the SD card information mounted from device When you select the item in the storage list you can set the functions related to the SD card here Storage Configura...

Страница 54: ...than 8MB new data will start to be overwritten overtop the oldest data However if it is set OFF and remaining space of SD card reach to less than 8MB recording will cease This does not affect recoridn...

Страница 55: ...ording IP filter type 3 Click Apply to save new settings 4 Filter IP Address Display the filtered IP addresses 5 IP Address Define the IP address you want to apply the IP filter to 6 Click Add to add...

Страница 56: ...n running older versions of VIGIL Server with Gen III VISIX Cameras RTSP Streams may be required Always disable RTSP Authetnication in this case before entering the RTSP URL for the cameras in the VIG...

Страница 57: ...tificate on the client side TLS It relies on client side and server side certificates to perform authentication 3 EAPOL Version Select the EAPOL Version 4 ID Type the ID to identify the client in the...

Страница 58: ...a certi cate please install the certi cate from the Security Certi cates menu 2 HTTPS connection Policy Select one of HTTP HTTPS HTTP and HTTPS depending on the connected web ONVIF RTSP over HTTP WEB...

Страница 59: ...elected certificate 5 Create Certificate signing request This is the encoded data that contains the necessary information for issuing the certificate They must be lled in when creating the CSR Certi c...

Страница 60: ...ti cate and private key 3 Certi cate Name Enter a unique name to identify certi cate 4 Select File Choose certi cation le 5 OK Request installing certi cate 6 Cancel Cancel install certi cate and retu...

Страница 61: ...Pg 61 www 3xlogic com 877 3xLOGIC helpdesk 3xlogic com Service Con guration Setup Security Setup 1 SSH The SSH function can be enabled or disabled here 2 Click Apply to save new settings 1 2...

Страница 62: ...877 3xLOGIC helpdesk 3xlogic com System Information is displayed here 1 Device Name Enter the device name 2 Location Shows camera s location 3 Click Apply to save new settings Setup System Setup Syst...

Страница 63: ...ction 1 Shows Uptime SD card NAND EEPROM Audio chip Important file system and NTP Status Warning If the camera is abnormally terminated a download button will appear on the diagnostics page to downloa...

Страница 64: ...l be displayed using a progress bar If you assign the wrong le name an error message will be shown Warning 1 Do not turn o the power of camera during the Firmware update Otherwise the system can hang...

Страница 65: ...dd or mm dd yy 3 Current Date Time Shows the current date and time setting in the camera 4 Synchronize with my computer Set the date time using those of the currently connected PC 5 Setup manually Set...

Страница 66: ...rom standard time during the spring and summer months and back again in the fall and winter in order to make better use of natural daylight 1 General Setting DST function can be enabled or disabled he...

Страница 67: ...ssword Combinations uppercase letters lowercase letters numbers special symbols Acceptable special characters are _ Click Apply to save new settings Click Cancel to return to the previous menu 3 Modif...

Страница 68: ...xlogic com 1 Filter Select a date time sort or type of log to lter the log 2 Click the Refresh button to refresh the log list Click Filter to view the ltered log 3 System Log List The ltered log is di...

Страница 69: ...Pg 69 www 3xlogic com 877 3xLOGIC helpdesk 3xlogic com 1 Language Select the language for the camera interface from the menu 2 Click Apply to save new settings Setup System Setup Language 1 2...

Страница 70: ...n the camera settings to their factory default state 2 Click Apply to save new settings All Reset all Settings to the factory defaults Except Network Settings and User Settings Reset all setting to de...

Страница 71: ...com Setup System Setup Restart If you click the RESTART menu a message box will be shown to con rm a camera system restart Click the OK button to restart You will be logged out and will require a rel...

Страница 72: ...com 877 3xLOGIC helpdesk 3xlogic com This menu will show you all the list of System Open Source Licensees used in the camera Open Source Name Version License is displayed System Open Source License S...

Страница 73: ...to a preset tour it can be selected here Preset Tours can be constructed and added from the main page 2 Click Apply to save new settings 3 Power Up Action Set the acti for PTZ to take when the camera...

Страница 74: ...www 3xlogic com 877 3xLOGIC helpdesk 3xlogic com Simple Scalable Secure...

Отзывы: