


NR Series Precision Colorimeter
8
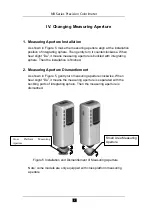
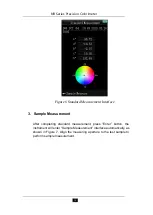
IV. Changing Measuring Aperture
1. Measuring Aperture Installation
As shown in Figure 5, make the measuring aperture align at the installation
position of integrating sphere. Then gently turn it counterclockwise. When
hear slight “Da”, it means measuring aperture is buckled with integrating
sphere. Then the installation is finished.
2. Measuring Aperture Dismantlement
As shown in Figure 5, gently turn measuring aperture clockwise. When
hear slight “Da”, it means the measuring aperture is separated with the
buckling parts of integrating sphere. Then the measuring aperture is
dismantled.
Figure 5 Installation and Dismantlement of Measuring Aperture
Note: some models are only equipped with cross platform measuring
aperture.
Cross
Platform
Measuring
Aperture
Small Area Measuring
Aperture
Содержание NR60CP
Страница 1: ......
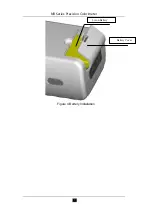
Страница 9: ...NR Series Precision Colorimeter 7 Figure 4 Battery Installation Li ion Battery Battery Cover...
Страница 14: ...NR Series Precision Colorimeter 12 Figure 8 Main Menu Figure 9 USB Communication...
Страница 30: ...NR Series Precision Colorimeter 28 Figure 25 Time Date Setting Figure 26 Time Setting...
Страница 31: ...NR Series Precision Colorimeter 29 Figure 27 Date Setting Figure 28 Time Format...
Страница 33: ...NR Series Precision Colorimeter 31 Figure 30 Restore Factory Settings...
Страница 39: ......


