3M MCWS075ME Скачать руководство пользователя страница 13

REPLENISHMENT OF SALT SUPPLY:

The salt storage capacity of the brine tank is approximately
180 lbs  (82 kg).   During each regeneration a specific amount
of salt is consumed, thus requiring its periodic replenish-
ment (the frequency and salt dosage level is dependent
on the regeneration schedule). Always replenish salt
before the supply is exhausted for a continuous supply
of softened water.

TYPE OF SALT TO USE:

Any type of water softener  salt may be used.  There are
advantages and disadvantages to every type of salt.
Please ask your local dealer for his advice.  Your unit is
designed to compensate for the disadvantages. However 
the use of block salt is not encouraged due to its poss-
ible problems in making enough brine for regeneration 
purposes.

BRINE TANK CLEAN-OUT:

To prevent service problems the brine tank should be
emptied and flushed out with a garden hose when dirt and
other insolubles accumulate.  

Steps to follow:

(1) Disconnect brine line at either end.

(2) Turn brine tank upside down and discard old salt.

(3) Rinse out with a garden hose.

(4) Reconnect brine line.

(5)  Before loading salt, using a pail or garden hose add 
enough water to the brine tank to cover the salt grid lower
shelf on 15” x 15” x 34” brine tank at least one (1) inch in 
depth.  Then add initial salt to brine tank and add one (1)
cup of unscented laundry bleach to the brine well.

(6) Perform approximately once a year if rock salt is 
used; with other types of salt, approximately once every 
other year.

PREVENTING IRON-FOULING OF MINERAL BED:

If iron is present in the water supply, the softener mineral
bed will eventually become iron-fouled, resulting in reduced
softening capacity and rust-stained fixtures.  Mixing one to
two ounces of IRON-X  Mineral Cleaner with every 80 lbs.
of salt added to brine tank will help minimize these prob-
lems from occurring.  IRON-X is available from your dealer.

PERIODICALLY CHECK TIME OF DAY SETTING:

Power outages will cause “TIME OF DAY” setting to
become incorrect.  To correct,

refer to Section 4 on how

to correct. 

MALFUNCTION OF UNIT:

Your water softener, under normal conditions, should pro-
vide years of virtually trouble-free service; however, since
it is a mechanical device, it can malfunction. 

(Refer to 

Section 5, SERVICE INSTRUCTIONS, if necessary).

CHANGE OF OPERATING CONDITIONS:

Should your family size, your water usage habits, or your
water quality change, the regeneration program settings
may have to be adjusted.  Consult your dealer if any of the
above occur.

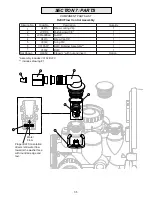
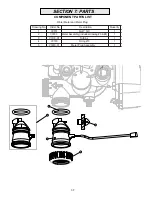
SPECIAL SERVICE INSTRUCTIONS:

Under normal circumstances, removal of valve should
never be required.  However, if it must be removed, it can
be done by disassembling the quick release clamp, by
removing latch.  Pressure should be relieved before at-
tempting any disassembly.  Upon reassembly, all o-rings
should be lubricated with silicone grease.  Reassemble
clamp as shown in Figure 6.  MAKE SURE ARROWS ON
LATCH SIDE OF CLAMP ARE ALIGNED.

Figure 6. CLAMP ASSEMBLY

4-1

SECTION  4:  MAINTENANCE

Содержание MCWS075ME

Страница 1: ...usco IN 46723 U S A Installer Please leave with homeowner CAUTION Damage to the system can occur including possible mineral tank structure failure resulting in a water leak if system is subjected to a...

Страница 2: ...te disinfection before or after the system To reduce the risk associated with a hazardous voltage due to installation on a home system that requires use of the cold water system as a safety ground If...

Страница 3: ...ually trouble free service Before starting the instal lation we suggest you read this manual all the way through for an overview and then follow the installation steps in the proper sequence IMPROPER...

Страница 4: ...e items The pumping rate of thewellpumpmustbesufficienttoaccommodatethese items plus the backwashing requirements of the water softener Consultyourdealerforalternativeinstructions if the pumping rate...

Страница 5: ...Y SECONDARY TANK CHECK VALVE PRESSURE OUTPUT SOLENOID VALVE TO 110 V PRIMARY TANK PRESSURE PRESSURE SWITCH TANK PRESSURE OUTPUT TO 110 V TREATED WATER TREATED WATER WELL WATER RAW SOLENOID VALVE CHECK...

Страница 6: ...WELL SAFETY BRINE VALVE ASSEMBLY BRINE LINE ELBOW INJECTOR COVER OFF OFF OFF OFF Step 7 Attach DRAIN LINE to DRAIN LINE FITTING To preventbackpressurefromreducingflowratebelow minimumrequiredforbackwa...

Страница 7: ...may be necessary when unusual operating conditions exist such as high concentrations of iron mang 2 3 Some areas prohibit the use of flexible drain lines Check with local code officials prior to inst...

Страница 8: ...salt fill to brine tank and one 1 cup eight ounces of unscented laundry bleach to the brine well Step 17 Put your new water softener through a complete regeneration to sanitize the system prior to use...

Страница 9: ...t itself If an extended power outage occurs the time of day will flash on and off which in dicated the time of day should be reset The system will remember the rest If the word error and a number are...

Страница 10: ...ay shows day IRU HVWHUGD DQG DVKHV WKH number of gallons treated yesterday Pressing the button will show day 2 which would be the day before yesterday and flashes the number of gallons treated on ORZ...

Страница 11: ...p Gallons total used since start up This display shows the total gallons This display shows the total days since startup Press the NEXT button to go to the next step Press REGEN to return to previous...

Страница 12: ...y To initiate a manual regeneration at the present delayed regeneraton time press and release REGEN The words REGEN TODAY will flash on the display to indicate that the system will regenerate at the p...

Страница 13: ...once a year if rock salt is used with other types of salt approximately once every other year PREVENTINGIRON FOULINGOFMINERALBED If iron is present in the water supply the softener mineral bedwilleve...

Страница 14: ...Check piston and spacer stack valve assembly c High drive forces on piston c Replace piston s and spacer stack assembly d Control valve piston not in home d Press NEXT and REGEN for 3 position second...

Страница 15: ...Replace main or regenerant piston a AC Adapter unplugged a Connect AC Adapter b No electric power at outlet b Repair outlet or use working outlet c Broken drive gear or c Replace drive gear or drive...

Страница 16: ...are not fully engaged the piston rod is not in hole the wires are jammed between the drivebracket and drive back plate or the gear is not engaging the drive cap assembly To inspect the drive gears th...

Страница 17: ...OXJ SRZHU VRXUFH MDFN EODFN ZLUH DQG SOXJ back in This resets the electronics and establishes the service SLVWRQ SRVLWLRQ 7KH GLVSOD VKRXOG DVK DOO ZRUGLQJ WKHQ DVK WKH VRIWZDUH YHUVLRQ H J DQG WKHQ U...

Страница 18: ...UHPRYH LW IURP WKH VKDIW R QRW XVH D ZLUH EUXVK WR FOHDQ WKH WXUELQH LSH ZLWK D FOHDQ FORWK RU FKHPLFDOO FOHDQ LQ GLOXWH VRGLXP ELVXO WH RU YLQHJDU 7KH WXUELQH FDQ EH LPPHUVHG LQ WKH FKHPLFDO R QRW L...

Страница 19: ...hite spots on glassware and dark surfaces 8 Low water pressure low flow rate 9 Rotten egg smell from hot water ONLY 10 Rotten egg smell from both hot and cold water 11 Lossofresinthrough drain line SO...

Страница 20: ...3 8 h s a w k c a B 3 3 3 3 4 e s n i R d i p a R 3 1 5 3 l l i f e R e n i r B 51 5 51 7 52 11 53 Approximate Total Time 84 61 63 65 69 T P N 1 T P N 1 T P N 1 T P N 1 T P N 1 e z i S t e l t u O t...

Страница 21: ...0P H 075P H 10P X2 H 10P X3 Brine Line Tubing 13000X 13000X 13000X 13000X 13000X Brine Tank Complete Brine Tank Complete w Extension Kit BT1534X BT1534X BT1534X BT1534X EXT BTCS33BK Overflow Fitting B...

Страница 22: ...ption 1 Assembly r e v o C t n o r F 1 0 5 7 1 3 V 1 1 r o t o M 1 0 7 0 1 3 V 2 3 V3106 01 Drive Bracket Spring Clip 1 1 oard B C P 8 0 1 3 V 4 3 6 3 x 2 1 r a e G e v i r D 0 1 1 3 V 5 1 r e v o C r...

Страница 23: ...V3005 Spacer Stack Assembly 1 1 1 1 p Assembly a C e v i r D 4 0 0 3 V 2 1 e t a l P k c a B e v i r D 8 7 1 3 V 3 4 V3011 Piston Down ow Assembly 1 5 V3174 Regenerant Piston 1 8 2 2 g n i r O 5 3 1 3...

Страница 24: ...c e j n I 6 7 1 3 V 1 1 5 3 1 g n i r O 2 5 1 3 V 2 1 1 n e e r c S r o t c e j n I 7 7 1 3 V 3 4 V3010 1Z Injector ASY Z Plug 5 V3010 1B INJECTOR ASY B BROWN V3010 1C INJECTOR ASY C VIOLET V3010 1E I...

Страница 25: ...a r D 1 p i l C g n i k c o L w o b l E 5 1 6 4 H 2 1 1 8 3 t r e s n i e b u t y l o P 6 P P C J 3 1 8 3 t u N K L B P 6 G P C J 4 1 8 3 p a C w o b l E 3 1 6 4 H 5 1 9 1 0 g n i r 0 3 6 1 3 V 6 1 BL...

Страница 26: ...olytube insert 5 8 PKP10TS8 BULK 2 3 V3192 Nut Drain Elbow 4 V3158 01 Drain Elbow Male 1 1 1 1 1 9 1 0 g n i r O 3 6 1 3 V 5 6 V3159 01 DLFC Retainer Assembly 7 One DLFC must be used if WWLQJ LV XVHG...

Страница 27: ...Description 1 C Q 1 t u N 1 5 1 3 V 1 1 Meter Assembly includes drawing 3 4 3 0 0 3 V 2 1 e n i b r u T 1 0 8 1 1 3 V 3 1 5 1 2 g n i r 0 5 0 1 3 V 4 1 Meter Plug Assembly 1 0 3 0 0 3 V 5 3 4 5 1 2 7...

Страница 28: ...ect 2 2 Split Ring 0 5 1 3 V 2 2 2 5 1 2 g n i R O 5 0 1 3 V 3 4 V3 Fitting 3 4 Brass Sweat Assembly Quantity Order No V3007 05 Description Fitting 1 1 4 Plastic Male NPT Assembly Drawing No Order No...

Страница 29: ...4 1 3 V 4 2 6 4 1 3 V 5 2 7 4 1 3 V 6 7 Bypass Rotor Seal Retainer 2 2 5 3 1 g n i r O 2 5 1 3 V 8 2 2 1 1 g n i r O 5 5 1 3 V 9 2 4 1 2 g n i r O 6 5 1 3 V 0 1 V3191 01 Vertical Adapter Assembly Orde...

Страница 30: ...93 01 Although no tools are necessary to assemble or disassemble the valve the wrench shown in various positions on the valve may be purchased to aid in assembly or disassembly 7 10 SECTION 7 PARTS CO...

Страница 31: ...l be to repair at its expense and at no charge to the original purchaser consumer any Product that is actually defective malfunctioning or otherwise in violation of this Warranty If CUNO for any reaso...

Страница 32: ...CUNO Aqua Pure and MacCLEAN are trademarks of 3M Company used under license 2006 3M Company All rights reserved...

Отзывы: