background image

10 


3M™ Dual-Touch Chassis Displays User Guide 


3M Touch Systems, Inc. Proprietary Information – TSD-42846A


CHAPTER 2 

Setting Up Your Dual-Touch Chassis Display 

This chapter describes how to set up your 3M Touch Systems Dual-Touch Chassis 
Display. You need to complete the following tasks: 


Unpack the components 


Connect the video cable, touch display USB cables, and power cable 


Power on the display and test your setup 


If you are not running Windows® 7 (or Tablet PC), install software from the 
enclosed CD. 

Unpacking Your Touch Display 

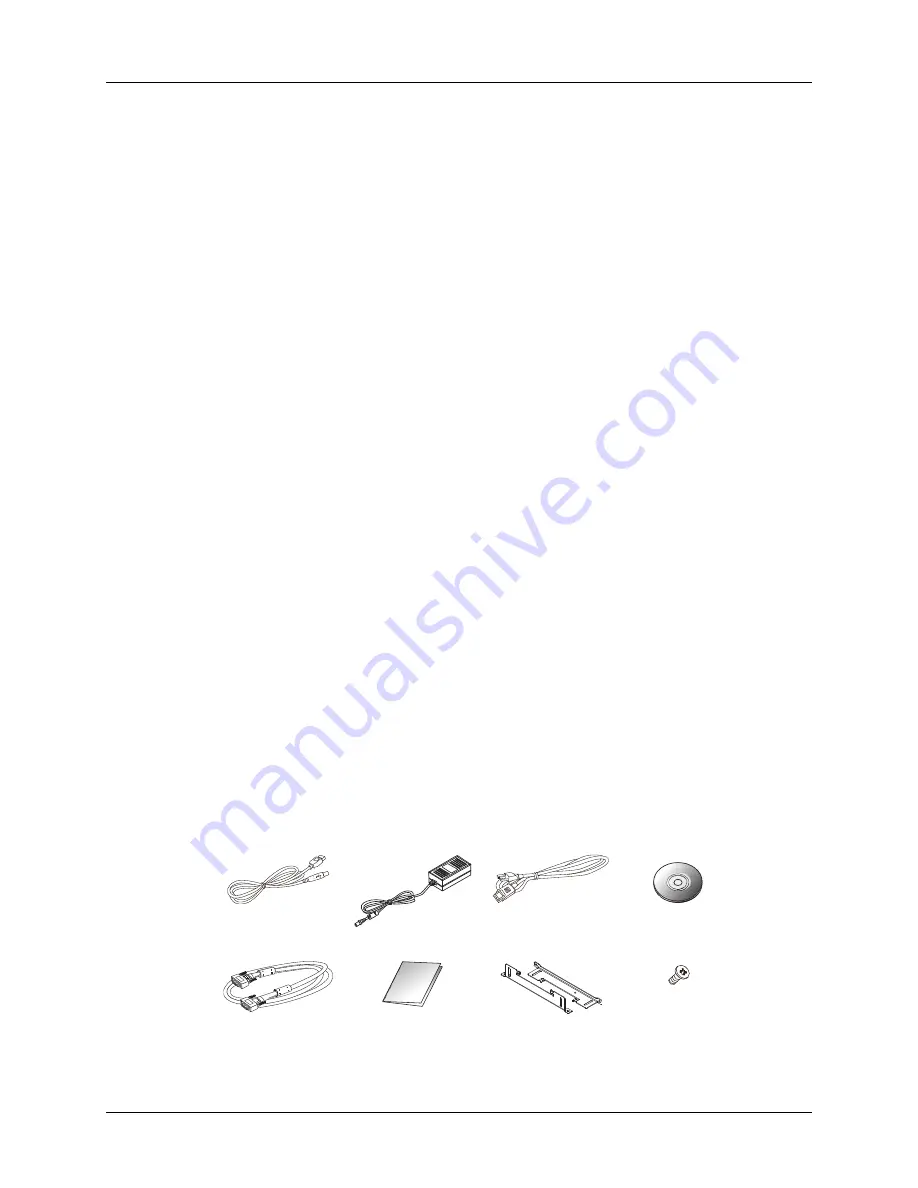
Carefully unpack the carton and inspect the contents. Your Dual-Touch Chassis Display 
includes the following cables and accessories: 


USB communication cable  


VGA video cables 


Power cable and DC power supply 


Touch documentation and driver CD 


Hardware kit -- 2 mounting brackets and (4) M4x6 screws 


USB cable  


DC power supply 


Power cable


Touch driver CD


VGA cable 


Quick Start Guide


2 L-Brackets 


4 (M4X6) Screws


Содержание C1510PS

Страница 1: ... Proprietary Information TSD 42846A 3M Dual Touch Chassis Display User Guide For the Product Line C1510PS C1710PS and C1910PS Read and understand all safety information contained in this document before using this product ...

Страница 2: ...c products and software are not specifically designed for use in medical devices as defined by United States federal law 3M Touch Systems Inc products and software should not be used in such applications without 3M Touch Systems Inc express written consent User should contact its sales representative if User s opportunity involves a medical device application IMPORTANT NOTICE TO PURCHASER Specific...

Страница 3: ...ual Touch Chassis Display Dimensions 11 Attaching the L Brackets 12 Connecting the Display 13 Supported Video Display Modes and Refresh Rates 13 Configuring the Display Settings 14 Adjusting the Dual Touch Chassis Video Display 14 User Controls For On Screen Display 14 How to Use the OSD Menus 14 On Screen Display Menus 15 Chapter 3 Troubleshooting Your Dual Touch Chassis Display Error Messages 17...

Страница 4: ...in popular smart phone and tablet devices today These displays specifically designed for kiosk and enclosure integrations feature a unique flat front surface ready design to allow for easy integration and upgrading current kiosk designs In addition the chemically strengthened glass and anti glare treatment are an ideal combination to support heavy use public applications while maintaining the kios...

Страница 5: ...ce 90 5 HID Windows 7 Driver VISTA XP 2000 CE XP Embedded Linux Apple Mac OS Important Safety Information Read and understand all safety information before using this product Follow all instructions marked on the product and described in this document Pay close attention to the following installation warnings and safety precautions Intended Use The 3M Dual Touch Display was designed for touch inpu...

Страница 6: ...nsible for compliance could void your authority to operate such equipment Do not use a damaged display or power supply Do not use a substitute DC power adapter Use only the DC adapter provided for the display Do not use non conforming replacement parts Do not place wet or damp objects on the display Do not expose the display to rain or other sources of water steam or moisture Do not place foreign ...

Страница 7: ...scle strain related to accessibility which may cause minor or moderate injury and or property damage Do not install the monitor in a manner or location with awkward accessibility Extended use may cause muscle tendon or fixed posture strains It is recommended you take periodic breaks from continuous use NOTICE You are notified that any change or modification to the equipment not expressly approved ...

Страница 8: ...l alcohol and water solution ratio of 50 50 is the best cleaning agent for your touch sensor Apply the cleaner with a soft lint free cloth Avoid using gritty cloths Always dampen the cloth and then clean the sensor Be sure to spray the cleaning liquid onto the cloth not the sensor so that drips do not seep inside the display or stain the bezel CAUTION To avoid the potentially hazardous situations ...

Страница 9: ...service after 5 30 p m until 8 00 p m US Eastern Standard Time 9 a m to 5 p m throughout Europe You can contact 3M Touch Systems Inc Technical Support US only Eastern Standard Time by calling the hot line sending email or a fax Technical Support Hot Line 978 659 9200 Technical Support Fax 978 659 9400 Toll Free 1 866 407 6666 Option 3 Email US TS techsupport mmm com Contact 3M Touch Systems Contac...

Страница 10: ...er cable Power on the display and test your setup If you are not running Windows 7 or Tablet PC install software from the enclosed CD Unpacking Your Touch Display Carefully unpack the carton and inspect the contents Your Dual Touch Chassis Display includes the following cables and accessories USB communication cable VGA video cables Power cable and DC power supply Touch documentation and driver CD...

Страница 11: ...3M Dual Touch Chassis Displays User Guide 11 3M Touch Systems Inc Proprietary Information TSD 42846A Remote Key sold separately Dual Touch Chassis Display Dimensions C1510PS C1710PS ...

Страница 12: ...n for attaching L brackets Note You will need a screwdriver to attach the L brackets Your touch monitor includes two L brackets and four screws M4x6 This equipment is intended to be mounted in accordance with the proper hardware and the installation instructions supplied with the product Use of mounting brackets or screws other than those specified in the installation instructions may cause a haza...

Страница 13: ...is configured the monitor is ready for use Connect the remote control cable to RJ type port optional Don t connect telephone or internet cable to RJ type port Adapter rating is 12Vdc 3A minimum marked with LPS Notice To ensure the LCD display works well with your computer please configure the display mode of your graphics card to make it less than or equal to 1024 x 768 for 15 or 1280 x 1024 for 1...

Страница 14: ...r adjusting the video display are located on the back of the Dual Touch Chassis Display These buttons let you display the on screen menu and adjust the phase image position contrast and brightness Before you make any adjustments Be sure to adjust the controls in your normal lighting conditions Display a test image or pattern whenever you adjust the video User Controls For On Screen Display Your Du...

Страница 15: ...will appear for 3 seconds b Use the Enter key to select OSD or Power setting then set at Unlock by pushing the Up or Down button c When the Up or Down button is released the previous setting will be saved and exit the Lock Unlock menu automatically Note When the OSD Lock Function is selected this indicates that all the buttons except Power are now disabled When the Power Lock function is selected ...

Страница 16: ...r is higher than that of the LCD display Reconfigure the resolution of your computer to make it less than or equal to 1024 x 768 for 15 or 1280 x 1024 for 17 and 19 recommended resolution Image has vertical flickering line bars Use Fine to make an adjustment Check and reconfigure the display mode of the vertical refresh rate of your graphic card to make it compatible with the LCD display Image is ...

Страница 17: ...use or touching the screen Out of Range The signal of the computer graphic card is not compatible with the LCD display When the signal is not included in the Video Display Modes listed in Chapter 2 of this manual the LCD monitor will display this message Touch Screen Driver Installation The Dual Touch Chassis Displays come with USB connections The touch driver is located on the enclosed CD ROM for...

Страница 18: ... step by step instructions as shown on the pop up windows Custom 1 Power on the computer 2 Make sure that the USB cable is connected to the computer 3 Follow the step by step instructions found in the folder file on the CD ROM Using Windows CE 1 Power on the computer 2 Make sure that the USB cable is connected to the computer 3 Using Platform Builder build an image file by following the step by st...

Страница 19: ...o guarantee that interference will not occur in a particular installation If this equipment does cause interference to radio or television equipment reception which can be determined by turning the equipment off and on the user is encouraged to try to correct the interference by one or more of the following measures Reorient or relocate the receiving antenna Move the equipment away from the receiv...

Страница 20: ...ded shielded video interface cable with bonded ferrite cores If a BNC cable is going to be used use only a shielded BNC 5 cable Also any unauthorized changes or modifications not expressly approved by the party responsible for compliance could void the user s authority to operate this device 3M Touch Systems is not responsible for any radio or television interference caused by using other than rec...

Отзывы: