background image

2

3D Systems, Inc.

1

A

B

A

2

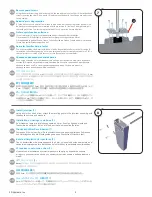
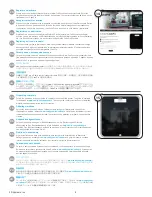
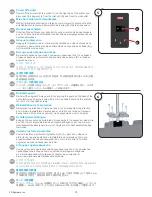
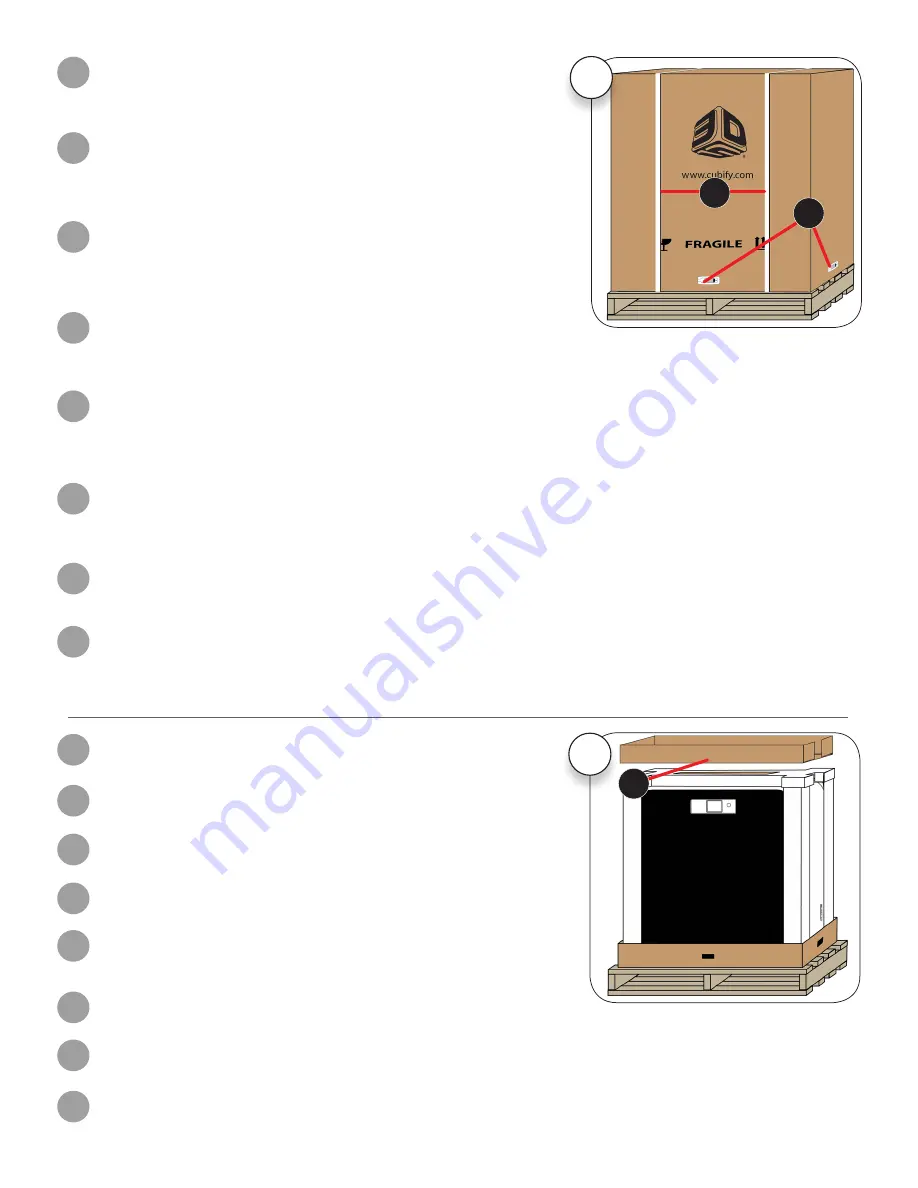
Remove the accessories tray

Lift off the acccessories tray (A) and set it aside.

EN

Retrait du bac à accessoires

Soulevez le bac à accessoires (A) et posez-le à part.

FR

Retire la bandeja de accesorios.

Levante la bandeja de accesorios (A) y déjela a un lado.

ES

Zubehördeckel abnehmen

Nehmen Sie den Zubehördeckel (A) ab, und legen Sie ihn an die Seite.

DE

Удаление поддона для дополнительных принадлежностей

Снимите поддон для дополнительных принадлежностей (A) и поставьте его 

рядом с коробкой.

RU

액세서리


트레이


꺼내기

액세서리


트레이

(A)


들어서


꺼내


옆에


둡니다

.

KO

取下配件托盘

取下配件托盘

 (A) 

并将其放在一边。

ZH

アクセサリートレイの取り外し

アクセサリートレイ(

A

)を持ち上げて横に置きます。

JA

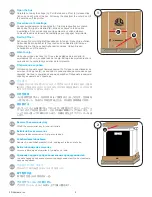
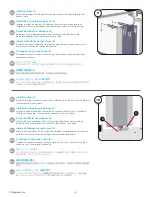
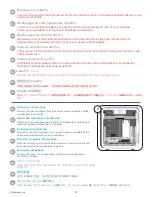
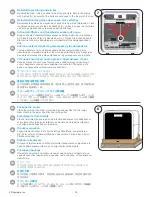
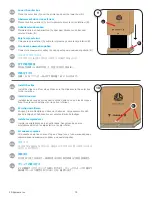
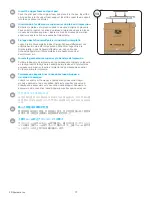
Open the box

Carefully cut away the straps (A). Pull the tabs on all four (4) release clips 

(B), one on each side of the box. Pull away the clips from the outer box. Lift 

the outer box off the printer.

EN

Ouverture de l’emballage

Coupez soigneusement les sangles (A). Tirez les languettes sur chacun 

des quatre (4) clips de maintien (B), situés de chaque côté du carton 

d’emballage. Tirez sur les clips pour les enlever du carton extérieur. 

Soulevez la partie extérieure de l’emballage pour dégager l’imprimante.

FR

Abra la caja.

Corte con cuidado las tiras (A). Tire de las pestañas de los cuatro (4) 

sujetadores (B), uno en cada lado de la caja. Extraiga los sujetadores de la 

caja exterior. Levante la caja exterior de la impresora.

ES

Karton öffnen

Schneiden Sie vorsichtig die Spannbänder (A) durch. Ziehen Sie auf allen 

Seiten des Kartons alle vier (4) Laschen aus den Rastclips (B) heraus. 

Ziehen Sie die Clips aus dem Außenkarton heraus. Heben Sie den 

Außenkarton vom Drucker ab.

DE

Открывание коробки

Осторожно срежьте скрепляющие ремни (A). Потяните за вкладки всех 

четырех (4) защелок (B); на каждой стороне коробки расположена одна 

защелка. Вытяните защелки из внешней коробки. Поднимите внешнюю 

коробку и снимите ее с принтера.

RU

상자


열기

(A)


조심스럽게


자릅니다

상자의


측면에


하나씩


 4

개의


릴리스


클립

(B)


있는


탭을


잡아


당깁니다

외부


포장


상자에서


클립을


빼냅니다

프린터를


외부


포장


상자에서


들어서


꺼냅니다

.

KO

打开包装箱

小心地剪断包装带

 (A)

。拉动所有四

 (4) 

个解锁夹片

 (B) 

上的拉手,包装箱每

一面上各有一个。将夹片从外部包装箱上拉出。将外部包装箱提离打印机。

ZH

箱を開ける

ストラップ(

A

)を慎重に切って外します。

4

箇所すべてのリリースクリッ

プ(

B

)のタブを引き出します。それぞれ箱の側面に

1

つずつあります。ク

リップを引っ張って外箱から外します。外箱を持ち上げてプリンターを出
します。

JA

Содержание CubePro

Страница 1: ...CubePro Setup and Repacking Guide Guide de configuration et d emballage Anleitung zur Ersteinrichtung und zum Wiederverpacken Gu a de configuraci n y reembalaje...

Страница 2: ......

Страница 3: ...ROVOQUER DES DOMMAGES L IMPRIMANTE FR Consulte la Gu a del usuario de CubePro para ver las instrucciones completas de funcionamiento y seguridad Puede encontrar la Gu a del usuario CubePro en Cubify c...

Страница 4: ...ture de l emballage Coupez soigneusement les sangles A Tirez les languettes sur chacun des quatre 4 clips de maintien B situ s de chaque c t du carton d emballage Tirez sur les clips pour les enlever...

Страница 5: ...te Heben Sie den Drucker aus dem unteren Schaumstoffrahmen Hierzu sind zwei Personen notwendig DE c RU KO ZH 2 JA Remove the print pad Remove the print pad box A and set it aside Remove the upper foam...

Страница 6: ...haumstoffh lse von beiden Seiten der Druckd sen A DE A RU A KO A ZH A JA Open accessory boxes Accessory boxes contain tool kit A 1 3 cartridges B depending on the printer model jet wiper and two glue...

Страница 7: ...m hex head screws securing the clear Z Axis guard A and remove the guard Save the guard and screws for repacking EN Retrait des vis de protection l aide du tournevis de 4 mm fourni avec le kit d outil...

Страница 8: ...sche A der Druckstrahl Wischer an dem Schlitz im Boden B aus und schieben sie die Druckstrahl Wischer nach unten DE 3 A B RU 3 A B KO 3 A B ZH 3 A B JA Install jet wiper 2 Mount the jet wiper mounting...

Страница 9: ...onde situ en bas du plateau dans l ouverture triangulaire de la plateforme FR Instale la bandeja de impresi n Coloque la bandeja de impresi n con el lado blanco hacia arriba en la plataforma de impres...

Страница 10: ...nd to a wall outlet Press the on off switch B to power on your CubePro EN Branchement du cordon d alimentation Raccordez le cordon d alimentation la prise A sur le c t droit de l imprimante et branche...

Страница 11: ...r www Cubify com en cubepro activate Geben Sie w hrend des Einschaltens den 4 stelligen Aktivierungscode im Druckerdisplay ein Ihre Seriennummer finden Sie auf der rechten Seite Ihres CubePro Druckers...

Страница 12: ...ne Bedruckstoffe von der Druckplatte Vuelva a embalar su CubePro UTILICE TODO EL MATERIAL DE EMBALAJE DEL EMBALAJE ORIGINAL EL ENV O SIN EL MATERIAL DE EMBALAJE ORIGINAL PUEDE DA AR LA IMPRESORA Retir...

Страница 13: ...soulevez le nettoyeur de jet puis d gagez le des fentes en forme de trou de serrure FR Retire el limpiador de inyectores Con la bandeja de impresi n baja levante el limpiador de inyectores y ret relo...

Страница 14: ...uszuschalten DE RU LED KO LED ZH LED JA Remove jet wiper 2 Using the 4mm hex head driver loosen and remove the two screws and washers from the mounting posts EN Retrait du nettoyeur de buse En utilisa...

Страница 15: ...n Z Achsenschutz A wieder an indem Sie den Schutz im hinteren Bereich des Druckers auflegen und mit dem 4 mm Sechskantschraubendreher die vier 4 Original 4 mm Sechskantschrauben festziehen DE Z A 4 4...

Страница 16: ...ties Reinstall the foam tubing on either side of the print jets Secure the tubing with zip ties A Ensure that the belts are not bound to the foam with the ties EN R installation des gaines de mousse e...

Страница 17: ...B RU A B KO A B ZH A B JA A B 10 Install the clips Install the clips on all four sides Make sure the clips secure the outer box to the lower box EN Installation des c Installez les d coupes sur les qu...

Страница 18: ...n des coins de protection en mousse Ins rez les quatre coins de protection en mousse chaque coin de l imprimante Veillez ce que les protections en mousse soient ins r es dans le berceau inf rieur en m...

Страница 19: ...sse de maintien sup rieur dans le carton au dessus de l imprimante FR Inserte la gomaespuma superior y la bandeja de impresi n Embale la bandeja de impresi n en la gomaespuma original y col quela en l...

Страница 20: ...ccessoires Placez le bac accessoires dans le carton au dessus du bloc de mousse de maintien sup rieur FR Inserte la bandeja de accesorios Coloque la bandeja de accesorios en la caja sobre el protector...

Страница 21: ...c de mousse de maintien sup rieur FR Vuelva a embalar las cajas de accesorios Vuelva a embalar los accesorios kit de herramientas A cartuchos B limpiador de inyectores y botellas de pegamento C y cabl...

Страница 22: ...ur les deux coutures lat rales pour garantir la fermeture des rabats FR Selle la caja Coloque cinta de embalaje a lo largo de la junta central superior de la caja y sobre las juntas de ambos lados par...

Страница 23: ...ndant l exp dition FR Ate la caja de la impresora al pal Instale dos tiras para amarrar la caja de la impresora al pal Las tiras requeridas n mero de pieza 403198 00 no est n incluidas pero se pueden...

Страница 24: ...22 3D Systems Inc...

Страница 25: ...effectuer correctement la mise niveau du plateau d impression WICHTIGE INFORMATIONEN Bevor Sie mit Ihrem ersten Druck beginnen m ssen Sie den Abstand zwischen Druckerplatte und den Druckstrahlen pr fe...

Страница 26: ...Systems Inc 333 Three D Systems Circle Rock Hill SC 29730 www 3dsystems com 2014 3D Systems Inc All rights reserved PN 401648 00 Rev B Support cubify cubify com Connect facebook com cubify Follow cubi...

Отзывы: