background image

Installing the IntelliJack

10

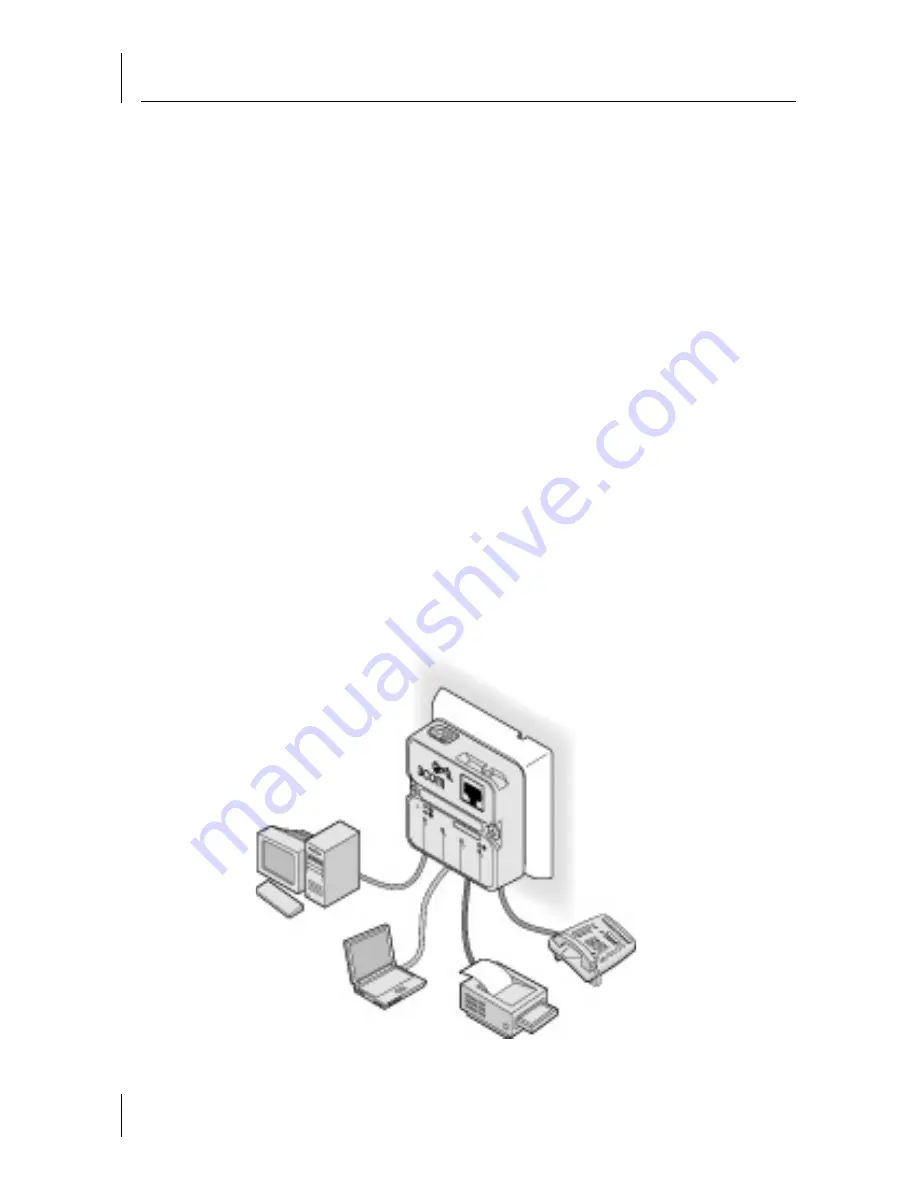
Connecting Devices to the IntelliJack

Once the power source and the data source have been verified in 
good working order and the IntelliJack has been installed and 
mounted, connect your networking devices (such as computers, 
printers, IP phones, cameras, etc.) to the IntelliJack.

The IntelliJack has two ways to connect devices:

1

RJ-45 Personal Area Network (PAN) Ports — any of the four 
switched ports on the bottom of the IntelliJack. All ports feature 
10/100 Mbps auto-negotiation, which configures the NJ105 
IntelliJack for 10 Mbps or 100 Mbps connections automatically.

2

Pass-through port—a single pass-through port is provided 
that allows an additional device to be connected to a 
separate network segment through the same IntelliJack. The 
data or voice traffic that travels through the pass-through 
port, passes through the IntelliJack without being switched.

Содержание IntelliJack NJ105

Страница 1: ...NJ105 IntelliJack 3CNJ105 4 port 10 100 Mbps Unmanaged Ethernet Switch http www 3com com http www 3com com productreg Published July 2003 User guide version 1 0 User Guide...

Страница 2: ...ocument in the hard copy documentation or on the removable media in a directory file named LICENSE TXT or LICENSE TXT If you are unable to locate a copy please contact 3Com and a copy will be provided...

Страница 3: ...al Components 17 Power Supplies and IP Phone Power Module 17 Mounting Plates and Spacers 18 Power Options 19 Using an Integrated Switch with Power Over Ethernet 20 Using Ethernet Multi port Midspan Po...

Страница 4: ...s Technical Support 33 Support from Your Network Supplier 35 Support from 3Com 36 Returning Products for Repair 36 3Com Corporation Limited Warranty 37 Limited Warranty and Regulatory Compliance Infor...

Страница 5: ...the 3Com IntelliJack is installed in the wall making it more secure and out of the way than deploying a remote desktop switch The NJ105 IntelliJack allows up to four networking devices such as compute...

Страница 6: ...ation familiarize yourself with the following items which are included with the NJ105 1 NJ105 IntelliJack 2 Four pairs of M3 5 x 25mm screws two per IntelliJack for mounting the IntelliJack to the wal...

Страница 7: ...match the different mounting locations compatible with the IntelliJack Thread forming screws for mounting into plastic M3 x 30mm 2x M3 x 40mm 2x Machine screws for mounting into metal M3 5 x 30mm 2x M...

Страница 8: ...k ports Four 10 100 Mbps auto negotiation ports which the NJ105 configures for 10 Mbps or 100 Mbps connections automatically green LEDs 2 Port LEDs and corresponding port numbers Indicate network stat...

Страница 9: ...evice For more information see Checking the LEDs on page 12 7 Local power supply cable strain relief Local power supply cable strain relief 8 Power socket The NJ105 can be powered from a local power s...

Страница 10: ...About the NJ105 IntelliJack 6...

Страница 11: ...ork via an Ethernet multi port endspan power supply Over the network via a single port Ethernet power supply Locally via a 3Com local power supply NOTE Power Over Ethernet also known as in line power...

Страница 12: ...ch type of power supply the IntelliJack will use For more information on power options and configuration see Appendix C Power Options Mounting the IntelliJack The IntelliJack mounts in any standard Br...

Страница 13: ...work PAN ports located on the bottom of the IntelliJack The black cable connects the LAN to the single pass through port located on the front of the IntelliJack 3 Choose one pair of the provided screw...

Страница 14: ...t devices 1 RJ 45 Personal Area Network PAN Ports any of the four switched ports on the bottom of the IntelliJack All ports feature 10 100 Mbps auto negotiation which configures the NJ105 IntelliJack...

Страница 15: ...st connect power to the IntelliJack there is a delay of approximately 5 seconds The power LED light blinks once or twice before remaining solid on Off the IntelliJack is not receiving power Power forw...

Страница 16: ...Installing the IntelliJack 12...

Страница 17: ...epending on the device drawing power Network Interface 10 Mbps Ethernet 10BASE T Ethernet IEEE 802 3 industry standard for a 10 Mbps baseband CSMA CD local area network 100 Mbps Ethernet 100BASE TX Et...

Страница 18: ...n speed and duplex mode can also be controlled using the configuration management software Environment Operating temperature 32 to 104 F 0 to 40 C Storage temperature 22 to 194 F 30 to 90 C Operating...

Страница 19: ...ired for networks that do not support Power Over Ethernet Voice Over IP VoIP Compatible with VoIP standard Power forwarding Power forwarding Port number 1 can be used with any standard networking devi...

Страница 20: ...Specifications 16...

Страница 21: ...t Endspan Power Supply For providing Power Over Ethernet to power up to 24 IntelliJacks 802 3af compliant integrated switch 3C17205 Single port Ethernet power supply For providing Power Over Ethernet...

Страница 22: ...5 and NJ205 IntelliJack devices in a UK style two or double gang box 3CNJMP FLR Mounting plate that enables the installation of the NJ105 or NJ205 IntelliJack in a floor box 3CNJMP SPR Mounting plate...

Страница 23: ...m IntelliJack AC Power Supply 3CNJPSL Before you begin the installation determine which type of power supply the IntelliJack will use NOTE For additional information on power supplies that support the...

Страница 24: ...et integrated into it Connect the network data power cable to the IntelliJack white cable as shown in the following illustration NOTE The black cable can also be connected to an Ethernet multi port mi...

Страница 25: ...existing Ethernet or Fast Ethernet infrastructure with standard Category 5 or better cabling and powers up to 24 IntelliJack devices For complete installation instructions see the Ethernet multi port...

Страница 26: ...e black cable can also be connected to Ethernet multi port midspan power supply and will power an IEEE 802 3af device if connected to the pass through port on the IntelliJack but it will not provide p...

Страница 27: ...hernet Power Supply To use a single port Ethernet power supply connect the power supply to the network hub or switch and to the IntelliJack white cable as shown in the following illustration The black...

Страница 28: ...f you are not using a single port or multi port endspan power supply you must purchase a local power supply from 3Com See Appendix B Obtaining Optional Components To power the IntelliJack with a local...

Страница 29: ...2 Plug the power cable into the IntelliJack 3 Check to ensure that the cable is secure in the strain relief 4 Route the cable behind the trim ring from top to bottom 5 Secure the local power supply an...

Страница 30: ...Power Options 26...

Страница 31: ...mplies with the British Standard Institute BSI BS 4664 1970 standard as described below Make sure the distance between the back of the IntelliJack and the inside of the wall or cubicle opening is at l...

Страница 32: ...ing may already be installed If it is not install the cabling following these general guidelines WARNING The NJ105 is designed to be mounted using the provided mounting plate or many after market face...

Страница 33: ...ly that supports Power Over Ethernet If using a local power supply the power supply is plugged into the IntelliJack and into a working electrical outlet Verify the IntelliJack is connected to the netw...

Страница 34: ...Ethernet make sure dip switch settings are correctly set and that cable is connected to both the LAN port on the back of the IntelliJack and to the workgroup switch Link LED is not on IntelliJack has...

Страница 35: ...ble is a good straight through cable Amber LED on Port 1 is not lit Power is not being forwarded to network device Make sure the cable is properly connected to the network device Make sure the cable i...

Страница 36: ...vice Attributes Error Unexpected configuration parameters Confirm that you have specified valid parameter values and retry the configuration operation NOTE This error should not appear to the user und...

Страница 37: ...n World Wide Web site www 3com com One Year Free Installation Support 3Com provides free installation and troubleshooting telephone support for this product for 90 days from the date of purchase Hours...

Страница 38: ...s interactive tool contains technical product information compiled by 3Com expert technical engineers around the globe Located on the World Wide Web at http knowledgebase 3com com this service gives a...

Страница 39: ...and support services When you consult your network supplier have the following information ready Product model name part number and serial number A list of system hardware and software including revis...

Страница 40: ...istance have the following information ready Product model name part number and serial number A list of system hardware and software including revision levels Diagnostic error messages Details about r...

Страница 41: ...user FOR NON US CUSTOMERS Where a limited lifetime warranty is not permitted by local law a 10 year warranty period shall be given by 3Com The duration of this warranty shall be modified where necessa...

Страница 42: ...Com shall not be responsible for any software firmware information or memory data of Customer contained in stored on or integrated with any products returned to 3Com for repair whether under warranty...

Страница 43: ...ALL FAIL OF ITS ESSENTIAL PURPOSE Some countries states or provinces do not allow the exclusion or limitation of implied warranties or the limitation of incidental or consequential damages for certain...

Страница 44: ...is equipment in a residential area is likely to cause harmful interference in which case the user will be required to correct the interference at the user s own expense Changes or modifications not ex...

Отзывы: