background image


4-1


4  

Starting and Configuring the Switch 

Setting up the Configuration Environment 

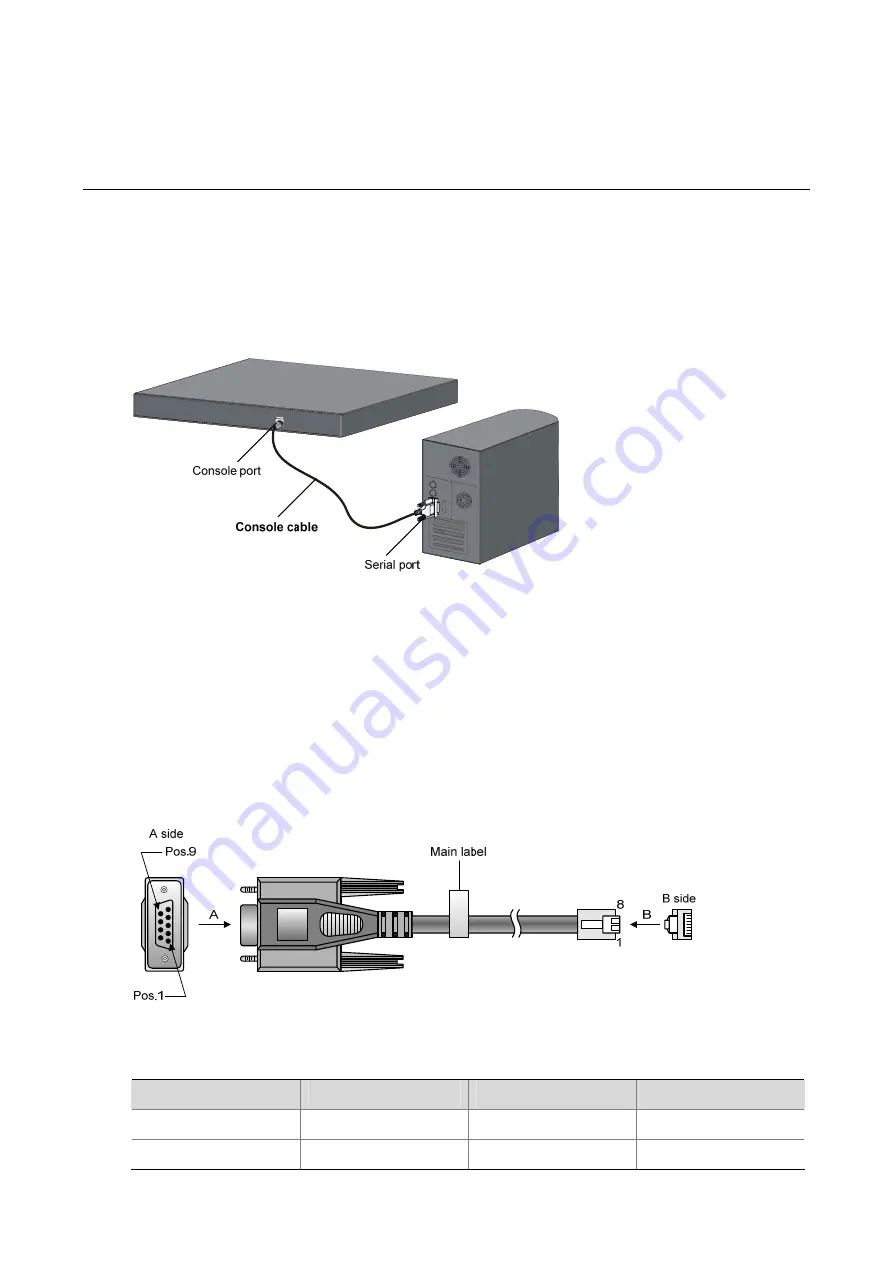
Set up the configuration environment as follows: 

Connect a terminal (a PC in this example) to the console port on the switch with a console cable.  

Figure 4-1 

Network diagram for configuration environment setup 


Connecting the Console Cable 

Console Cable 

A console cable is an 8-core shielded cable. One end of the cable is a crimped RJ-45 connector, which 
is connected to the console port of the switch, and the other end is a DB-9 female connector, which is 
connected to the serial port on the console terminal, as shown below. 

Figure 4-2 

Console cable 


Table 4-1 

Console cable pinouts 

RJ-45 

Signal 

Direction 

DB-9 

1 RTS 

 7 

2 DTR 

 4 

Содержание 4210G Series

Страница 1: ...3Com Switch 4210G Family Getting Started Guide Manual Version 6W100 20100203 www 3com com 3Com Corporation 350 Campus Drive Marlborough MA USA 01752 3064...

Страница 2: ...cial license for the Software Technical data is provided with limited rights only as provided in DFAR 252 227 7015 Nov 1995 or FAR 52 227 14 June 1987 whichever is applicable You agree not to remove o...

Страница 3: ...how to load Boot ROM and host software for the 3Com Switch 4210G Family 6 Maintenance and Troubleshooting Introduces the problems that might occur during the installation and the booting of the 3Com...

Страница 4: ...re successful configuration or good performance Means a complementary description Means techniques helpful for you to make configuration with ease Related Documentation In addition to this manual each...

Страница 5: ...l Interface Modules 1 15 Short haul Dual Port 10 GE CX4 Interface Module 1 15 Dual Port 10 GE XFP Interface Module 1 16 One port 10 GE XFP Interface Module 1 17 Dual Port 10 GE SFP Interface Module 1...

Страница 6: ...uration Environment 4 1 Connecting the Console Cable 4 1 Console Cable 4 1 Connection Procedure 4 2 Setting Terminal Parameters 4 2 Booting the Switch 4 5 Checking before Powering on the Switch 4 5 Po...

Страница 7: ...iii Configuration System Failure 6 4 Troubleshooting when there is no terminal display 6 4 Troubleshooting when the terminal display is illegible 6 4...

Страница 8: ...WR 24 Port 4210G PWR 48 Port Physical dimensions H W D 43 6 440 300 mm 1 72 17 32 11 81 in 43 6 440 420 mm 1 72 17 32 16 54 in Weight 4 4 kg 9 70 lb 4 7 kg 10 36 lb 6 9 kg 15 21 lb 7 4 kg 16 31 lb Man...

Страница 9: ...se use the external RPS power supply units recommended by 3Com only Static power consumption 4210G 24 Port 36 W 4210G NT 24 Port 35 W 4210G 48 Port 55 W 4210G NT 48 Port 54 W 55 W 78 W Power consumpti...

Страница 10: ...rt status LED mode switching button Rear Panel Figure 1 2 Rear panel of the Switch 4210G 24 Port Ethernet switch 1 AC power input 2 RPS power input shipped with a protective cover 3 Grounding screw 4...

Страница 11: ...SFP port status LED Rear Panel Figure 1 4 Rear panel of the Switch 4210G 48 Port Ethernet switch 1 AC power input 2 RPS power input shipped with a protective cover 3 Grounding screw 4 Interface modul...

Страница 12: ...Port status LED mode switching button Rear Panel Figure 1 6 Rear panel of the Switch 4210G PWR 24 Port Ethernet switch 1 RPS power input 2 AC power input 3 Grounding screw 4 Interface module slot 1 MO...

Страница 13: ...rt 12 1000Base X SFP port status LED Rear Panel Figure 1 8 Rear panel of the Switch 4210G PWR 48 Port Ethernet switch 1 RPS power input 2 AC power input 3 Grounding screw 4 Interface module slot 1 MOD...

Страница 14: ...port 4 1000Base X SFP port status LED 5 Console port 6 Seven segment LED 7 Port mode LED Mode 8 System status LED PWR 9 RPS status LED RPS 10 Port status LED mode switching button Rear Panel Figure 1...

Страница 15: ...S status LED RPS 8 Port status LED mode switching button 9 1000Base X SFP port 10 1000Base X SFP port status LED Rear Panel Figure 1 12 Rear panel of the Switch 4210G NT 48 Port Ethernet switch 1 AC p...

Страница 16: ...rt specifications Item Specification Connector type RJ 45 Interface standard z 10 Mbps full duplex z 100 Mbps full duplex z 1000 Mbps full duplex z MDI MDI X auto sensing Max transmission distance 100...

Страница 17: ...igabitEthernet1 0 46 GigabitEthernet1 0 50 GigabitEthernet1 0 48 GigabitEthernet1 0 51 GigabitEthernet1 0 45 Switch 4210G 48 Port Switch 4210G NT 48 Port Switch 4210G PWR 48 Port GigabitEthernet1 0 52...

Страница 18: ...ch 4210G 48 Port Switch 4210G NT 24 Port and Switch 4210G NT 48 Port LED Status Description Steady green The AC input is normal and the RPS is in the position or works normally Steady yellow The RPS i...

Страница 19: ...en segment LED Description Flashing green The LED displays the specific numbers one by one POST running The LED displays the POST test ID Flashing red The LED flashes the specific numbers POST failed...

Страница 20: ...61 80 81 100 For example when the LED displays the sign it indicates that the PoE power currently provided by the switch occupies 0 to 20 of the total PoE power that the switch can provide 10 100 1000...

Страница 21: ...yellow The port operates in half duplex mode the LED is fast flashing when data is being sent and or received on the port Flashing yellow 3 Hz POST failed on the port Steady yellow duplex mode Off The...

Страница 22: ...itches through these 10 GE ports for IRF implementation Table 1 15 Description of the supported interface modules Model Description Interface quantity and type Remarks 3C17767 Short haul Dual Port 10...

Страница 23: ...le is hot swappable and its maximum transmission distance is 3 m 9 84 ft which is suitable for short distance connections only Table 1 16 CX4 cables supported by the short haul dual port 10 GE CX4 int...

Страница 24: ...M1310 1310 nm 9 125 m single mode optical fiber 10 km 6 21 mi XFP LH40 SM1550 F1 1550 nm LC 9 125 m single mode optical fiber 40 km 24 85 mi z You are recommended to use XFP transceivers of 3Com on th...

Страница 25: ...fiber or an SFP cable provided by H3C For details about the supported SFP transceivers and SFP cables refer to Table 1 18 Table 1 18 SFP transceivers and SFP cables supported by dual port 10 GE SFP i...

Страница 26: ...ription of LEDs of Interface Modules There is a LED for each port on the interface module panel Table 1 19 describes the LEDs Table 1 19 Description of LEDs on interface modules LED Mark Status Descri...

Страница 27: ...damaged severely in case of a fall z Ensure proper ventilation of the equipment room and keep the ventilation vents of the switch free of obstruction z Make sure that the operating voltage is the same...

Страница 28: ...communications failures The following table lists the dust concentration limit Table 2 1 Dust concentration limit in the equipment room Substance Unit Concentration limit Dust Particles m 3 x 10 4 no...

Страница 29: ...r overcurrent caused by lightning strikes Laser Safety The Switch 4210G are Class 1 laser devices When the optical ports on the Switch 4210G are operating do not stare into the optical ports because t...

Страница 30: ...r actions without permission Installation Flow of the Switch Figure 3 1 Hardware installation flow of the switch Start Install the switch to the specified position Connect the ground wire Connect the...

Страница 31: ...the Switch 4210G Method Model Use front mounting brackets Use front mounting brackets and a tray Use front and rear mounting brackets Switch 4210G 24 Port Switch 4210G 48 Port Switch 4210G NT 24 Port...

Страница 32: ...11 81 in Standard Switch 4210G PWR 24 Port Switch 4210G PWR 48 Port 43 6 440 420 mm 1 72 17 32 16 54 in Standard Standard Use Front Mounting Brackets to Install a Switch Only the Switch 4210G 24 Port...

Страница 33: ...g Brackets and a Tray to Install a Switch All models of the Switch 4210G support installation using front mounting brackets together with a tray Follow these steps to install a switch into a 19 inch s...

Страница 34: ...nting brackets and fix one end of mounting brackets to the switch as shown in Figure 3 4 Step4 Take out the load bearing screws packed together with the rear mounting brackets and place them in a prop...

Страница 35: ...re 3 8 Figure 3 8 Fix front and rear mounting brackets 1 1 7 3 4 5 6 2 1 Front square holed post 2 Load bearing screw Used to bear the weight 3 Rear panel 4 Rear square holed post 5 Rear mounting brac...

Страница 36: ...el 2 Rear square holed post 3 Load bearing screw 4 Rear mounting bracket Step7 Fix the other end of the front mounting brackets to the front brackets with screws and captive nuts and ensure that front...

Страница 37: ...orkbench In many cases standard 19 inch racks are not available Therefore switches are often placed on clean workbenches To place your switch on a workbench you simply need to z Make sure that the wor...

Страница 38: ...rip is available at the installation site attach one end of the yellow green grounding cable PGND cable of the switch to the grounding screw on the grounding strip the grounding screw and the groundin...

Страница 39: ...ure 3 12 Connect the PGND cable to the grounding strip 1 Grounding post 2 Grounding strip 3 PGND cable 4 Hex nut The fire main and lightning rod of a building are not suitable for grounding the switch...

Страница 40: ...tribution room or AC transformer side the switch PE terminal and the PE wire are well connected and the three wire input cable of the PGND cable is used for the power supply cable If the PE wire of th...

Страница 41: ...Step1 Wear an ESD preventive wrist strap ensure a good skin contact and make sure that the ESD preventive wrist strap is properly grounded Step2 Install the bail latch to prevent the AC power cord fro...

Страница 42: ...4210G NT 24 Port and Switch 4210G NT 48 Port can work with RPS500 A3 using its 12 V 10 5 A output and a 0404A03C power cord Procedures for connecting the RPS power cords are the same for these three m...

Страница 43: ...s ON If yes the power is properly connected Connecting the RPS Power Cord of the Switch 4210G PWR 24 Port and Switch 4210G PWR 48 Port The Switch 4210G PWR 24 Port and Switch 4210G PWR 48 Port can wor...

Страница 44: ...al of various interface modules are similar This section describes the installation and removal of the Dual Port 10 GE XFP Interface Module 3C17766 for illustration Installing an Interface Card Step1...

Страница 45: ...loosen the captive screws at both sides of the interface module until all spring pressure is released Step3 Pull the interface module towards you along the guide rails until it completely comes out of...

Страница 46: ...Put on an ESD preventive wrist strap and verify the ESD preventive wrist strap properly grounded Step2 Hold the plug of the CX4 cable pull the handle at the end of the plug to horizontally unplug the...

Страница 47: ...dules and cables z Physical connection mode daisy chain connection or ring connection z Cable connection For details see Drawing a Plan for an IRF with Switches 2 Install the IRF members to the correc...

Страница 48: ...ementing an IRF of switches draw a plan according to actual conditions of the user network and network devices and take the following points into consideration Determine the number of IRF members and...

Страница 49: ...ve Figure 3 26 The ring connection mode Each of the devices comprising a ring connection or non edge devices in a daisy chain connection needs two 10 GE ports to connect other devices therefore you ne...

Страница 50: ...are adopted in an IRF with ports operating in the aggregation mode ports of MOD 1 can only be connected to ports of MOD 2 and the locations of the ports of the interface modules are not limited Figur...

Страница 51: ...as the power label on the switch z Check whether the ground wire is connected z Check whether the power cords are connected correctly z Check whether all the interface cables are routed indoors If th...

Страница 52: ...m for configuration environment setup Connecting the Console Cable Console Cable A console cable is an 8 core shielded cable One end of the cable is a crimped RJ 45 connector which is connected to the...

Страница 53: ...he switch z When disconnecting a PC from a powered on switch you are recommended to disconnect the DB 9 connector of the console cable from the PC after disconnecting the RJ 45 connector from the swit...

Страница 54: ...nter the HyperTerminal window The Connection Description dialog box appears as shown below Figure 4 3 Connection description of the HyperTerminal Step2 Type the name of the new connection in the Name...

Страница 55: ...Bits per second to 19200 Data bits to 8 Parity to None Stop bits to 1 and Flow control to None Figure 4 5 Set the serial port parameters Step4 Click OK after setting the serial port parameters and th...

Страница 56: ...ord and ground cable are properly connected z The power supply voltage is consistent with that required by the switch z The console cable is properly connected the terminal which can be a PC used for...

Страница 57: ...ging the Startup Mode z If you press Ctrl B within 1 second the system displays Password Enter the correct Boot ROM password and click Enter to enter the Boot Menu By default no password is set and yo...

Страница 58: ...operation or press a key other than Ctrl B within one second Once the remaining waiting time becomes zero the system begins to automatically start up and the following information is displayed Auto b...

Страница 59: ...rtup mode Yes or No Y N Enter Y The system displays the following information Setting startup mode done BOOT MENU 1 Download application file to flash 2 Select application file to boot 3 Display all f...

Страница 60: ...B within five seconds the system begins to automatically start up and the following information is displayed Auto booting Decompress Image OK Board checking LSP1LTSUD SDRAM fast selftest OK Flash fas...

Страница 61: ...witch now The Switch 4210G provide abundant command views For detailed descriptions about the configuration commands and CLI refer to 3Com Switch 4210G Family Configuration Guide 3Com Switch 4210G Fam...

Страница 62: ...TP Through Ethernet Port Loading Software Using FTP Loading files through the CLI Loading Software Using TFTP The Boot ROM software version must match the host software version when you load the Boot...

Страница 63: ...aiting time here is one second If you set the startup mode to normal this waiting time is five seconds For the setting of the startup mode refer to the section Changing the Startup Mode Input the corr...

Страница 64: ...ceiving program sends an acknowledgement packet and the sending program proceeds to send another packet otherwise the receiving program sends a negative acknowledgement packet and the sending program...

Страница 65: ...0 0 Return Enter your choice 0 5 3 Set the download rate of the console port on the switch Select an appropriate download rate For example if you select 115200 bps that is enter 5 the following inform...

Страница 66: ...he console port on the switch Step1 Select Call Disconnect in the HyperTerminal window to disconnect the terminal from the switch Figure 5 1 Disconnect the terminal from the switch Step2 Select File P...

Страница 67: ...ction The new settings can take effect only after you reestablish the connection 5 Download the Boot ROM file Step1 Press Enter in the HyperTerminal window to start downloading the program The system...

Страница 68: ...re 5 6 Page for file sending After the Boot ROM file is downloaded the terminal displays the following information CCCCCCCCCCCCCCCCCCCCCCCCCCCCCCCCCCdone Bootrom updating done Your baudrate should be...

Страница 69: ...he switch The system displays the following information 1 Set TFTP protocol parameter 2 Set FTP protocol parameter 3 Set XMODEM protocol parameter 0 Return to boot menu Enter your choice 0 3 3 To load...

Страница 70: ...nter your choice 0 3 Step4 Select 1 in the Boot ROM update menu to download the Boot ROM software using TFTP Then set the following TFTP related parameters as required Load File name update btm Switch...

Страница 71: ...rotocol parameter 0 Return to boot menu Enter your choice 0 3 1 To load the host software through XMODEM select 1 The subsequent steps are almost the same as those for loading the Boot ROM software ex...

Страница 72: ...load the Boot ROM software using FTP Then set the following FTP related parameters as required Load File name update btm Switch IP address 10 1 1 2 Server IP address 10 1 1 1 FTP User Name 4210G FTP U...

Страница 73: ...ameter 0 Return to boot menu Enter your choice 0 3 2 To load the host software through FTP select 2 The subsequent steps are almost the same as those for loading the Boot ROM software except that the...

Страница 74: ...bin Step4 Restart the switch to make the updated host software and the Boot ROM file effective Sysname reboot Before restarting the switch make sure other configurations are all saved to avoid the lo...

Страница 75: ...of the software to be loaded and the correct working path of TFTP server when using FTP verify that you have specified the correct server and switch IP addresses the correct name of the software to be...

Страница 76: ...he following z Check whether the AC power cord is well connected to the switch whether the AC receptacle on the switch and the AC power socket are faulty z Check whether the external AC power supply s...

Страница 77: ...switch and the AC power socket are faulty z Check whether the AC external power supply system is normal 3 The system status LED is on but the RPS status LED is off An RPS input failure occurs Then do...

Страница 78: ...tally illegible Troubleshooting when there is no terminal display If there is no output information after the configuration is powered on please check whether z The power supply is normal z The consol...

Отзывы: