


139
■
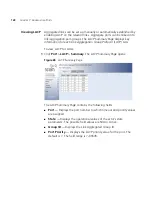
Select the VLANs to apply this change to
— Defines the VLAN ID to
which the port is to be assigned.
2
Select a port.
3
Select the port’s membership type.
4
Enter the VLAN ID to be assigned to the port.
5
Click
. The VLANs are configured, and the device is updated.
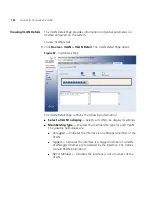
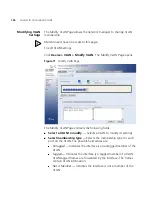
Removing VLANs
The
VLAN Remove Page
allows the network administrator to remove
VLANs.
Monitor users have no access to this page.
To delete VLANs:
1
Click
Device > VLAN > Remove
. The
VLAN Remove Page
opens:
Figure 73
VLAN Remove Page
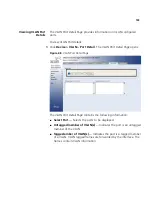
The
VLAN Remove Page
contains the following fields:
■
ID
— Displays the VLAN ID.
■
Name
— Displays the user-defined VLAN name.
■
Select All
— Allows the user to select the entire table to be removed.
■
Select None
— Deselects all entries in the VLAN list.
2
Select the VLAN IDs to be deleted.
3
Click
. The selected VLANs are deleted, and the device is
updated.
Содержание 3CRDSF9PWR-US - OfficeConnect Managed Fast Ethernet PoE...
Страница 6: ...6 ABOUT THIS GUIDE...
Страница 14: ......
Страница 102: ...102 CHAPTER 4 MANAGING DEVICE SECURITY...
Страница 112: ...112 CHAPTER 5 MANAGING SYSTEM INFORMATION...
Страница 120: ...120 CHAPTER 6 CONFIGURING PORTS...
Страница 130: ...130 CHAPTER 7 AGGREGATING PORTS 3 Click The LACP Link Aggregation is modified and the application is updated...
Страница 140: ...140 CHAPTER 8 CONFIGURING VLANS...
Страница 198: ...198 CHAPTER 14 MANAGING SYSTEM FILES...
Страница 203: ...203 2 Define the fields 3 Click The settings are applied to the selected ports and the device is updated...
Страница 204: ...204 CHAPTER 15 MANAGING POWER OVER ETHERNET DEVICES...
Страница 228: ...228 APPENDIX A 3COM NETWORK MANAGEMENT...
Страница 234: ...234 APPENDIX B DEVICE SPECIFICATIONS AND FEATURES...
Страница 238: ...238 APPENDIX C PIN OUTS...
Страница 256: ......


