background image

96

K

APITEL

 2: 3C

OM

 E

MAIL

 F

IREWALL


INSTALLIEREN

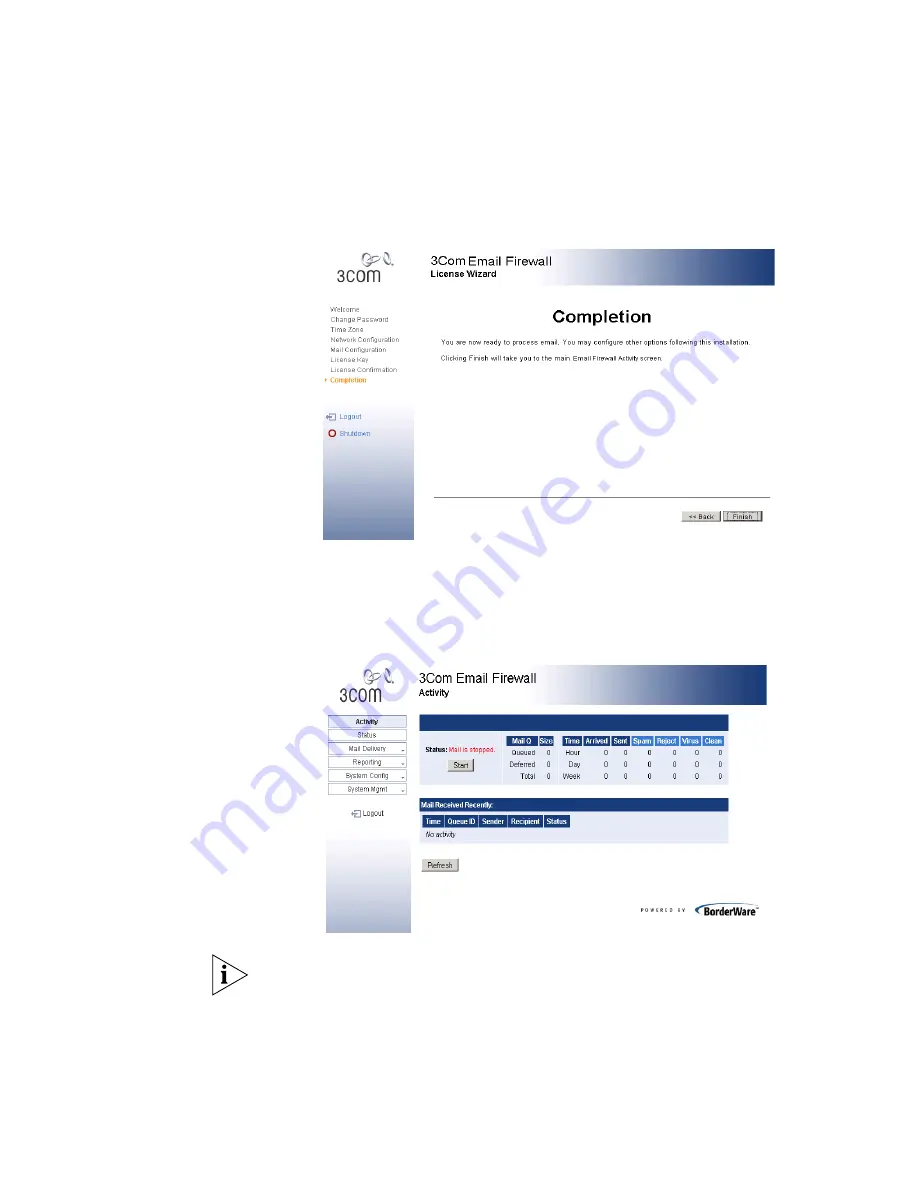
8 Die 3Com Email Firewall ist nun lizenziert und die Installation ist 

abgeschlossen. Klicken Sie Finish, um fortzufahren.

9 Nun erscheint der 3Com Email Firewall-Bildschirm 

Activity

.


Der Mail-Service ist direkt nach der Installation zunächst unterbrochen. 
Klicken Sie Start, um die Mail-Verarbeitung zu beginnen.

Nachdem Sie Start geklickt haben, erscheint u. U. eine Meldung, dass die 

Anti-Virus-Updates noch  nicht durchgeführt wurden. Nach der 

Installation wird der erste Update erst nach 60 Minuten durchgeführt. Sie 

können zu Mail Delivery -> Anti-Virus gehen, um einen sofortigen Update 

zu starten.

Содержание 3CR3MFA-92

Страница 1: ... FR EN DE IT ES Email Firewall Installation Guide Installation Guide for the 3Com Email Firewall Guide d installation pour le 3Com Email Firewall 3Com Email Firewall Installationsanleitung Guida all installazione di 3Com Email Firewall Guía de instalación de Firewall 3Com Email ...

Страница 2: ...2 227 7015 Nov 1995 or FAR 52 227 14 June 1987 whichever is applicable You agree not to remove or deface any portion of any legend provided on any licensed program or documentation contained in or delivered to you in conjunction with this Installation Guide Unless otherwise indicated 3Com registered trademarks are registered in the United States and may or may not be registered in other countries ...

Страница 3: ...gs 11 Modifying the Firewall Router Configuration 12 2 INSTALLING THE 3COM EMAIL FIREWALL Connect the 3Com Email Firewall to a Network 13 Connect to the 3Com Email Firewall via a Web Browser 14 Using the Setup Wizard 15 License Agreement 16 Anti Virus License Agreement 16 Change Password 17 Set Time Zone 17 Network Configuration 18 Mail Configuration 19 Completion 20 Using the Licensing Wizard 21 ...

Страница 4: ...vices 26 Network Services 26 Modify Internal Mail Server 27 Exchange 5 5 27 Exchange 2000 27 Testing Outbound Mail Delivery 28 Testing Inbound Mail Delivery 29 A CONFIGURING YOUR COMPUTER S IP ADDRESS Windows XP 31 Windows 2000 33 ...

Страница 5: ...managing the 3Com Email Firewall It assumes a working knowledge of TCP IP network and email communications protocols For more detailed information on 3Com Email Firewall configuration please see the accompanying User Guide If release notes are shipped with your product and the information there differs from the information in this guide follow the instructions in the release notes Most user guides...

Страница 6: ...eholders that appear in angle brackets Example To change your password use the following syntax system password password In this example you must supply a password for password Commands The word command means that you must enter the command exactly as shown and then press Return or Enter Commands appear in bold The words enter and type When you see the word enter in this guide you must type someth...

Страница 7: ...ocumentation Comments Your suggestions are very important to us They will help make our documentation more useful to you Please send comments about this document to 3Com via the following URL http www 3com com corpinfo en_US contactus index html Please include the following information when contacting us Document title Document part number on the title page Page number if appropriate Example 3Com ...

Страница 8: ...8 ABOUT THIS GUIDE ...

Страница 9: ...Configuration Worksheet Modifying the Firewall Router Configuration Registering your 3Com Email Firewall Before installation you must register your 3Com Email Firewall License Key with 3Com The License Key will be used during the installation process to license and activate the 3Com Email Firewall Using a web browser go to the following URL http esupport 3com com If you do not have an eSupport use...

Страница 10: ... situated between your mail servers and the Internet so that there are no direct SMTP Simple Mail Transport Protocol connections between external and internal servers The 3Com Email Firewall is installed behind the existing firewall on the Internal network Inbound mail will be forwarded from the Firewall or Router to the 3Com Email Firewall where it will be scanned processed and then sent to your ...

Страница 11: ...first time you will need to have the following information on hand Use the included Configuration Worksheet to record these items Hostname The Hostname assigned to the 3Com Email Firewall such as mail in mail example com Domain The Domain Name associated with the assigned Hostname This is typically the domain that email is being processed for such as example com IP Address Enter the IP address you...

Страница 12: ...80 Proxy Username and Password Enter a username and password for the proxy server Modifying the Firewall Router Configuration For the 3Com Email Firewall to function properly various networking ports or proxies must be configured on your firewall or router The following table describes the list of ports required Table 3 Firewall Router Port Configuration Port Description From Internet To Internet ...

Страница 13: ... Using the Setup Wizard Using the Licensing Wizard Connect the 3Com Email Firewall to a Network Install and connect the 3Com Email Firewall as follows 1 Unpack the 3Com Email Firewall cables and documentation 2 Connect the power cable from a power source to your 3Com Email Firewall 3 To begin the installation and configuration of the 3Com Email Firewall you must first connect directly to it using ...

Страница 14: ...t 3 The default IP address used by the 3Com Email Firewall is 192 168 1 253 Reconfigure your computer s local network settings to use an address on the same network Use the IP address 192 168 1 252 with a subnet mask of 255 255 255 0 See Appendix A on page 31 for instructions on changing your computer s IP address If there are existing systems on the network using these addresses use a crossover E...

Страница 15: ... Wizard will guide you through the installation of the 3Com Email Firewall Click the Next button to continue with the initial configuration of the 3Com Email Firewall During the installation you can always go back to a previous screen by clicking the Back button ...

Страница 16: ...mplete the initialization phase by reading and accepting the license agreement Read the license agreement select I Accept and then click Next to continue Anti Virus License Agreement You must read and accept the Anti Virus software license agreement before continuing Read the license agreement select Accept and then click Next to continue ...

Страница 17: ...ew password Choose a secure password of at least 8 characters in length and include a mixture of upper and lowercase alphabetic characters numbers and special characters such as the symbol The password is case sensitive and you can use both upper and lower case characters Click Next to continue Set Time Zone Set your region country and time zone Click Next to continue ...

Страница 18: ... IP Address Enter the IP address for this 3Com Email Firewall The default is 192 168 1 253 and you can use this address if it does not conflict with any other internal systems Net Mask Enter the appropriate net mask for your network If your IP address is 192 168 1 253 then the net mask will be 255 255 255 0 Gateway Enter the default gateway for this 3Com Email Firewall This is typically the hostna...

Страница 19: ... email address for the administrator of this 3Com Email Firewall Notifications will go to this email address Anti Spam Action Set your default action for the 3Com Email Firewall s Anti Spam features The choices are as follows Disabled The Anti Spam features are disabled Modify Subject Headings Anti Spam features are enabled Messages determined to be spam will have their subject field modified with...

Страница 20: ...a valid user name for the proxy server Password Enter and confirm a corresponding password for the user name entered above Click Next to continue Completion You have completed the initial configuration of the 3Com Email Firewall Ensure that you read the final instructions on the Setup Wizard s Completion screen Click Finish to shutdown the system When the 3Com Email Firewall is shutdown connect th...

Страница 21: ... Internet The 3Com Email Firewall will be using the new IP address that you set during the network configuration 2 Power on the 3Com Email Firewall Wait at least 1 to 2 minutes for the system to start before trying to connect 3 Set the IP address of your configuration computer to an address used on the same network See Appendix A on page 31 for detailed information on changing your computer s IP A...

Страница 22: ...TALLING THE 3COM EMAIL FIREWALL 6 Enter your License Key and click Next to continue 7 Confirm your registration information by ensuring your System ID and License Key information are correct and click Next to continue ...

Страница 23: ... now be displayed The mail services are initially in a stopped state after installation Click the Start button to start the mail processing After clicking Start you may receive a message that the Anti Virus updates have not been completed After installation the first update will not occur for a default 60 minutes You can go to Mail Delivery Anti Virus to initiate an immediate update ...

Страница 24: ...24 CHAPTER 2 INSTALLING THE 3COM EMAIL FIREWALL ...

Страница 25: ... Email Firewall and includes the following topics Checking the 3Com Email Firewall s Status Modify Internal Mail Server Testing Outbound Mail Delivery Testing Inbound Mail Delivery Checking the 3Com Email Firewall s Status When the installation is complete select Status from the main menu to determine if all services and servers are functioning ...

Страница 26: ...ver If it is inaccessible check the internal mail server to ensure that it is running Perform network tests to ensure you have connectivity between the 3Com Email Firewall and the internal mail server Gateway Indicates your connection to the local gateway which is typically your router If the gateway is inaccessible ensure that it is up and running and perform network tests to ensure connectivity ...

Страница 27: ...systems use the following procedure 1 Open Exchange Administrator 2 Go to Organization Site Configuration Connections Internet Mail Service Properties 3 In the Connections tab go to the Message Delivery section and in the dialog box Forward all messages to host enter the IP address of the 3Com Email Firewall Exchange 2000 For Exchange 2000 systems use the following procedure 1 Open Exchange System...

Страница 28: ... an updated view 3 Check the email mailbox of the destination external user to ensure the mail was delivered In this scenario the mail message should use the following route Internal mail client to your internal mail server Internal mail server to the 3Com Email Firewall 3Com Email Firewall to the Firewall Router Firewall Router to the external destination mail client If your message was not deliv...

Страница 29: ...internal mail client 3 Check the Activity page of the 3Com Email Firewall to ensure the mail message shows up in the Mail Received Recently section Click the Refresh button to provide an updated view In this scenario the mail message should use the following route External mail client to your Firewall Router Firewall Router to the 3Com Email Firewall 3Com Email Firewall to the internal mail server...

Страница 30: ...30 CHAPTER 3 POST INSTALLATION TASKS ...

Страница 31: ... it from a computer on the same network The following instructions will guide you through the steps to change your configuration computer s IP address settings to connect to the 3Com Email Firewall Windows XP To modify your network settings on a Windows XP system 1 Click the Start button and select Control Panel 2 Click Network and Internet Connections and then double click the Network Connections...

Страница 32: ...on 5 Copy down your current settings as you will need to restore them when the 3Com Email Firewall installation is complete 6 Enter the IP Address 192 168 1 252 with a subnet mask of 255 255 255 0 Leave the other fields blank 7 Click the OK button to complete the Advanced setup 8 Click OK button to complete the TCP IP setup ...

Страница 33: ...e Start button and select Settings Control Panel 2 Click Network and Dial up Connections and then double click the Network Connections icon 3 Right click on Local Area Connection and select Properties 4 Select Use the following IP address and enter 192 168 1 252 and 255 255 255 0 for the Subnet mask ...

Страница 34: ...34 APPENDIX A CONFIGURING YOUR COMPUTER S IP ADDRESS 5 Click OK In the Local Area Connection Properties dialog box click OK 6 Close the Network and Dial up Connections window ...

Страница 35: ...http www 3com com Pièce no DIA MFA100 AAA01 Publié en janvier 2005 Guide d installation du Email Firewall Guide d installation pour le 3Com Email Firewall ...

Страница 36: ...2 227 7015 Nov 1995 or FAR 52 227 14 June 1987 whichever is applicable You agree not to remove or deface any portion of any legend provided on any licensed program or documentation contained in or delivered to you in conjunction with this Installation Guide Unless otherwise indicated 3Com registered trademarks are registered in the United States and may or may not be registered in other countries ...

Страница 37: ...e la configuration du coupe feu routeur 47 2 INSTALLATION DU COUPE FEU 3COM EMAIL FIREWALL Connexion du 3Com Email Firewall au réseau 49 Connexion au coupe feu 3Com Email Firewall via un navigateur Web 50 Utilisation de l assistant d installation 51 Licence 52 Licence anti virus 52 Modification du mot de passe 53 Réglage du fuseau horaire 54 Configuration du réseau 54 Configuration du courrier 55 ...

Страница 38: ...ce réseau 62 Modification du serveur interne de courrier 63 Exchange 5 5 63 Exchange 2000 63 Essai de livraison du courrier sortant 64 Essai de livraison du courrier entrant 65 A CONFIGURATION DE L ADRESSE IP DE VOTRE ORDINATEUR Windows XP 67 Windows 2000 69 ...

Страница 39: ...t la gestion du 3Com Email Firewall Ce guide sous entend une connaissance pratique des protocoles de réseau TCP IP et de communication par courrier Pour de plus amples renseignements sur la configuration du 3Com Email Firewall veuillez consulter le guide de l utilisateur fourni Veuillez suivre les instructions des mises à jour livrées avec votre produit si celles ci diffèrent des instructions du g...

Страница 40: ...ot syntax apparaît vous devez évaluer la syntaxe fournie puis saisir les valeurs appropriées dans les paramètres substituables qui s affichent entre les parenthèses en chevron Par exemple Utilisez la syntaxe suivante pour modifier votre mot de passe system password password Dans cet exemple vous devez saisir un mot de passe dans password Commands Vous devez saisir la commande exactement telle qu i...

Страница 41: ...suggestions sont très importantes pour nous Elles nous aideront à rendre notre documentation plus pratique pour vous Veuillez faire parvenir vos remarques à propos de ce document à 3Com via l URL suivant http www 3com com corpinfo en_US contactus index html Veuillez inclure les renseignements suivants dans votre correspondance Titre du document Numéro de pièce du document affiché sur la page titre...

Страница 42: ...ll Pièce numéro DIA MFA100 AAA01 Page 25 Veuillez noter que nous pouvons répondre uniquement aux remarques et aux questions relatives à la documentation des produits 3Com Communiquez avec votre fournisseur réseau pour les questions relatives au soutien technique ou aux ventes ...

Страница 43: ...wall Utilisation du formulaire de configuration Modification de la configuration du coupe feu routeur Enregistrement de votre coupe feu 3Com Email Firewall Vous devez enregistrer la clé de la licence de votre coupe feu 3Com Email Firewall auprès de 3Com avant de débuter l installation Cette clé sera utilisée au cours du processus d installation pour licencier et activer le coupe feu 3Com Email Fir...

Страница 44: ... place du coupe feu 3Com Email Firewall Le coupe feu 3Com Email Firewall est conçu pour servir d interface entre votre serveur de courrier et l Internet pour éviter des connexions directes SMTP Simple Mail Transport Protocol entre des serveurs externes et internes Le 3Com Email Firewall s installe derrière le coupe feu existant sur le réseau interne Le courrier entrant sera acheminé à partir du co...

Страница 45: ...ignements suivants facilement accessibles Utilisez le formulaire de configuration fourni pour noter ces données Hostname l adresse Internet attribuée au coupe feu 3Com Email Firewall par exemple mail dans mail example com Domain le nom du domaine associé à l adresse Internet attribuée Ce nom est habituellement le domaine par lequel l e mail est traité tel que example com IP Address saisissez l adr...

Страница 46: ...Proxy saisissez un serveur mandataire si vous en utilisez un sur votre réseau Dans ce cas cette information est requise pour le bon fonctionnement de l anti virus l anti spam et les mises à jour de licences Saisissez l adresse suivant le format https hostname port par exemple https proxy example com 8080 Proxy Username and Password saisissez un nom d utilisateur et un mot de passe pour le serveur ...

Страница 47: ...Email Firewall Le tableau suivant décrit les ports requis Tableau 3 Configuration ports p coupe feu routeur Port Description De l Internet Vers l Internet Du réseau interne Vers le réseau interne Protocole 21 FTP pour les systèmes de secours TCP 25 SMTP TCP 53 DNS UDP TCP 80 Mises à jour anti virus TCP 123 NTP protocole de synchronisa tion réseau UDP 443 Connexion de la sécurité TCP 443 Accès admi...

Страница 48: ...48 CHAPITRE 1 TÂCHES AVANT INSTALLATION ...

Страница 49: ...eu 3Com Email Firewall via un navigateur Web Utilisation de l assistant d installation Utilisation de l assistant de licence Connexion du 3Com Email Firewall au réseau Suivez les étapes suivantes pour installer et relier le coupe feu 3Com Email Firewall 1 Déballez le coupe feu 3Com Email Firewall les câbles et la documentation 2 Reliez le cordon d alimentation à votre 3Com Email Firewall Branchez ...

Страница 50: ...1 Assurez vous que le coupe feu 3Com Email Firewall et votre ordinateur sont bien reliés sur le réseau soit directement soit via un concentrateur ou un routeur 2 Mettez le 3Com Email Firewall sous tension Attendez au moins 1 à 2 minutes pour que le système soit complètement fonctionnel avant d essayer de vous connecter 3 Le 192 168 1 253 est l adresse IP par défaut utilisée par le coupe feu 3Com E...

Страница 51: ... la barre d adresse 5 Ouvrez une session avec le nom d utilisateur admin et le mot de passe par défaut admin L écran d accueil de l assistant d installation s affichera Utilisation de l assistant d installation L assistant d installation vous guidera tout au long de l installation du coupe feu 3Com Email Firewall Cliquez sur le bouton Next pour poursuivre la configuration initiale du 3Com Email Fi...

Страница 52: ...ités de la licence pour compléter la phase d initialisation Lisez les modalités de la licence sélectionnez I Accept puis cliquez sur Next pour poursuivre Licence anti virus Lisez et acceptez les modalités de la licence du logiciel anti virus avant de poursuivre Lisez les modalités de la licence sélectionnez Accept puis cliquez sur Next pour poursuivre ...

Страница 53: ... par défaut admin puis saisissez et confirmez un nouveau mot de passe Sélectionnez un mot de passe sûr d une longueur minimale de 8 caractères composé de lettres majuscules et de minuscules de nombres et de symboles spéciaux comme le Le mot de passe est sensible à la casse Utilisez des lettres majuscules et minuscules Cliquez sur le bouton Next pour poursuivre ...

Страница 54: ...ivantes requises à partir de votre formulaire de configuration Hostname saisissez l adresse Internet et non le nom du domaine complet du 3Com Email Firewall telle que mail dans mail example com Domain saisissez le nom du domaine tel que example com IP Address saisissez l adresse IP pour ce coupe feu 3Com Email Firewall L adresse par défaut est 192 168 1 253 Utilisez la si elle n est pas en conflit...

Страница 55: ...courrier requis suivants à partir de votre formulaire de configuration Internal Mail Server Address saisissez l adresse IP ou l adresse Internet du serveur interne de courrier pour acheminer le courrier vers celui ci une fois le traitement effectué par le 3Com Email Firewall Si votre réseau comprend plus d un serveur interne de courrier additionnez les adresses supplémentaires une fois l installat...

Страница 56: ...vec l adresse Internet de 3Com Email Firewall comme données d action Use Secure Proxy sélectionnez la case à cocher pour activer l utilisation d un serveur mandataire si vous en utilisez un sur votre réseau Dans ce cas ce réglage est requis pour le bon fonctionnement de l anti virus l anti spam et les mises à jour de licence Address saisissez l adresse du serveur mandataire selon ce format https h...

Страница 57: ... coupe feu 3Com Email Firewall éteint reliez l interface réseau à un réseau qui sera en mesure d accéder à l Internet L assistant de licence aura besoin de cet accès Internet pour activer votre système auprès de 3Com Utilisation de l assistant de licence Une fois la configuration initiale terminée à l aide de l assistant d installation et le redémarrage de votre coupe feu 3Com Email Firewall effec...

Страница 58: ...il Firewall sous tension Attendez au moins 1 à 2 minutes pour que le système soit fonctionnel avant d essayer de vous connecter 3 Modifiez l adresse IP de votre ordinateur de configuration Saisissez une adresse utilisée sur le même réseau Consultez l Annexe A à la page 67 pour les renseignements spécifiques à la modification de l adresse IP de votre ordinateur 4 Démarrez le navigateur Web de votre...

Страница 59: ...Saisissez la clé de votre licence et cliquez sur le bouton Next pour poursuivre 7 Confirmez votre information d enregistrement en vérifiant l exactitude de votre ID système et la clé de votre licence puis cliquez sur le bouton Next pour poursuivre ...

Страница 60: ...ant Après l installation les services de courrier sont inactifs Cliquez sur le bouton Start pour lancer le traitement du courrier Après avoir cliqué sur le bouton Start vous pouvez recevoir un message indiquant que les mises à jour de votre anti virus sont incomplètes Il existe un délai par défaut de 60 minutes après l installation pour le lancement automatique de la première mise à jour Accédez a...

Страница 61: ...Vérification de l état du coupe feu 3Com Email Firewall Modification du serveur interne de courrier Essai de livraison du courrier sortant Essai de livraison du courrier entrant Vérification de l état du coupe feu 3Com Email Firewall A partir du menu principal sélectionnez Status pour contrôler si tous les services et serveurs sont opérationnels après l achèvement de l installation ...

Страница 62: ... fichier Interface réseau Internal Mail Server affiche l état de votre serveur interne de courrier En cas d inaccessibilité vérifiez si le serveur interne de courrier fonctionne Effectuez les tests de réseau pour contrôler la connexion entre le 3Com Email Firewall et le serveur interne de courrier Gateway affiche votre connexion à la passerelle locale qui est habituellement votre routeur En cas d ...

Страница 63: ...s s appliquent à un serveur Microsoft Exchange Exchange 5 5 Suivez la procédure suivante pour les systèmes Exchange 5 5 1 Accédez à l administrateur Exchange 2 Puis cliquez sur Organization Site Configuration Connections Internet Mail Service Properties 3 Sous l onglet Connections dirigez vous vers la section Message Delivery puis saisissez l adresse IP du 3Com Email Firewall dans la boîte de dial...

Страница 64: ... mettre la page à jour 3 Contrôlez la boîte d entrée de l utilisateur de destination externe pour vérifier la livraison de ce courrier Selon ce scénario le courrier devrait suivre le chemin suivant Courrier de l ordinateur client interne vers le serveur interne de courrier Serveur interne de courrier vers le 3Com Email Firewall 3Com Email Firewall vers le coupe feu routeur Coupe feu routeur vers l...

Страница 65: ...dresse de courrier externe 3 Accédez à la page Activity du coupe feu 3Com Email Firewall pour vérifier la présence du courrier dans la section Mail Received Recently Cliquez sur le bouton Refresh pour mettre la page à jour Selon ce scénario le courrier devrait suivre le chemin suivant Ordinateur client externe vers votre coupe feu routeur Coupe feu routeur vers le 3Com Email Firewall 3Com Email Fi...

Страница 66: ...66 CHAPITRE 3 TÂCHES APRÈS INSTALLATION ...

Страница 67: ...tir d un ordinateur relié au même réseau Les instructions ci dessous vous guideront parmi les étapes à suivre pour effectuer les modifications nécessaires des paramètres d adresse IP de votre ordinateur de configuration afin que vous puissiez vous relier au 3Com Email Firewall Windows XP Pour modifier vos paramètres réseau sur un système Windows XP 1 Cliquez sur le bouton Start puis sélectionnez C...

Страница 68: ... Properties 5 Notez bien vos paramètres actuels car vous les utiliserez plus tard pour les restaurer une fois l installation du 3com Email Firewall complétée 6 Saissez l adresse IP 192 168 1 252 avec le masque de sous réseau 255 255 255 0 Laissez les autres champs en blanc 7 Cliquez sur le bouton OK pour terminer l installation Advanced 8 Cliquez sur le bouton OK pour terminer l installation TCP I...

Страница 69: ...s sélectionnez Settings Control Panel 2 Cliquez sur Network and Dial up Connections puis cliquez deux fois sur l icône Network Connections 3 Cliquez à droite sur Local Area Connection puis sélectionnez Properties 4 Sélectionnez Use the following IP address puis saisissez le 192 168 1 252 et le masque de sous réseau 255 255 255 0 ...

Страница 70: ...0 ANNEXE A CONFIGURATION DE L ADRESSE IP DE VOTRE ORDINATEUR 5 Cliquez sur OK Cliquez sur OK dans la boîte de dialogue Local Area Connection Properties 6 Fermez la fenêtre Network and Dial up Connections ...

Страница 71: ...http www 3com com Teilnr DIA MFA100 AAA01 Veröffentlicht im Januar 2005 Email Firewall Installationsanleitung 3Com Email Firewall Installationsanleitung ...

Страница 72: ...2 227 7015 Nov 1995 or FAR 52 227 14 June 1987 whichever is applicable You agree not to remove or deface any portion of any legend provided on any licensed program or documentation contained in or delivered to you in conjunction with this Installation Guide Unless otherwise indicated 3Com registered trademarks are registered in the United States and may or may not be registered in other countries ...

Страница 73: ...k und Mail Konfigurations Einstellungen 81 Verändern der Firewall Router Konfiguration 83 2 3COM EMAIL FIREWALL INSTALLIEREN 3Com Email Firewall an ein Netzwerk anschließen 85 Über einen Webbrowser Verbindung zur 3Com Email Firewall aufnehmen 86 Verwendung des Setup Assistenten 87 Lizenzvereinbarung 88 Antivirus Lizenzverein barung 88 Kennwort ändern 89 Zeitzone einstellen 90 Netzwerkkonfiguration...

Страница 74: ...erung 98 BorderWare Mail Sicherheitsservice 98 Netzwerk Service 98 Internen Mail Server ändern 99 Exchange 5 5 99 Exchange 2000 99 Testen der Ausgangs Mail Auslieferung 100 Testen der Eingangs Mail Auslieferung 101 A KONFIGURATION DER IP ADRESSE IHRES PCS Windows XP 103 Windows 2000 105 ...

Страница 75: ...mail Firewall verantwortlich ist Sie setzt Kenntnis von TCP IP Netzwerk und Email Kommunikationsprotokollen voraus Weitere Informationen zur 3Com Email Firewall Konfiguration finden Sie in der beiliegenden Bedienungsanleitung Wenn Ihr Produkt mit Versionsinformationen ausgeliefert wurde und die darin enthaltenen Informationen jenen in dieser Anleitung nicht entsprechen befolgen Sie bitte die Anwei...

Страница 76: ...andene Schreibweise deuten und anschließend die entsprechenden Werte in die Platzhalter in der spitzen Klammer einfügen müssen Beispiel Verwenden Sie den folgenden Syntax um Ihr Kennwort zu ändern system password password In diesem Beispiel müssen Sie für password ein Kennwort eingeben Befehle Das Wort command bedeutet dass Sie den Befehl genau so wie vorgegeben eingeben und dann die Eingabetaste ...

Страница 77: ...d bekannten Problemen Dokumentations Anmerkungen Ihre Vorschläge sind uns sehr wichtig Diese helfen dabei Ihnen unsere Dokumentation näher zu bringen Bitte senden Sie Ihre Anmerkungen über den folgenden URL an 3Com http www 3com com corpinfo en_US contactus index html Bitte geben Sie dabei an Titel des Dokuments Teilnummer des Dokuments auf der Titelseite Seitennummer sofern zutreffend Worte in ku...

Страница 78: ...sanleitung Teilnummer DIA MFA100 AAA01 Seite 25 Wir weisen darauf hin dass wir ausschließlich auf Bemerkungen und Fragen zur 3Com Produktdokumentation antworten können Fragen zu technischem Support oder Vertrieb bitte zunächst an Ihren Netzwerk administrator richten ...

Страница 79: ...er Firewall Router Konfiguration Registrieren Ihrer 3Com Email Firewall Vor der Installation müssen Sie Ihren 3Com Email Firewall Lizenzschlüssel bei 3Com registrieren Dieser Lizenzschlüssel wird während des Installationsprozesses zur Lizenzierung und Aktivierung Ihrer 3Com Email Firewall verwendet Gehen Sie in Ihrem Webbrowser auf die folgende URL http esupport 3com com Wenn Sie keinen eSupport B...

Страница 80: ...all ist zur Positionierung zwischen Ihren Mail Servern und dem Internet vorgesehen so dass keine direkten SMTP Simple Mail Transport Protocol Verbindungen zwischen den externen und internen Servern bestehen Die 3Com Email Firewall wird hinter der vorhandenen Firewall auf dem internen Netzwerk installiert Eingehende Mails werden von der Firewall oder dem Router an die 3Com Email Firewall weitergele...

Страница 81: ...onfigurations Einstellungen Wenn die 3Com Email Firewall zum ersten Mal installiert wird müssen Sie folgende Informationen zur Hand haben Notieren Sie diese Informationen auf dem beigefügten Konfigurations Arbeitsblatt Hostname Der der 3Com Email Firewall zugeordnete Hostname wie z B mail bei mail example com Domain Der Domainname der zum zugeordneten Hostnamen gehört Dies ist gewöhnlich das Domai...

Страница 82: ...nachrichtigungen werden an diese Email Adresse gesendet Proxy Geben Sie einen optionalen Proxy Server ein wenn Sie einen in Ihrem Netzwerk verwenden Wenn Sie einen Proxy Server verwenden muss dieser eingegeben werden damit die Antivirus Anti Spam und Lizenzierungs Updates vorschriftsmäßig funktionieren Geben Sie die Adresse in folgendem Format ein https hostname port https proxy example com 8080 P...

Страница 83: ...smäßig funktioniert In der folgenden Tabelle wird die Liste der erforderlichen Ports beschrieben Tabelle 3 Firewall Router Portkonfiguration Port Beschrei bung Vom Internet Zum Internet Vom internen Netzwerk Zum internen Netz werk Protokoll 21 FTP für Systemsi cherungen TCP 25 SMTP TCP 53 DNS UDP TCP 80 Anti Virus Updates TCP 123 NTP Network Time Protocol UDP 443 Sichere Verbindung TCP 443 Sichere...

Страница 84: ...84 KAPITEL 1 AUFGABEN VOR DER INSTALLATION ...

Страница 85: ...enten Verwendung des Lizenz Assistenten 3Com Email Firewall an ein Netzwerk anschließen Die 3Com Email Firewall wie folgt installieren und anschließen 1 Packen Sie die 3Com Email Firewall die Kabel und die Dokumentation aus 2 Das Netzkabel von einer Stromversorgung an die 3Com Email Firewall anschließen 3 Sie müssen sich zuerst von einem anderen Computer aus direkt an die 3Com Email Firewall ansch...

Страница 86: ...inuten ab bis das System vollständig gestartet ist bevor Sie versuchen eine Verbindung herzustellen 3 Die Standard IP Adresse der 3Com Email Firewall ist 192 168 1 253 Konfigurieren Sie die lokalen Netzwerkeinstellungen Ihres PCs erneut sodass eine Adresse im gleichen Netzwerk verwendet wird Verwenden Sie die IP Adresse 192 168 1 252 mit der Subnet Maske 255 255 255 0 Siehe Anhang A auf Seite 103 ...

Страница 87: ...ildschirm des Setup Assistenten Verwendung des Setup Assistenten Der Setup Assistent führt Sie nun durch die Installation der 3Com Email Firewall Klicken Sie Next um mit der ersten Konfiguration der 3Com Email Firewall fortzufahren Während der Installation können Sie jederzeit zum vorigen Bildschirm zurückkehren indem Sie die Schaltfläche Back klicken ...

Страница 88: ... die Lizenzvereinbarung lesen und akzeptieren Lesen Sie die Lizenzvereinbarung und wählen Sie I Accept und klicken Sie anschließend auf Next um fortzufahren Antivirus Lizenzverein barung Sie müssen die Antivirus Lizenzvereinbarung lesen und akzeptieren bevor Sie fortfahren Lesen Sie die Lizenzvereinbarung und wählen Sie Accept und klicken Sie anschließend auf Next um fortzufahren ...

Страница 89: ... Kennwort ein und bestätigen Sie dieses Wählen Sie ein sicheres Kennwort mit einer Zeichenlänge von mindestens 8 Zeichen ein Das Kennwort kann eine Mischung aus Groß und Kleinbuchstaben Zahlen und Sonderzeichen wie z B enthalten Das Kennwort ist groß kleinschreibungsabhängig und Sie können sowohl Groß als auch Kleinschreibung verwenden Klicken Sie Next um fortzufahren ...

Страница 90: ...ext um fortzufahren Netzwerkkonfiguration Geben Sie die folgenden erforderlichen Netzwerk Informationen aus Ihrem Konfigurations Arbeitsblatt ein Hostname Geben Sie den Hostnamen nicht den vollständigen Domain Namen der 3Com Email Firewall ein wie z B mail bei mail example com Domain Geben Sie den Domain Namen ein wie z B example com ...

Страница 91: ...ters Name Server Geben Sie den Hostnamen oder die IP Adresse Ihres DNS Servers ein Klicken Sie Next um fortzufahren Mail Konfiguration Geben Sie die folgenden erforderlichen Mail Konfigurations informationen aus Ihrem Konfigurations Arbeitsblatt ein Internal Mail Server Address Geben Sie die IP Adresse oder den Hostnamen des internen Mail Servers ein an den die Mails gesendet werden nachdem sie vo...

Страница 92: ...er Spam Quarantäneordner umgeleitet Die Aktion wird auf Redirect To eingestellt Hierbei ist der 3Com Email Firewall Hostname gleich den Aktionsdaten Use Secure Proxy Markieren Sie dieses Kästchen um die Verwendung eines Web Proxyservers zu aktivieren falls Sie einen solchen in Ihrem Netzwerk verwenden Wenn Sie einen Proxy Server verwenden ist diese Einstellung erforderlich damit die Antivirus Anti...

Страница 93: ...an das Netzwerk an über das Sie sich mit dem Internet verbinden können Der Lizenz Assistent muss mit dem Internet verbunden sein um Ihr System mit 3Com zu aktivieren Verwendung des Lizenz Assistenten Nach Abschluss der ursprünglichen Konfiguration mit dem Setup Assistenten und dem Neustart der 3Com Email Firewall führt Sie der Lizenz Assistent durch das Verfahren mit dem Sie Ihr System lizenzieren...

Страница 94: ...rtet bevor Sie versuchen mit dem Internet Verbindung aufzunehmen 3 Stellen Sie die IP Adresse Ihres Konfigurations PCs auf eine Adresse ein die auf dem gleichen Netzwerk verwendet wird Siehe Anhang A auf Seite 103 bzgl detaillierter Informationen zum Ändern der IP Adresse Ihres PCs 4 Starten Sie einen Webbrowser auf Ihrem PC und geben Sie die neue IP Adresse der 3Com Email Firewall als URL in die ...

Страница 95: ...E 6 Geben Sie Ihren Lizenzschlüssel ein und klicken Sie Next um fortzufahren 7 Bestätigen Sie Ihre Registrierungsinformationen indem Sie die Richtigkeit Ihrer System ID und Ihres Lizenzschlüssels prüfen und klicken Sie Next um fortzufahren ...

Страница 96: ... Activity Der Mail Service ist direkt nach der Installation zunächst unterbrochen Klicken Sie Start um die Mail Verarbeitung zu beginnen Nachdem Sie Start geklickt haben erscheint u U eine Meldung dass die Anti Virus Updates noch nicht durchgeführt wurden Nach der Installation wird der erste Update erst nach 60 Minuten durchgeführt Sie können zu Mail Delivery Anti Virus gehen um einen sofortigen U...

Страница 97: ... müssen Es umfasst folgende Themen Prüfen des Status der 3Com Email Firewall Internen Mail Server ändern Testen der Ausgangs Mail Auslieferung Testen der Eingangs Mail Auslieferung Prüfen des Status der 3Com Email Firewall Wenn die Installation abgeschlossen ist wählen Sie Status auf dem Hauptmenü um zu prüfen ob alle Funktionen und Server funktionieren ...

Страница 98: ...ers an Ist dieser nicht zugriffsbereit prüfen Sie ob der interne Mail Server läuft Führen Sie Netzwerktests durch um sicherzustellen dass eine Verbindung zwischen der 3Com Email Firewall und dem internen Mail Server besteht Gateway Zeigt Ihre Verbindung zum lokalen Gateway an Dies ist gewöhnlich Ihr Router Wenn nicht auf das Gateway zugegriffen werden kann stellen Sie sicher dass diese vorschrifts...

Страница 99: ...olgenden Anweisungen gelten für einen Microsoft Exchange Server Exchange 5 5 Bei Exchange 5 5 Systemen das folgende Verfahren anwenden 1 Öffnen Sie den Exchange Administrator 2 Gehen Sie auf Organization Site Configuration Connections Internet Mail Service Properties 3 Auf der Registerkarte Connections auf den Abschnitt Message Delivery gehen und im Dialogfeld Forward all messages to host die IP A...

Страница 100: ... Prüfen Sie die Mailbox den Posteingang des externen Empfangs Benutzers um sicherzustellen dass die Mail ankam In diesem Szenario müsste die Mail das System wie folgt durchlaufen Interner Mail Client zu Ihrem internen Mail Server Interner Mail Server zur 3Com Email Firewall 3Com Email Firewall zur Firewall zum Router Firewall Router zum externen Empfangs Mail Client Wenn Ihre Mail nicht ausgeliefe...

Страница 101: ...resse an einen internen Mail Client 3 Sehen Sie auf der Seite Activity der 3Com Email Firewall nach ob die Mail im Abschnitt Mail Received Recently erscheint Klicken Sie Refresh um einen aktuellen Status abzurufen In diesem Szenario müsste die Mail das System wie folgt durchlaufen Externer Mail Client zur Firewall zum Router Firewall Router zur 3Com Email Firewall 3Com Email Firewall zum internen ...

Страница 102: ...102 KAPITEL 3 AUFGABEN NACH DER INSTALLATION ...

Страница 103: ... von einem anderen PC im gleichen Netzwerk verbinden Die folgenden Anweisungen führen Sie durch die Schritte mit denen Sie die Konfiguration der IP Adresseneinstellungen Ihres PCs verändern können um sich mit der 3Com Mail Firewall zu verbinden Windows XP So verändern Sie die Netzwerkeinstellungen auf einem Windows XP Betriebssystem 1 Klicken Sie Start und wählen Sie Control Panel 2 Klicken Sie Ne...

Страница 104: ...ließend die Schaltfläche Properties 5 Notieren Sie Ihre aktuellen Einstellungen da Sie diese nach der Installation der 3Com Email Firewall wieder herstellen müssen 6 Geben Sie die IP Adresse 192 168 1 252 mit einer Subnet Maske von 255 255 255 0 ein Lassen Sie die anderen Felder leer 7 Klicken Sie OK um den Advanced Setup abzuschließen 8 Klicken Sie OK um den TCP IP Setup abzuschließen ...

Страница 105: ... einem Windows 2000 Betriebssystem 1 Klicken Sie Start und wählen Sie Settings Control Panel 2 Klicken Sie Network and Dial up Connections und doppelklicken Sie anschließend auf das Symbol Network Connections 3 Rechtsklicken Sie auf Local Area Connection und wählen Sie Properties ...

Страница 106: ... Wählen Sie Use the following IP address und geben Sie 192 168 1 252 und 255 255 255 0 für die Subnet Maske ein 5 Klicken Sie OK Im Dialogfeld Local Area Connection Properties klicken Sie auf OK 6 Schließen Sie das Fenster Network and Dial up Connections ...

Страница 107: ...http www 3com com Codice DIA MFA100 AAA01 Pubblicato nel gennaio 2005 Email Firewall Guida all installazione Guida all installazione di 3Com Email Firewall ...

Страница 108: ...2 227 7015 Nov 1995 or FAR 52 227 14 June 1987 whichever is applicable You agree not to remove or deface any portion of any legend provided on any licensed program or documentation contained in or delivered to you in conjunction with this Installation Guide Unless otherwise indicated 3Com registered trademarks are registered in the United States and may or may not be registered in other countries ...

Страница 109: ...configurazione del firewall router 118 2 INSTALLAZIONE DI 3COM EMAIL FIREWALL Connessione di 3Com Email Firewall a una rete 119 Connessione di 3Com Email Firewall tramite browser Web 120 Uso dell installazione guidata 121 Contratto di licenza 122 Contratto di licenza antivirus 122 Modifica della password 123 Impostazione del fuso orario 123 Configurazione di rete 124 Configurazione della posta 125...

Страница 110: ...ete 132 Modifica del server della posta interno 133 Exchange 5 5 133 Exchange 2000 133 Verifica del recapito della posta in uscita 134 Verifica del recapito della posta in arrivo 135 A CONFIGURAZIONE DELL INDIRIZZO IP DEL COMPUTER Windows XP 137 Windows 2000 139 ...

Страница 111: ...e della gestione di 3Com Email Firewall e presuppone una conoscenza del funzionamento delle reti TCP IP e dei protocolli di comunicazione per la posta Per informazioni più dettagliate sulla configurazione di 3Com Email Firewall consultare la Guida per l utente acclusa Se con il prodotto sono fornite alcune note di rilascio con informazioni che differiscono da quelle contenute in questa guida segui...

Страница 112: ...llo schermo Sintassi Il termine sintassi indica che occorre tenere presente la sintassi fornita e specificare i valori appropriati per i segnaposti racchiusi tra parentesi angolari Esempio Per modificare la password utilizzare la sintassi seguente password di sistema password In questo esempio è necessario fornire una password per password Comandi Il termine comandi indica che è necessario inserir...

Страница 113: ...azione Consideriamo i suggerimenti molto importanti perché ci aiutano a rendere la documentazione più utile per l utente Inviare eventuali commenti su questo documento a 3Com mediante il seguente URL http www 3com com corpinfo en_US contactus index html Al momento del contatto è necessario includere le informazioni seguenti Titolo del documento Codice del documento sulla pagina del titolo Numero d...

Страница 114: ...wall Codice DIA MFA100 AAA01 Pagina 25 Tenere presente che possiamo rispondere solo ai commenti e alle domande relativi alla documentazione dei prodotti 3Com Le domande che riguardano l assistenza tecnica o le vendite vanno indirizzate in prima istanza al fornitore dei servizi di rete ...

Страница 115: ...odifica della configurazione del firewall router Registrazione di 3Com Email Firewall Prima dell installazione è necessario registrare la chiave di licenza di 3Com Email Firewall con 3Com Tale chiave dovrà essere utilizzata durante l installazione per registrare e attivare 3Com Email Firewall Utilizzando un browser Web andare all URL seguente http esupport 3com com Se non si dispone di un nome ute...

Страница 116: ... Email Firewall 3Com Email Firewall va situato tra i server della posta e Internet in modo che non esistano connessioni SMTP Simple Mail Transport Protocol dirette tra i server interni ed esterni 3Com Email Firewall viene installato dietro il firewall esistente nella rete interna La posta in arrivo viene inoltrata dal firewall o router a 3Com Email Firewall dove verrà analizzata elaborata e inviat...

Страница 117: ...all per la prima volta è necessario avere a portata di mano le informazioni seguenti Utilizzare il foglio di configurazione incluso per prenderne nota Hostname Il nome host assegnato a 3Com Email Firewall ad esempio mail in mail example com Domain Il nome del dominio associato al nome host assegnato In genere si tratta del dominio per cui viene elaborata la posta elettronica ad esempio example com...

Страница 118: ...and Password Inserire un nome utente e una password per il server proxy Modifica della configurazione del firewall router Per consentire il corretto funzionamento di 3Com Email Firewall è necessario configurare diverse porte di rete o proxy sul firewall o sul router Nella tabella seguente è fornito l elenco delle porte richieste Tabella 3 Configurazione delle porte per firewall router Porta Descri...

Страница 119: ...b Uso dell installazione guidata Uso del License Wizard Connessione di 3Com Email Firewall a una rete Installare e connettere 3Com Email Firewall nel modo seguente 1 Togliere dalla confezione 3Com Email Firewall i cavi e la documentazione 2 Collegare il cavo di alimentazione a una presa elettrica e a 3Com Email Firewall 3 Per iniziare l installazione e la configurazione di 3Com Email Firewall è ne...

Страница 120: ...indirizzo IP predefinito utilizzato da 3Com Email Firewall è 192 168 1 253 Riconfigurare le impostazioni di rete locale del computer per utilizzare un indirizzo nella stessa rete Utilizzare l indirizzo IP 192 168 1 252 con una subnet mask 255 255 255 0 Per istruzioni sulla modifica dell indirizzo IP del computer consultare l Appendice A a pagina 137 Se sulla rete vi sono sistemi che già utilizzano...

Страница 121: ...ione guidata fornisce istruzioni dettagliate per installare 3Com Email Firewall Fare clic sul pulsante Next per continuare la configurazione iniziale di 3Com Email Firewall Durante l installazione è sempre possibile ritornare alla schermata precedente facendo clic sul pulsante Back ...

Страница 122: ...iziale con la lettura e l accettazione del contratto di licenza Leggere il contratto di licenza selezionare I Accept quindi fare clic su Next per continuare Contratto di licenza antivirus Prima di continuare è necessario accettare il contratto di licenza per il software antivirus Leggere il contratto di licenza selezionare Accept quindi fare clic su Next per continuare ...

Страница 123: ...cegliere una password sicura di almeno 8 caratteri di lunghezza e includere contemporaneamente lettere maiuscole e minuscole numeri e caratteri speciali quali il simbolo Le password tengono conto di maiuscole e minuscole ed è possibile utilizzare entrambi questi tipi di lettere Fare clic su Next per continuare Impostazione del fuso orario Impostare area paese e fuso orario Fare clic su Next per co...

Страница 124: ...ample com IP Address Inserire l indirizzo IP per 3Com Email Firewall L indirizzo predefinito è 192 168 1 253 e può essere utilizzato se non è in conflitto con altri sistemi interni Net Mask Inserire la maschera di rete corretta per la rete Se l indirizzo IP è 192 168 1 253 la maschera di rete sarà 255 255 255 0 Gateway Inserire il gateway predefinito per questo 3Com Email Firewall In genere si tra...

Страница 125: ...izzo e mail dell amministratore di 3Com Email Firewall Le notifiche saranno inviate a tale indirizzo Anti Spam Action Impostare l azione predefinita per le funzioni antispam di 3Com Email Firewall Sono disponibili le seguenti opzioni Disabled Le funzioni antispam vengono disattivate Modify Subject Headings Le funzioni antispam vengono attivate Il testo nel campo dell oggetto dei messaggi rilevati ...

Страница 126: ...t User Name Inserire un nome utente valido per il server proxy Password Inserire e confermare una password che corrisponda al nome utente inserito in precedenza Fare clic su Next per continuare Completamento La configurazione iniziale di 3Com Email Firewall è stata completata Leggere attentamente le istruzioni finali nella schermata Completion dell installazione guidata Fare clic su Finish spegner...

Страница 127: ...rado di accedere a Internet 3Com Email Firewall utilizzerà il nuovo indirizzo IP impostato durante la configurazione di rete 2 Accendere 3Com Email Firewall Attendere almeno 1 2 minuti che il sistema si avvii prima di tentare la connessione 3 Impostare l indirizzo IP del computer di configurazione su un indirizzo nella stessa rete Per informazioni dettagliate sulla modifica dell indirizzo IP del c...

Страница 128: ...ALL 6 Inserire la chiave di licenza e fare clic su Next per continuare 7 Confermare le informazioni di registrazione controllando che le informazioni relative a ID di sistema e chiave di licenza siano corrette quindi fare clic su Next per continuare ...

Страница 129: ...opo l installazione i servizi di posta sono in stato interrotto Fare clic sul pulsante Start per avviare l elaborazione della posta Dopo aver fatto clic su Start è possibile che si riceva un messaggio che indica che gli aggiornamenti antivirus non sono stati completati Dopo l installazione il primo aggiornamento avviene per impostazione predefinita dopo 60 minuti Andare a Mail Delivery Anti Virus ...

Страница 130: ...130 CAPITOLO 2 INSTALLAZIONE DI 3COM EMAIL FIREWALL ...

Страница 131: ...trattati sono i seguenti Controllo dello stato di 3Com Email Firewall Modifica del server della posta interno Verifica del recapito della posta in uscita Verifica del recapito della posta in arrivo Controllo dello stato di 3Com Email Firewall Una volta completata l installazione selezionare Status dal menu principale per stabilire se tutti i servizi e i server sono funzionanti ...

Страница 132: ...ervizi di rete Internal Mail Server Indica lo stato del server della posta interno Se non è accessibile controllare il server della posta interno per verificare che sia in esecuzione Eseguire i test di rete per controllare che la connessione tra 3Com Email Firewall e il server della posta interno sia attiva Gateway Indica la connessione con il gateway locale che in genere è rappresentato dal route...

Страница 133: ...ver Microsoft Exchange Exchange 5 5 Per i sistemi Exchange 5 5 attenersi alla procedura seguente 1 Aprire il programma di amministrazione di Microsoft Exchange 2 Andare a Organizzazione Sito Configurazione Connessioni Proprietà Servizio posta Internet 3 Nella scheda Connessioni nella sezione Recapito messaggi e nella finestra di dialogo Inoltro di tutti i messaggi all host inserire l indirizzo IP ...

Страница 134: ...are la visualizzazione 3 Controllare la casella di posta dell utente di destinazione esterno per verificare che il messaggio sia stato recapitato Secondo questo esempio il messaggio dovrebbe utilizzare la seguente route Da client di posta interno a server di posta interno Da server di posta interno a 3Com Email Firewall Da 3Com Email Firewall a firewall router Da firewall router a client di posta ...

Страница 135: ...are una e mail a un client di posta interno 3 Controllare la pagina Activity di 3Com Email Firewall per verificare che nella sezione Mail Received Recently vengano visualizzati i messaggi di posta Fare clic sul pulsante Refresh per aggiornare la visualizzazione Secondo questo esempio il messaggio dovrebbe utilizzare la seguente route Da client di posta esterno a firewall router Da firewall router ...

Страница 136: ...136 CAPITOLO 3 OPERAZIONI SUCCESSIVE ALL INSTALLAZIONE ...

Страница 137: ... necessario connettersi da un altro computer sulla stessa rete Di seguito sono fornite le istruzioni per modificare le impostazioni dell indirizzo IP del computer di configurazione per potersi connettere a 3Com Email Firewall Windows XP Per modificare le impostazioni di rete su un sistema Windows XP 1 Fare clic sul pulsante Start e selezionare il Pannello di controllo 2 Fare clic su Rete e conness...

Страница 138: ...onare Proprietà 4 Evidenziare Protocollo Internet TCP IP quindi fare clic sul pulsante Proprietà 5 Copiare le impostazioni attuali perché sarà necessario ripristinarle dopo aver completato l installazione di 3Com Email Firewall 6 Inserire l indirizzo IP 192 168 1 252 con una subnet mask 255 255 255 0 Lasciare gli altri campi in bianco ...

Страница 139: ...e TCP IP Windows 2000 Per modificare le impostazioni di rete su un sistema Windows 2000 1 Fare clic sul pulsante Start e selezionare Impostazioni Pannello di controllo 2 Fare clic su Rete e connessioni remote quindi fare doppio clic sull icona Connessioni di rete 3 Fare clic con il pulsante destro del mouse su Connessione LAN e selezionare Proprietà ...

Страница 140: ...L COMPUTER 4 Selezionare Utilizza il seguente indirizzo IP e inserire 192 168 1 252 e 255 255 255 0 per la subnet mask 5 Fare clic su OK Nella finestra di dialogo Proprietà Connessione LAN fare clic su OK 6 Chiudere la finestra Rete e connessioni remote ...

Страница 141: ...http www 3com com Número de pieza DIA MFA100 AAA01 Publicado en enero de 2005 Email Firewall Guía de instalación Guía de instalación de Firewall 3Com Email ...

Страница 142: ...2 227 7015 Nov 1995 or FAR 52 227 14 June 1987 whichever is applicable You agree not to remove or deface any portion of any legend provided on any licensed program or documentation contained in or delivered to you in conjunction with this Installation Guide Unless otherwise indicated 3Com registered trademarks are registered in the United States and may or may not be registered in other countries ...

Страница 143: ...figuración del firewall o del router 152 2 INSTALACIÓN DE 3COM EMAIL FIREWALL Conecte 3Com Email Firewall a una red 153 Conéctese a 3Com Email Firewall a través de un navegador de Internet 154 Uso del ayudante de configuración 155 Acuerdo de licencia 156 Acuerdo de licencia Antivirus 156 Cambiar la contraseña 157 Ajuste de la zona horaria 157 Network Configuración de red 158 Mail Configuración de ...

Страница 144: ...rk Services 166 Modificación del servidor de correo interno 167 Exchange 5 5 167 Exchange 2000 167 Pruebas de envío de correo externo 168 Pruebas de envío de correo interno 169 A CONFIGURACIÓN DE LA DIRECCIÓN IP DE SU ORDENADOR Windows XP 171 Windows 2000 173 ...

Страница 145: ...irewall Se presuponen conocimientos funcionales de protocolos de redes TCP IP y comunicación por correo electrónico Si desea obtener más información relativa a la configuración de 3Com Email Firewall consulte la Guía de usuario anexa Si se incluyen notas de publicación con el producto y la información en ellas es diferente de la información en esta guía siga las instrucciones de las notas de publi...

Страница 146: ...éntesis Ejemplo Para cambiar su contraseña utilice la sintaxis siguiente system password password En este ejemplo debe escribir una contraseña para password Comandos La palabra command significa que debe introducir el comando tal y como se le muestra y a continuación pulsar Return o Enter Los comandos aparecen en negrita Las palabras enter y type Cuando vea la palabra enter en esta guía debe escri...

Страница 147: ...entación Sus sugerencias son muy importantes para nosostros Nos ayudarán a hacer que nuestra documentación sea más útil para usted Envíe sus comentarios sobre este documento a 3Com a través del URL siguiente http www 3com com corpinfo en_US contactus index html Incluya la información siguiente cuando se ponga en contacto con nosotros Título del documento Número de pieza del documento en la página ...

Страница 148: ...148 ACERCA DE ESTA GUÍA ...

Страница 149: ...figuración Modifique la configuración del firewall o del router Registro de su 3Com Email Firewall Antes de la instalación debe registrar la clave de licencia de su 3Com Email Firewall La clave de su licencia debe usarse durante el proceso de instalación para autorizar y activar 3Com Email Firewall Vaya a la siguiente dirección URL usando un navegador http esupport 3com com Si no tiene un nombre y...

Страница 150: ...ail Firewall está diseñado para situarse entre sus servidores de correo e Internet para que no existan conexiones directas SMTP Protocolo de transporte de correo simple entre servidores externos e internos 3Com Email Firewall se instala detrás del firewall existente en la red Internet El correo entrante será enviado desde el firewall o router a 3Com Email Firewall donde se escaneará procesará y en...

Страница 151: ...uiente a mano Use la hoja de configuración incluida para registrar estos elementos Hostname El hostname asignado a 3Com Email Firewall como por ejemplo mail en mail example com Domain El nombre de dominio asociado al hostname asignado Normalmente se trata del dominio para el que se procesa el correo como por ejemplo example com IP Address Introduzca la dirección IP que usará para este 3Com Email F...

Страница 152: ...e com 8080 Proxy Username and Password Introduzca un nombre de usuario y una contraseña para el servidor de proxy Modifique la configuración del firewall o del router Para que 3Com Email Firewall funcione correctamente deben configurarse varios puertos de red o proxies en el firewall o el router En la siguiente tabla se describe la lista de puertos necesarios Tabla 3 Configuración del firewall o d...

Страница 153: ...de configuración Uso del ayudante de licencia Conecte 3Com Email Firewall a una red Instale y conecte 3Com Email Firewall de la manera siguiente 1 Desembale los cables y la documentación de 3Com Email Firewall 2 Conecte el cable de alimentación de una fuente de alimentación a su 3Com Email Firewall 3 Para iniciar la instalación y configuración del 3Com Email Firewall debe conectarse primero direct...

Страница 154: ...dirección IP predeterminada usada por 3Com Email Firewall es 192 168 1 253 Reconfigure los ajustes de la red local de su ordenador para usar una dirección en la misma red Use la dirección IP 192 168 1 252 con una máscara de subred de 255 255 255 0 Consulte el Apéndice A en la página 171 para obtener instrucciones sobre cómo cambiar la dirección IP de su ordenador Si ya hay sistemas en la red que u...

Страница 155: ...ación El ayudante de configuración le guiará a través de la instalación de 3Com Email Firewall Pulse el botón Next para continuar con la configuración inicial de 3Com Email Firewall Durante la instalación siempre puede volver a la pantalla anterior pulsando el botón Back ...

Страница 156: ...ar la fase de inicialización leyendo y aceptando el acuerdo de licencia Lea el acuerdo de licencia seleccione I Accept y pulse Next para continuar Acuerdo de licencia Antivirus Debe leer y aceptar el acuerdo de la licencia del software antivirus antes de continuar Lea el acuerdo de licencia seleccione Accept y pulse Next para continuar ...

Страница 157: ...o la nueva contraseña Escoja una contraseña segura de al menos 8 caracteres de longitud e incluya una mezcla de caracteres alfanuméricos en mayúscula y minúscula números y caracteres especiales como el símbolo La contraseña puede introducirse tanto en letras mayúsculas como minúsculas Pulse Next para continuar Ajuste de la zona horaria Ajuste su región país y zona horaria Pulse Next para continuar...

Страница 158: ...ddress Introduzca la dirección IP para este 3Com EMail Firewall La dirección predeterminada es 192 166 1 253 y puede usar esta dirección si no entra en conflicto con otros sistemas internos Net Mask Introduzca la máscara de red apropiada para su red Si su dirección IP es 192 168 1 253 entonces la máscara de red será 255 255 255 0 Gateway Introduzca la puerta de enlace predeterminada para este 3Com...

Страница 159: ...trador de este 3Com Email Firewall Las notificaciones irán a esta dirección de correo Anti Spam Action Ajuste una configuración predeterminada para las características contra correo no deseado de 3Com EMail Firewall Las opciones son las siguientes Disabled Las funciones contra correo no deseado están desactivadas Modify Subject Headings Las funciones contra correo no deseado están desactivadas Los...

Страница 160: ... hostname port User Name Introduzca un nombre de usuario válido para el servidor de proxy Password Introduzca y confirme una contraseña que coincida con el nombre de usuario introducido anteriormente Pulse Next para continuar Finalización Ha completado la configuración inicial de 3Com Email Firewall Asegúrese de que lee las instrucciones finales de la pantalla de Completion del asistente de config...

Страница 161: ...irección IP que haya determinado durante la configuración de la red 2 Encienda 3Com Email Firewall Espere al menos de 1 a 2 minutos para que el sistema se reinicie antes de intentar conectarse 3 Ajuste la dirección IP de su ordenador de configuración a una dirección usada en la misma red Consulte el Apéndice A en la página 171 para obtener instrucciones detalladas sobre cómo cambiar la dirección I...

Страница 162: ...162 CAPÍTULO 2 INSTALACIÓN DE 3COM EMAIL FIREWALL 7 Confirme la información de registro asegurándose de que la identificación de sistema y la clave de licencia son correctos y pulse Next para continuar ...

Страница 163: ...eo se encuentran inicialmente parados después de la instalación Pulse el botón Start para inciar el procesado de correo Después de pulsar Start es posible que reciba un mensaje que diga que las actualizaciones del antivirus no se han completado Después de la instalación la primera actualización no tendrá lugar durante un tiempo predeterminado de 60 minutos Puede ir a Mail Delivery Anti Virus para ...

Страница 164: ...164 CAPÍTULO 2 INSTALACIÓN DE 3COM EMAIL FIREWALL ...

Страница 165: ...y que incluye los temas siguientes Comprobación del estado de 3Com Email Firewall Modificación del servidor de correo interno Pruebas de envío de correo externo Pruebas de envío de correo interno Comprobación del estado de 3Com Email Firewall Cuando la instalación se haya completado seleccione Status en el menú principal para determinar si todos los servicios y servidores funcionan ...

Страница 166: ...ail Server Indica el estado de su servidor de correo interno Si no puede accederse compruebe el servidor de correo interno para asegurarse de que funciona Realice las pruebas de red para asegurarse de que hay conectividad entre 3Com Email Firewall y el servidor de correo interno Gateway Indica su conexión a la puerta de enlace local que es normalmente el router Si esta puerta de enlace es inaccesi...

Страница 167: ...s instrucciones siguientes son para un servidor de intercambio de Microsoft Exchange 5 5 Para sistemas Exchange 5 5 use el procedimiento siguiente 1 Abra Exchange Administrator 2 Vaya a Organization Site Configuration Connections Internet Mail Service Properties 3 En la pestaña Connections vaya a la sección Message Delivery y en el cuadro de diálogo Forward all messages to host introduzca la direc...

Страница 168: ...btener una vista actualizada 3 Compruebe el correo electrónico del usuario externo de destino para asegurarse de que se ha enviado el mensaje En este supuesto el mensaje debería seguir la ruta siguiente Cliente de correo interno a su servidor de correo interno Servidor de correo interno a 3Com Email Firewall 3Com Email Firewall a un firewall o router Firewall o router a un cliente de correo de des...

Страница 169: ...ctrónico a un cliente de correo interno 3 Compruebe la página Activity de 3Com Email Firewall para asegurarse de que el mensaje aparece en la sección Mail Received Recently Pulse el botón Refresh para obtener una vista actualizada En este supuesto el mensaje debería seguir la ruta siguiente Cliente de correo externo a su firewall o router Firewall o router a 3Com Email Firewall 3Com Email Firewall...

Страница 170: ...170 CAPÍTULO 3 TAREAS POSTERIORES A LA INSTALACIÓN ...

Страница 171: ...denador en la misma red Las instrucciones siguientes le guiarán en el proceso que debe seguir para cambiar los ajustes de la dirección IP de la configuración de su ordenador para conectarse a 3Com Email Firewall Windows XP Para modificar los ajustes de su red en un sistema operativo Windows XP 1 Pulse el botón Start y seleccione Control Panel 2 Pulse Network and Internet Connections y pulse dos ve...

Страница 172: ... ajustes actuales ya que necesitará restaurarlos cuando la instalación de 3Com Email Firewall se haya completado 6 Introduzca la dirección IP 192 168 1 252 con una máscara de subred de 255 255 255 02 Deje los campos restantes en blanco 7 Pulse el botón OK para completar la configuración Advanced 8 Pulse el botón OK para completar la configuración de TCP IP ...

Страница 173: ...tart y seleccione Settings Control Panel 2 Pulse Network and Dial up Connections y pulse dos veces en el icono Network Connections 3 Pulse con el botón derecho del ratón en Local Area Connection y seleccione Properties 4 Seleccione Use the following IP address y escriba 192 168 1 252 y 255 255 255 0 para la máscara de subred ...

Страница 174: ...174 APÉNDICE A CONFIGURACIÓN DE LA DIRECCIÓN IP DE SU ORDENADOR 5 Pulse OK En el cuadro de diálogo Local Area Connection Properties pulse OK 6 Cierre la ventana Network and Dial up Connections ...

Страница 175: ...WORK SHEET ...

Страница 176: ......

Отзывы: