Verifying the Firmware Version on Both Devices
In order to communicate properly, the keypad and the control panel must be running the same
firmware version.
NOTE:
If the keypad has not yet been paired to the control panel, the firmware version number
displays on the keypad’s main screen.
To check the firmware version on the keypad and control panel (after they have been paired):
1
Press the
Home
button.
2
At the Home screen, tap
Security
.
3
Tap
Menu
.
4
Tap
Toolbox
.
5
At the
Enter Your Code to Access the Toolbox
screen, enter the master code.
6
At the
Toolbox (1 of 3)
screen, tap → to scroll to the
Toolbox (2 of 3)
screen.
7
Tap
Version
.
8
At the
Version
screen, ensure the
Firmware Version
field matches on both the control panel
and keypad.
Updating the Firmware
To update the firmware on the keypad, you will need:
●
The Firmware Update Cable for the TS2 and Control Panel (2GIG-UPCBL2).
● To download the latest firmware update go to dealer.2gig.com.
Firmware update available at www.2gig.com/dealers.
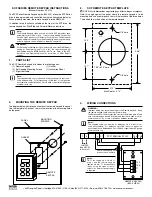
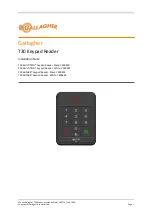
Programming the Keypad to the Control Panel
To communicate with up to four (4) Wireless Touch Screen Keypads, you must install the 900 MHz
Transceiver Module in the control panel before using the programming steps below. See above
Minimum
Requirements
for information on which XCVR module is required.
To program the keypad into the control panel:
1
Connect the AC Adapter to the keypad as described in
Connecting the Power to the Keypad
.
2
Power ON the keypad. The
This Device is Not Paired with a Control Panel
message appears on the
keypad’s screen.
3
Ensure the control panel is powered ON. Then tap the
Home
button.
4
Tap the logo in the lower-right corner of the control panel Home screen.
5
At the
Enter Your Code
screen, enter your four (4)-digit installer code.
6
At the
Installer Toolbox (page 1 of 2)
screen, tap System Configuration.
7
At the
Q1: Select RF Sensor # (01 to 48)
screen, tap
Go To
.
8
At the
Enter Question Number (2 Digits)
screen, enter
04
.
9
At the
Q4: Select RF Keypad # (1 to 4)
screen, tap → to scroll to the desired keypad number (1-4).
For example, tap → to scroll to (1)
keypad one
. Then tap ↓.
10
At the
Q: Select RF Keypad # Used (0 to 1)
screen, tap → to scroll to (1)
Enabled
. Then tap ↓.
11
At the
Q: Select RF Keypad # Equipment Code
screen, tap → to scroll to (1059)
2GIG-TS2 Wireless
Touch Screen Keypad
. Then tap ↓.
12
At the
Q: RF Keypad # Keypad ID (Read-Only)
screen, press the Learn button. This places the
control panel into learning mode.
13
On the control panel at the
Pair with Xcvr Device
screen, the “initiating learning process”
message appears.
14
On the keypad, at the
This Device is Not Paired with the Control Pane
l screen, tap
Pair with Panel
.
This places the keypad into learning mode.
When the “learn operation succeeded” message appears on both the control panel and keypad, the
devices are linked.
15
Ensure the following is true:
●
On the control panel at the
Pair with Xcvr Device
screen, ensure the
Type
reads
2GIG-TS2-E
Wireless Touch Screen Keypad
and that the
ID#
appears. Tap
OK
.
●
On the keypad at the
Pair with Panel
screen, ensure that the
Network ID
shows a unique
hexadecimal number for the control panel and that the
Keypad ID
number appears. Tap
OK
.
16
On the control panel at the
Pair with Xcvr Device
screen, tap
OK
. Then tap ↓.
NOTE:
The keypad displays a “The Security System is Temporarily Not Operational” message and
remains in this state until you finish programming the device into the panel, save the changes, and exit
out of programming mode.
17
At the
Q: RF Keypad # Keypad ID (Read-Only)
screen, ensure the keypad ID appears. Then tap ↓.
18
At the
Q: Select RF Sensor # Equipment Age
screen, tap → to select one of the following:
●
(0)
New
(Default). Then tap ↓.
OR
●
(1)
Existing
. Then tap ↓.
19
At the
Q: Construct RF Sensor # Voice Descriptor
screen, the voice descriptor keypad one (or
keypad two
,
keypad three
, and so on) should display.
If you want to change the voice descriptor, tap the delete (X) button. Then tap
Insert
, then enter the
appropriate voice descriptor code. For example, to create a voice descriptor code named
keypad
one
, do the following:
●
Tap
Insert
. Then enter 123 for
keypad
.
●
Tap
Insert
. Then enter 161 for
one
. Then tap ↓.
TIP:
For a complete list of available voice descriptors, see the control panel’s
Quick Programming Guide
.
20
At the
Summary of RF Keypad #
screen, tap Skip.
21
At the
Q5: Enter Exit Delay, in Seconds (45-120
) screen, enter the desired exit delay. The default
value is 60. The tap End. This setting affects both the control panel and keypad.
22
At the
Summary of System Configuration
screen, tap
Save Changes
and ensure a check mark
appears in the
Save Changes
box. Then tap
Exit
. This restarts the control panel.
NOTE:
You can program up to four (4) keypads into the control panel by repeating the steps above.
Disabling a Keypad from the Control Panel
If you want to disable a keypad after programming it into the control panel:
1
Ensure the control panel is powered ON. Then tap the
Home
button.
2
Tap the logo in the lower-right corner of the control panel Home screen.
3
At the
Enter Your Code
screen, enter your four (4)-digit installer code to go to the
Installer Toolbox
(page 1 of 2) screen.
4
At the
Installer Toolbox
(1 of 2) screen, tap
System Configuration
.
5
At the
Q1: Select RF Sensor # (01 to 48)
screen, tap
Go To
.
6
At the
Enter Question Number (2 Digits)
screen, enter
04
.
7
At the
Q4: Select RF Keypad # (1 to 4)
screen, tap → to scroll to the keypad number (1-4) to
remove. For example, tap → to scroll to
(1)
keypad one
. Then tap ↓.
8
At the
Q: Select RF Keypad # Used
screen, tap → to scroll to
(0)
Disabled
. Then tap ↓.
9
Tap ↓ until the
Summary of RF Keypad #
screen appears. Then tap
Skip
.
10
At the
Q5: Enter Exit Delay
,
in Seconds (45-120)
screen, tap
End
.
11
At the
Summary of System Configuration
screen, tap
Save Changes
and ensure a check mark
appears in the
Save Changes
box. Then tap
Exit
. This restarts the control panel.
Restoring the Keypad’s Factory Settings
To restore the keypad’s factory settings to use it with a different control panel:
1
Power OFF and then power ON the keypad.
2
Press and hold down both the
Emergency
and
Home
buttons for approximately 20 seconds.
3
When both buttons illuminate, the keypad’s factory settings have been restored. The screen will
display the following message: “
This Device is Not Paired with a Control Panel
.”
SPECIFICATIONS
Wireless Signal Range
500 ft (152.4 m), open air, with Wireless Control Panel
Transceiver
Silicon Labs SI1001-E-GM2
Transmitter Frequency
900 MHz frequency-hopping bi-directional communication
Radio
25 channel frequency-hopping spread spectrum, 403 kHz channel spacing (910.2-
920.275 MHz), GFSK modulation, 128 kbps, +19dBm maximum RF power out
Dimensions (L x W x H)
4.3” x 6.7” x 0.8” (11 x 17 x 2 cm)
Weight (including battery)
9.6 oz.
Housing Material
ABS Plastic
Color
White
Operating Temperature
32°-120 F° (0°-49° C)
Relative Humidity
5-95% Non-Condensing
Operating Voltage
14VDC
Certification
FCC, Industry Canada
REGULATORY INFORMATION
Wireless Product Notice
Radio controls provide a reliable communications link and fill an important need in portable wireless
signaling; however, there are some limitations which must be observed.
●
For United States Installations Only: The radios are required to comply with FCC Rules and
Regulations as Part 15 devices. As such, they have limited transmitter power and therefore
limited range (approximately 400 ft.).
●
A receiver cannot respond to more than one transmitted signal at a time and may be blocked by
radio signals that occur on or near their operating frequencies, regardless of code settings.
● Changes or modifications to the device may void FCC compliance.
●
Infrequently used radio links should be tested regularly to protect against undetected interference
or fault.
●
A general knowledge of radio and its vagaries should be gained prior to acting as a wholesale
distributor or dealer, and these facts should be communicated to the end users.
FCC Notice
This device complies with Part 15 of the FCC Rules. Operation is subject to the following two conditions:
1
This device may not cause harmful interference, and
2
This device must accept any interference received, including interference that may cause
undesired operation.
This equipment has been tested and found to comply with the limits for Class B Digital Device, pursuant
to Part 15 of the FCC Rules. These limits are designed to provide reasonable protection against harmful
interference in a residential installation. This equipment generates and can radiate radio frequency
energy and, if not installed and used in accordance with the instructions, may cause harmful interference
to radio communications. However, there is no guarantee that interference will not occur in a particular
installation. If this equipment does cause harmful interference to radio or television reception, which
can be determined by turning the equipment off and on, the user is encouraged to try to correct the
interference by one or more of the following measures:
●
Reorient or relocate the receiving antenna
●
Increase the separation between the equipment and receiver
●
Connect the equipment into an outlet on a circuit different from that to which the receiver
is connected
●
Consult the dealer or an experienced radio/TV technician for help
Any changes or modifications not expressly approved by the party responsible for compliance could void
the user’s authority to operate the equipment.
Industry Canada Notices
This device complies with Industry Canada licence-exempt RSS standard(s). Operation is subject to the
following two conditions: (1) this device may not cause interference, and (2) this device must accept any
interference, including interference that may cause undesired operation of the device.
Repairs to certified equipment should be made by an authorized Canadian maintenance facility designated
by the supplier. Any repairs or alterations made by the user to this equipment, or equipment malfunctions,
may give the telecommunications company cause to request the user to disconnect the equipment.
Users should ensure for their own protection that the electrical ground connections of the power
utility, telephone lines and internal metallic water pipe system, if present, are connected together. This
precaution may be particularly important in rural areas.
WARNING:
Users should not attempt to make such connections themselves, but should contact the
appropriate electric inspection authority, or electrician, as appropriate.
Operating and Storage Temperature
The recommended storage temperature for all touchscreens is -10°C to 60°C (14°F to 140°F).
For optimal touchscreen use, operational temperature is 0°C to 49°C (32°F to 120°F).
LIMITED WARRANTY
This Nortek Security & Control LLC product is warranted against defects in material and workmanship
for one (1) year. This warranty extends only to wholesale customers who buy direct from Nortek Security
& Control LLC or through Nortek Security & Control LLC’s normal distribution channels. Nortek Security
& Control LLC does not warrant this product to consumers. Consumers should inquire from their selling
dealer as to the nature of the dealer’s warranty, if any.
THERE ARE NO OBLIGATIONS OR LIABILITIES ON THE PART OF NORTEK SECURITY &
CONTROL LLC FOR CONSEQUENTIAL DAMAGES ARISING OUT OF OR IN CONNECTION
WITH USE OR PERFORMANCE OF THIS PRODUCT OR OTHER INDIRECT DAMAGES
WITH RESPECT TO LOSS OF PROPERTY, REVENUE, OR PROFIT, OR COST OF REMOVAL,
INSTALLATION, OR REINSTALLATION. ALL IMPLIED WARRANTIES FOR FUNCTIONALITY, ARE
VALID ONLY UNTIL THE WARRANTY EXPIRES. THIS NORTEK SECURITY & CONTROL LLC
WARRANTY IS IN LIEU OF ALL OTHER WARRANTIES EXPRESSED OR IMPLIED.
All products returned for warranty service require a Return Authorization Number (RA#). Contact Returns
at 1-855-546-3351 for an RA# and other important details.
For technical support in the USA and Canada:
855-2GIG-TECH
(855-244-4832)
Contact:
https://www.nortekcontrol.com/technical-support/
Visit www.nortekcontrol.com for technical support hours of operation.
For technical support outside of the USA and Canada:
Contact your
regional distributor.
Visit www.2gig.com/dealers/ for a list of distributors in your region.
10032360 Rev-B
© 2021 Nortek Security & Control LLC. All rights reserved. 2GIG is a registered trademark
of Nortek Security & Control LLC. All other company and product names used herein may
be trademarks, or registered trademarks of the respective companies.
Nortek Security & Control LLC | 2GIG
5919 Sea Otter Place, Suite 100
Carlsbad, CA 92010 USA