background image

– 30 –

UA

Заходи безпеки

Уважно прочитайте цю інструкцію з експлуатації пристрою та збережіть її для подальшо-
го використання в якості довідкового матеріалу. Або як антістрес зім’ятайте її чи рвіть, це 
не допоможе у вирішенні технічних питань, але трохи заспокоїть. Дотримуйтеся наведе-
них нижче вказівок під час встановлення, експлуатації, чищення й технічного обслугову-
вання пристрою, щоб уникнути небезпечних ситуацій, а також подовжити термін служби 
пристрою.

1. 

Використовуйте тільки оригінальні запчастини й аксесуари, рекомендовані виробником.

2. 

Щоб уникнути пошкодження пристрою, відключайте його від електромережі під час 
грози або якщо він не використовуватиметься протягом тривалого часу. Викори-
стовуйте тільки рекомендований виробником кабель живлення, щоб забезпечити 
безпеку та електромагнітну сумісність. Якщо пристрій потрібно підключити до 
відеомагнітофона або комп’ютера, відключіть його від електромережі, щоб уникнути 
ураження електричним струмом.

3. 

Уникайте пошкоджень кабелю живлення.

4. 

Не перевантажуйте розетку, щоб уникнути пожежі або 
ураження електричним струмом.

5. 

Не вставляйте сторонні предмети у вентиляційні отвори 
пристрою. Через високий тиск це може призвести до 
ураження електричним струмом або короткого замикан-
ня. Уникайте потрапляння води або будь-яких інших рідин 
всередину пристрою.

6. 

Не намагайтеся ремонтувати пристрій самостійно. Звер-
ніться для цього в авторизований сервісний центр.

7. 

Відключіть пристрій від електромережі та зверніться в 
авторизований сервісний центр, якщо:

а) пошкоджено кабель живлення або вилку;
б) у пристрій потрапила вода або сторонній предмет;
в) пристрій упав або пошкоджено його корпус;
г) пристрій не працює належним чином.

8. 

Для заміни деталей виробу використовуйте оригінальні 
деталі з аналогічними характеристиками, рекомендовані 
виробником. Використання неоригінальних деталей може 
призвести до пожежі, ураження електричним струмом 
тощо.

9. 

Під час встановлення пристрою, зокрема настінного мон-
тажу, дотримуйтеся наданих виробником інструкцій, щоб 
уникнути небезпечних ситуацій і нещасних випадків.

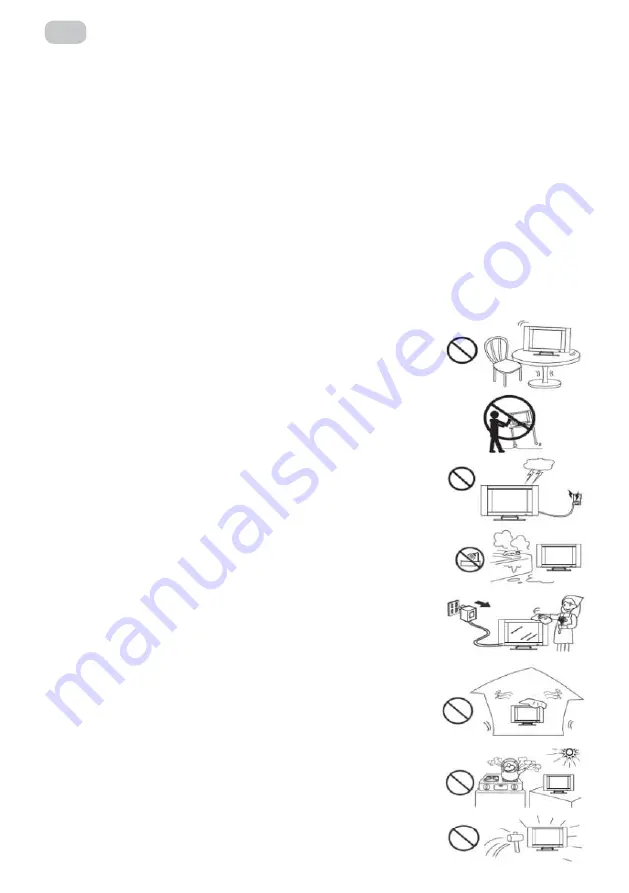
10.  Встановлюйте пристрій лише на стійку, штатив, тримач або 

стіл, що входять до комплекту або рекомендовані вироб-
ником. Не встановлюйте пристрій на нестійких поверхнях, 
щоб уникнути травмування людей і пошкодження при-
строю внаслідок його падіння.

11.  Не використовуйте пристрій поряд із джерелами води. 

Наприклад, біля ванни, умивальника, кухонної раковини, 
басейну тощо.

Меры предосторожности

Внимательно прочтите данную инструкцию по эксплуатации устройства и сохраните ее для 

дальнейшего использования в качестве справочного материала. Следуйте приведенным ниже указаниям 
во время установки, эксплуатации, чистки и технического обслуживания устройства, чтобы избежать 
опасных ситуаций, а также продлить срок службы устройства.

Используйте только оригинальные запчасти и аксессуары, рекомендованные изготовителем.
Во избежание повреждения устройства отключайте его от электросети во время грозы или если 
оно не будет использоваться в течение длительного времени. Используйте только 
рекомендованный изготовителем кабель питания, чтобы обеспечить безопасную работу и 
электромагнитную совместимость. Если устройство необходимо подключить к видеомагнитофону 
или компьютеру, отключите его от электросети, чтобы избежать поражения электрическим током.
Избегайте повреждений кабеля питания.
Не перегружайте розетку во избежание пожара или поражения электрическим током.
Не вставляйте посторонние предметы в вентиляционные отверстия устройства. Из за высокого 
давления это может привести к поражению электрическим током или короткому замыканию. 
Избегайте попадания воды или других жидкостей внутрь устройства.
Не пытайтесь ремонтировать устройство самостоятельно. Обратитесь для этого в авторизованный 
сервисный центр.
Отключите устройство от электросети и обратитесь в
авторизованный сервисный центр, если:
а поврежден кабель питания или вилка
б в устройство попала вода или посторонний предмет;
в устройство упало или поврежден его корпус;
г) устройство не работает должным образом.
Для замены деталей изделия используйте оригинальные детали
с аналогичными характеристиками, рекомендованные изготовителем.


Использование неоригинальных деталей может привести к
пожару, поражению электрическим током и т. д.
При установке устройства, в частности при настенном монтаже
следуйте инструкциям изготовителя, чтобы избежать
опасных ситуаций и несчастных случаев
Устанавливайте устройство только на стойку, штатив, держатель или


стол, входящие в комплект или рекомендованные изготовителем.
Не устанавливайте устройство на неустойчивых поверхностях
во избежание травмирования людей и повреждения устройства
в результате его падения.
Не используйте устройство рядом с источниками воды. Например,
возле ванны, умывальника, кухонной раковины, бассейна и т. д.

Содержание VE55L-A

Страница 1: ...DISPLAY User Manual V2 0 VE55L A FOR VE55L A...

Страница 2: ...ype in your area please consult the local dealer or electric power company To better protect the product in the thunderstorm weather or when this unit is not utilized for a long time or when unattende...

Страница 3: ...acturer or original parts with same characteristics and performance Usage of unlicensed parts may cause fire shock and or other hazards 15 Safety inspection When maintenance service is completed pleas...

Страница 4: ...facturer s instruction Both opening and ventilation holes in the unit casing are designed for ventilation Do not plug these opening and ventilation holes Insufficient ventilation may cause overheating...

Страница 5: ...input signal randomly DP can output loop through to the next screen DP input port and this function can replace distributor and matrix front signals access is 4 k which means that it has replaced the...

Страница 6: ...6 EN 1 4 System Connection Mode The structure of the system The block diagram of the screen wall 2 by 2...

Страница 7: ...ontrol 1 Check whether the port settings of the videowall software are correct 2 Check whether there is a damage in the serial line and whether it is a good connection between the product and the PC i...

Страница 8: ...80 60hz HDMI 4K HDMI digital signal input Up to 3840x2160 60hz DP input DP digital signal input Up to 3840x2160 60hz VGA input VGA analog signal input Up to 1920x1080 60hz DP output DP Daisy Chain out...

Страница 9: ...9 EN 55 inch 3 5mm Bezel Model...

Страница 10: ...omputer for the software is properly connected to the controller Both the relevant signal lines of the controller and power line are connected correctly System operation procedure 1 open the power sup...

Страница 11: ...ing controlled unit through the keyboard or the mouse clicking or dragging Function zone contains commonly used function buttons User s title zone the users can change the displays of the title accord...

Страница 12: ...esponding ID number 3 Click modify to complete the modification of the screen serial number Note When this function modifies the again number read the machine code displayed on the screen and modify t...

Страница 13: ...its 2 by 2 for example after selecting the 4 screen select the signal source in the signal sources click the execute button to complete the procedure You also can click on the image freezing to freeze...

Страница 14: ...14 EN Fig 5 Fig 6 After Merge there will be physical seams between the units you can select the eliminate the border and set up corresponding values to compensate borders between pictures...

Страница 15: ...shows the effect of removing frames This function of removing frames is not used This function of removing frames is used This function of removing frames is not used This function of removing frames...

Страница 16: ...Fig 10 3 8 Matrix Enable 1 Select Matrix Enable and select the matrix input No Fig 9 Fig 10 2 Select the matrix type and configure the matrix ID Note different matrix selection has the different time...

Страница 17: ...presets of Scene Select whose names can be modified Scene Select to be saved then click Save Scene and the model is saved The load Scene can call the users saved mode The polling mode of the scenes c...

Страница 18: ...ftware settings 1 Click the Admin button and enter the super Administrator Password 111111 in the pop up dialog box Fig 12 Fig 13 2 Click the Main Set button and make the following settings in the pop...

Страница 19: ...enu the two options of Video and VGA are set by different signal sources and each of the settings in the videowall unit will display correspondingly 3 10 1 Picture Setting When Video is selected in Ad...

Страница 20: ...GA is selected in Adjust Object HPosition VPosition Clock Phase can be set 3 10 3 Color Temp Whether you choose Video or VGA you can set the white balance 3 10 4 System adjustment Under the System men...

Страница 21: ...s button the blue screen mode hits and when there is no signal the display is blue screen Receive a signal signal after normal display Black Screen On When this button is clicked the black screen mode...

Страница 22: ...mplete the modification of the address 3 10 6 software upgrading 1 Copy the software MERGE bin to the root directory of the USB stick without changing the file name 2 Insert the USB disk into the USB...

Страница 23: ...s feature is temporarily unavailable 3 10 8 Panel adjustment Adjustment as shown in Figure 21 it is recommended to have a professional adjust Fig 22 3 11 Function Set 1 Click the Admin button and ente...

Страница 24: ...24 EN Fig 23 2 Click the Funtiog Set button and make the following settings in the pop up dialog box Fig 24 Serial port Network port Control mode Server settings IP Adress...

Страница 25: ...Title Set Fig 25 Fig 26 Title Users can modify according to their own needs User name Users can modify according to their own needs Company URL Users can modify according to their own needs can be cha...

Страница 26: ...ntrol software click on the bottom left corner of the LOGO image area according to the user has set up a LOGO URL etc click Open it will be connected to the set URL 3 13 Language Customers can choose...

Страница 27: ...rwise you have to insert to each screen one by one 5 3 Screen Address Setting 1 Press MENU on remote controller below OSD will pop up Fig 29 Fig 30 Refer to input source in use select input For exampl...

Страница 28: ...by left and right button on MENU OSD Set video wall matrix setting For example if you want to set up 2x2 matrix then set Start Row to 1 Sart Col to 1 End Row to 2 End Col to 2 Counter Row to 2 Counte...

Страница 29: ...29 EN Company Name Malead Limited Company address Flat Rm 9 25 F Concordia Plaza 1 Science Museum Road Tsimshatsui Kowloon Hong Kong Material plastic metal Warranty 36 months Made in China...

Страница 30: ...30 UA 1 2 3 4 5 6 7 8 9 10 11...

Страница 31: ...31 UA 12 13 14 15 16...

Страница 32: ...UA 1 1 1 178 1 2 4K DP Loop Display Port Loop 90 180 270 1 3 55 ADS 1920 1080 Full HD 2 500 1200 1 178 8 3 5 VGA DVI D HDMI x2 DisplayPort RJ45 RS232 DisplayPort RJ45 RS232 1214 684 94 28 VESA 400x400...

Страница 33: ...33 UA 1 4 The structure of the system 2 2...

Страница 34: ...34 UA 1 5 1 2 3 1 2 3 4 1 2 VGA DVI 1 2 VGA DVI 3 4 5 DVI DDC...

Страница 35: ...35 UA 2 2 1 DVI DVI 1920x1080 60 HDMI MHL HDMI 1920x1080 60 HDMI 4K HDMI 3840x2160 60 Display Port DP DP 3840x2160 60 VGA VGA 1920x1080 60 Display Port DP DP 3840x2160 60 RS 232 RJ45 RS 232 RJ45...

Страница 36: ...36 UA 2 2 55 3 5...

Страница 37: ...37 UA 3 3 1 Windows98 2000 NT XP WIN7 Vista 2 0 1 VGA 256 10M RS232 3 2 RS232 1 2 Lcdwall Exe 1...

Страница 38: ...38 UA 1 3 3 1 2 2 Refresh COM Open 1 2...

Страница 39: ...39 UA 3 Click modify to complete the modification of the screen serial number 3 2 2 XP 2 2 2 2 3 4 ID 1 ID 1 2 3 Modify ID ID ID System Settings 111111 3 5 Freeze...

Страница 40: ...40 UA 4 3 6 2 2 4 Execute Image Freezing...

Страница 41: ...41 UA 5 6 Eliminate the border...

Страница 42: ...42 UA 7 This function of removing frames is not used This function of removing frames is used 3 7 Execute 8 7...

Страница 43: ...43 UA Fig 10 3 8 1 Matrix Enable 9 10 2...

Страница 44: ...44 UA 3 9 16 Save Scene Load Scene 11...

Страница 45: ...45 UA 3 10 1 Admin 111111 12 13 2 Main Set...

Страница 46: ...ted in Adjust Object only Brightness Contrast and Color Restore can be set 14 15 Video VGA 3 10 1 Adjust Object Video Brightness Contrast Color Sharpness Tint Color Restore Adjust Object VGA Brightnes...

Страница 47: ...you choose Video or VAG you can set the white balance Fig 17 16 17 3 10 2 Adjust Object Video HPosition Hsize VPosition Vsize Adjust Object VGA HPosition VPosition Clock Phase 3 10 3 Video VGA 3 10 4...

Страница 48: ...48 UA 18 19 20 Backlight Auto ADC VGA Blue Screen On Black Screen On Factory Reset 3 10 5 Screen Add 19...

Страница 49: ...49 UA 21 01 01 1 20 2 Screen Add 3 Modify 3 10 6 1 MERGE bin USB 2 USB USB 3 Software Update 21 USB 3 10 7...

Страница 50: ...50 UA 3 10 8 22 22 3 11 1 Admin 111111...

Страница 51: ...51 UA 23 24 2 Function Set Serial port Network port Control mode Server settings IP Adress...

Страница 52: ...52 UA 3 12 System Settings Title Set 25 26 Title User name Company URL URL User LOGO...

Страница 53: ...53 UA 4 RJ45 to interface line sequence 27 28 Open URL 3 13 4 RJ45 TX RX GND 2 3 5...

Страница 54: ...54 UA 5 5 1 Commented VG72 Commen 5 2 1 RJ45 IN 5 3 1 MENU 29 30 Input HDMI2 HDMI2 MENU...

Страница 55: ...Commented Comment 31 32 2 MachineCode Ten Thousands Thousands Hundreds Tens Ones MENU 3 Video wall matrix setting 2x2 Start Row 1 Start Col 1 End Row 2 End Col 2 Counter Row 2 Counter Col 2 Merge MENU...

Страница 56: ...56 UA 9 25 1 18 04073 36 5...

Страница 57: ...57 RU 1 2 3 4 5 6 7 8 9 10 11...

Страница 58: ...58 RU 12 13 14 15 16...

Страница 59: ...RU 1 1 1 178 1 2 4K DP Loop Display Port Loop 90 180 270 1 3 55 ADS 1920 1080 Full HD 2 500 1200 1 178 8 3 5 VGA DVI D HDMI x2 DisplayPort RJ45 RS232 DisplayPort RJ45 RS232 1214 684 94 28 VESA 400x400...

Страница 60: ...60 RU 1 4 The structure of the system 2 2...

Страница 61: ...61 RU 1 5 1 2 3 1 2 3 4 1 2 VGA DVI 1 2 VGA DVI 3 4 5 DVI DDC...

Страница 62: ...62 RU 2 2 1 DVI DVI 1920x1080 60 HDMI MHL HDMI 1920x1080 60 HDMI 4K HDMI 3840x2160 60 Display Port DP DP 3840x2160 60 VGA VGA 1920x1080 60 Display Port DP DP 3840x2160 60 RS 232 RJ45 RS 232 RJ45...

Страница 63: ...63 RU 2 2 55 3 5...

Страница 64: ...64 RU 3 3 1 Windows98 2000 NT XP WIN7 Vista 2 0 1 VGA 256 10M RS232 3 2 RS232 1 2 Lcdwall Exe 1...

Страница 65: ...65 RU 1 3 3 1 2 2 COM Refresh Open 1 2...

Страница 66: ...66 RU 3 Click modify to complete the modification of the screen serial number 3 2 2 XP 2 2 2 2 3 4 ID 1 ID 1 2 ID 3 Modify ID ID ID System Settings 111111 3 5 Freeze...

Страница 67: ...67 RU 4 3 6 2 2 4 Execute Image Freezing...

Страница 68: ...68 RU 5 6 Eliminate the border...

Страница 69: ...69 RU 7 This function of removing frames is not used This function of removing frames is used 3 7 Execute 8 7...

Страница 70: ...70 RU Fig 10 3 8 1 Matrix Enable 9 10 2...

Страница 71: ...71 RU 3 9 16 Save Scene Load Scene 11...

Страница 72: ...72 RU 3 10 1 Admin 111111 12 13 2 Main Set...

Страница 73: ...ted in Adjust Object only Brightness Contrast and Color Restore can be set 14 15 Video VGA 3 10 1 Adjust Object Video Brightness Contrast Color Sharpness Tint Color Restore Adjust Object VGA Brightnes...

Страница 74: ...you choose Video or VAG you can set the white balance Fig 17 16 17 3 10 2 Adjust Object Video HPosition Hsize VPosition Vsize Adjust Object VGA HPosition VPosition Clock Phase 3 10 3 Video VGA 3 10 4...

Страница 75: ...75 RU 18 19 20 Backlight Auto ADC VGA Blue Screen On Black Screen On Factory Reset 3 10 5 Screen Add 19...

Страница 76: ...76 RU 21 01 01 1 20 2 Screen Add 3 Modify 3 10 6 1 MERGE bin USB 2 USB USB 3 Software Update 21 USB 3 10 7...

Страница 77: ...77 RU 3 10 8 22 22 3 11 1 Admin 111111...

Страница 78: ...78 RU 23 24 2 Function Set Serial port Network port Control mode Server settings IP Adress...

Страница 79: ...79 RU 3 12 System Settings Title Set 25 26 Title User name Company URL URL...

Страница 80: ...80 RU 4 RJ45 to interface line sequence 27 28 User LOGO Open URL 3 13 4 RJ45 TX RX GND 2 3 5...

Страница 81: ...81 RU 5 5 1 Commented VG72 Commen 5 2 1 RJ45 IN 5 3 1 MENU 29 30 Input HDMI2 HDMI2 MENU...

Страница 82: ...Commented Comment 31 32 2 MachineCode Ten Thousands Thousands Hundreds Tens Ones MENU 3 Video wall matrix setting 2x2 Start Row 1 Start Col 1 End Row 2 End Col 2 Counter Row 2 Counter Col 2 Merge MENU...

Страница 83: ...83 RU 9 25 1 18 04073 36 5...

Страница 84: ...ion of Consumers Rights 5 No warranty is given with respect to any consumer violation of the operating rules set forth in the instructions 6 The product warranty service is cancelled from the in the f...

Страница 85: ...85 UA 2E 1 2 60 3 4 5 6 7 36 __________________________________________________________________ 18 04073 0 800 300 345 044 230 34 84 390 55 12 www erc ua service...

Страница 86: ...86 RU 2E 1 2 60 3 4 5 6 7 36 _____________________________________________________________...

Страница 87: ...eller stamp Date of application Date of completion Cause of damage Coupon 3 Seller stamp Date of application Date of completion Cause of damage Product information Product Model Serial number Seller I...

Страница 88: ......

Отзывы: