14
UA
Опис продукту
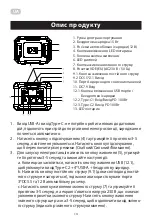
1. Ручка для транспортування
2. Бездротова зарядка 15 Вт
3. Роз’єми автомобільної зарядки (12 В)
4. Кнопка ввімкнення LED ліхтарика
5. Головна кнопка живлення
6. LED дисплей
7. Кнопка живлення змінного струму
8. Розетки VDE(EU) (AC230 В / 50 Гц)
9.1. Кнопка живлення постійного струму
9.2 DC5.5*2.1 Вихід
10. Порт Андерсон для сонячних панелей
11. DC7.9 Вхід
12.1. Кнопка ввімкнення USB портів /
Бездротової зарядки
12.2. Type-C1 Вхід/Вихід PD 100 Вт
12.3. Type-C2 Вихід PD 100 Вт
13. LED ліхтарик
1. Вихід USB-A і вихід Type-C: не потрібно робити ніяких додаткових
дій, підключіть пристрій до портативної електростанції, заряджання
почнеться автоматично.
2. Натисніть кнопку з підсвічуванням (4) та утримуйте її протягом 3-5
секунд, освітлення увімкнеться. Натисніть кнопку підсвічування,
щоб переключити різні режими (Слабкий/Сильний/Блимання).
3. Для запуску електростанції натисніть кнопку живлення (5), утримуй-
те її протягом 3-5 секунд та виконайте наступні дії:
a. Коли екран засвітиться, натисніть кнопку живлення USB (12.1),
щоб увімкнути вихід Type-C2 + 4*USB-A + бездротову зарядку.
b. Натисніть кнопку постійного струму (9.1) (доки світлодіод постій-
ного струму не загориться), тоді можна використовувати порти
3*DC5.5 та 12 В автомобільну розетку.
c. Натисніть кнопку живлення змінного струму (7) та утримуйте її
протягом 3-5 секунд, на екрані з’явиться напруга 230 В, що означає
увікнення розетки змінного струму. Натисніть кнопку живлення
змінного струму ще раз на 3-5 секунд, щоб відключити вихід змінно-
го струму (індикатор змінного струму вимкнено).
1. 15W Wireless Charging
2. hand shank
3. 2*12V Cigar lighter(Female)
4. LED On/Off Power Button
5.Main On/Off Power Button
6. LED Screen Display
7. AC On/Off Power Button
8. 2*VDE(Europe) Socket Output(AC230V/50Hz)
9.1. DC On/Off Power Button
9.2. 3*DC5.5*2.1 Output
10. Anderson Port For Solar Charging
11. DC7.9 Input Only
12.1. USB Port/Wireless Charging On/Off Button
12.2. Type-C1 Input/Output PD100W
12.3. Type-C2 Output PD100W only
13. LED Torch
1.Type-C1 Input/Output, no need to do any actions, connect your device, the Power Station will be
discharged automatically.
2.Press the Light Button(4) for 3-5 seconds, the lighting will be turned on, click the light button to switch
different modes (Weak/Strong/Blink).
The following steps must be turned on the Power Station: Press Power Button(5) for 3-5 seconds
a.When the Screen is lighted on, Press the USB Power button(12.1) to turn on the Type-C2+4*USB-A+
Wireless output
b.Press the DC button (9.1, till LED for DC is lighted on), then 3*DC5.5(at the bottom of the screen) and
2*12V Car outlet (at the top of the screen) can be output.
c.Press the AC Power Button(7) for 3-5seconds,the Screen show moment Voltage 230V means AC
Socket can be output. Press AC Power Button again for 3-5seconds to cut off the AC Output(the LED
for AC was turned off).
Notice:
1.It is recommended that the loaded device should not exceed 1200W, and the excessive power may cause output protection
or burn out the product.
2.Only Anderson Port for Solar Charging
3.The Cooling Fan will be started when the total output Power >=150W(1pc), Power >=300W(2pcs)
4.USB-A QC3.0-18W have no output when DC Charging Input
5.DC input will be cut off @85% battery level when DC+PD Input same time
6.3*DC5.5 and 3*Car Outlet have no output when DC7.9 Input
7.DC Output will be cut off when AC Output reached 1000W
Содержание 2E-OPS-1200
Страница 11: ...11 UA 1 2 3 4 5 6 7 30 8 9 1 3 50 10 11...
Страница 12: ...12 UA 13 14 15 17 18 19 30...
Страница 13: ...13 UA 1 1 2 168 1 3 Type C 30 cm Type C to Type C 1 4 DC5 5 2 1 1 5 1...
Страница 17: ...17 UA 10...
Страница 18: ...18 UA 120 Anderson...
Страница 19: ...19 UA PD DC5 5 Type C LED...
Страница 20: ...RU 20 1 2 3 4 5 6 7 30 8 9 1 3 50 10 11...
Страница 21: ...RU 21 22 23 25 26 27 28 31...
Страница 22: ...RU 22 1 1 2 168 1 3 Type C 30 cm Type C to Type C 1 4 DC5 5 2 1 1 5 1...
Страница 26: ...RU 26 10...
Страница 27: ...RU 27 120 Anderson...
Страница 28: ...28 RU 28 PD DC5 5 Type C LED...
Страница 30: ...30 30 UA 12...
Страница 31: ...RU 31 12...

