1PBROADBAND technicolor DGA4231 Скачать руководство пользователя страница 8

*DSL37820940*

DSL37820940

TECHNICOLOR

1-5 rue Jeanne d’Arc

92130 Issy-les-Moulineaux

France

technicolor.com

Copyright 2018 Technicolor. All rights reserved. DMS3‑QIG‑25‑518 v1.0.
All tradenames referenced are service marks, trademarks, or registered trademarks of their 

respective companies. Specifications subject to change without notice.

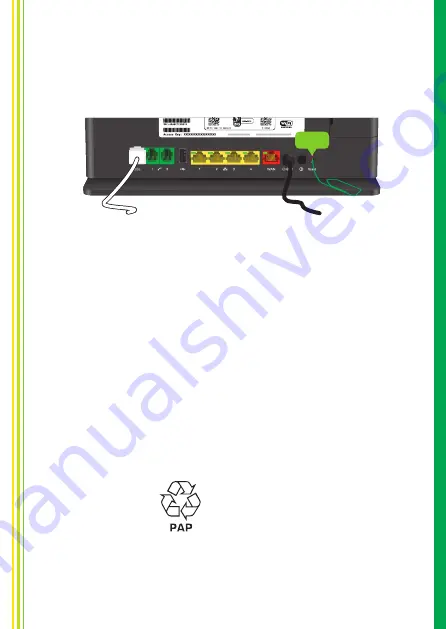
8.3. How to reset your 

DGA4231

If at some point you want to restore the default settings, proceed as follows:

Make sure that your 

DGA4231

 is turned on.

Use a pen or an unfolded paperclip to push the recessed 

Reset

 button on the 

back panel of your 

DGA4231

 for 

at least 10 seconds

 and then release it.

Reset

Your 

DGA4231

 restarts and applies the factory default settings.

Содержание technicolor DGA4231

Страница 1: ...DGA4231 Quick Setup Guide ...

Страница 2: ... of your package Your package contains the following items D E F B C A Item Description A One DGA4231 B User Documentation this Quick Setup Guide Safety Instructions Regulatory Notices Other additional documents may be included C One power adapter type may differ depending on region D One DSL cable E One Ethernet cable with yellow connectors F One Ethernet cable with red connectors optional ...

Страница 3: ... access device for example an Optical Network Terminal ONT for fibre In this setup your DGA4231 is used as local router Follow the instructions from Option B Local router setup on page 2 Option A DSL Gateway setup DSL 1 Plug the DSL cable into the grey DSL port on your DGA4231 2 Plug the other end of the DSL cable into your telephone wall socket Option B Local router setup WAN 1 Plug the Ethernet ...

Страница 4: ...ectric power supply adapter into the power inlet port of your DGA4231 Plug the adapter into a nearby power outlet 2 Press the power button on the back panel If the LED is blinking green or orange your DGA4231 is updating its software If this is the case wait until the LED becomes solid green This can take several minutes Do not power off your device or unplug any cables ...

Страница 5: ...231 3 Connect the other end of the Ethernet cable to your device 4 Connect your other Ethernet devices 5 We recommend you to first configure your DGA4231 see 7 Conf igure your DGA4231 to your needs optional on page 6 before connecting your Wi Fi devices see 6 2 Connect your Wi Fi devices on page 4 6 2 Connect your Wi Fi devices Your DGA4231 has two Wi Fi access points The 5 GHz access point offers...

Страница 6: ...ports WPS PBC and you know how to start it For more information consult the documentation of your Wi Fi device 2 On the top panel of your DGA4231 briefly press the WPS button and then release it The WPS LED starts blinking orange 3 Within two minutes start WPS PBC on your Wi Fi device You will probably have to do this in one of the following ways Press a WPS button on your Wi Fi device Start WPS P...

Страница 7: ... Wi Fi is on If the Wi Fi LED is solid or blinking green the Wi Fi is on If the Wi Fi LED is off then use one of the following methods to check if the Wi Fi is on Browse to the DGA4231 web interface and check the colors of the bullet in the Wireless card If the bullets are green then the Wi Fi is on On a Wi Fi device that is within range of the DGA4231 check whether the DGA4231 appears in the list...

Страница 8: ...arks of their respective companies Specifications subject to change without notice 8 3 How to reset your DGA4231 If at some point you want to restore the default settings proceed as follows 1 Make sure that your DGA4231 is turned on 2 Use a pen or an unfolded paperclip to push the recessed Reset button on the back panel of your DGA4231 for at least 10 seconds and then release it Reset 3 Your DGA42...

Отзывы: