1010music Toolbox Скачать руководство пользователя страница 6


Toolbox User Manual 

11/23/17 10:32 AM 


Copyright 1010music LLC 2017 


Digital Heart – Analog Soul


P. 6 

Setup Toolbox 

In this section we will discuss how to install toolbox in your Eurorack, insert the microSD card, and configure the basic 
input and output signals.  

Rack Installation 

First let’s make sure you have a compatible Eurorack. Toolbox requires a +12V 
connection and uses the standard 16-pin ribbon cable to connect to the rack. You 
should always power down the Eurorack when connecting new modules. Remove 
toolbox from the packing material and attach the ribbon cable to the back of the 
module. The cable is bi-directional so it does not matter which end is inserted into 
the module. However, the connector must be in the correct orientation.  The 
connector on the module is keyed so the ribbon cable won’t fit in the wrong 
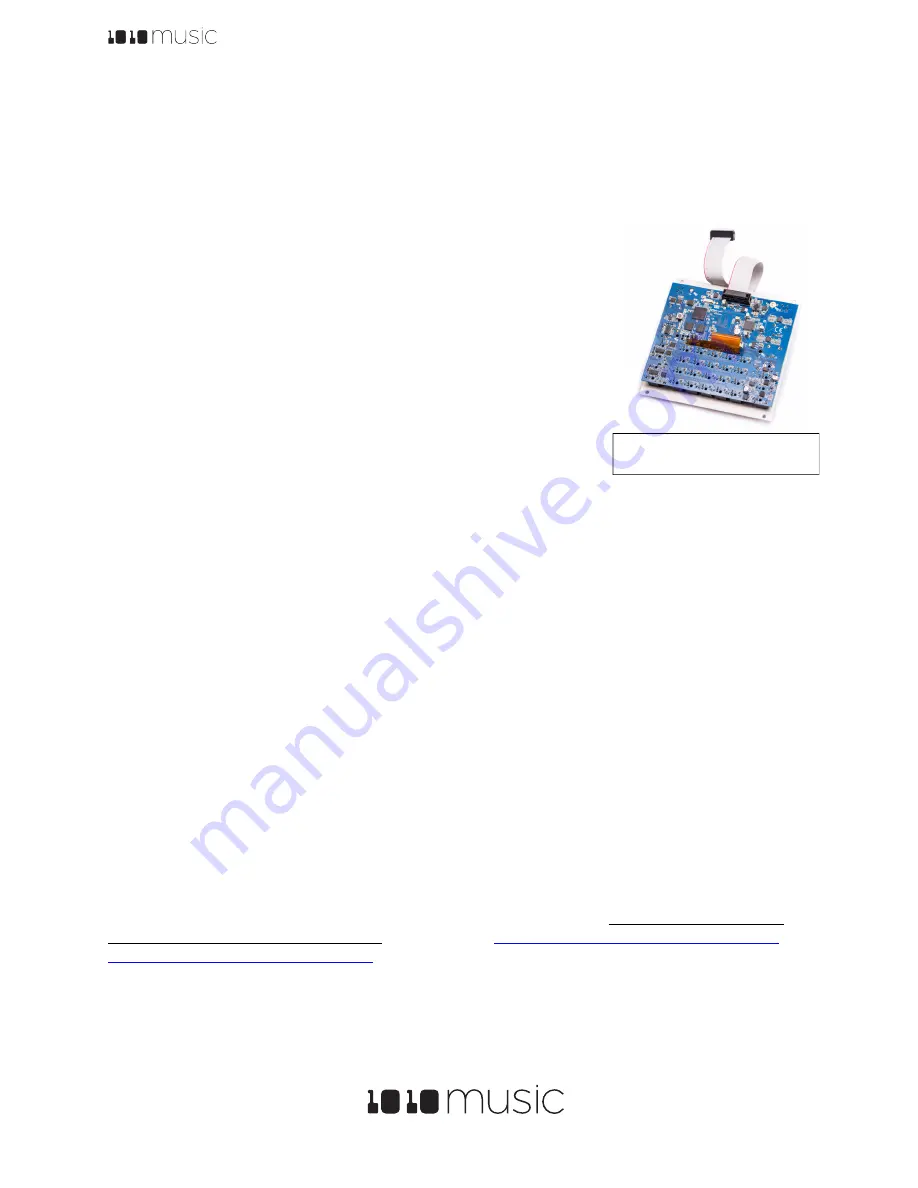
orientation. The correct orientation places the edge of the ribbon cable with the 
red line on the left side of the module as shown in Figure 3 to the right.  Next, 
connect the other end of the ribbon cable to the power supply for your Eurorack.  
When connecting to the Eurorack power supply, extra care is needed because not 
all power supplies are keyed to ensure correct orientation. The ribbon cable should 
be connected to the power supply so that the edge of the ribbon cable with the 
red line is aligned with the 

12

V pins on the power supply bus. When you power 

up, watch closely to make sure that the module powers up. If the touch screen 
doesn’t respond right away, turn off the rack and confirm the cable orientation.  1010music modules do contain some 
buffering to prevent burning out the module but that only buffers for so long.  Don’t power up yet.  
 
Next make sure the microSD card that came with the module is inserted into the Memory Card Slot.  Most modules 
come with the microSD card already inserted. The card should be inserted with the notched edge down.  Now you 
can power up the rack.  The module should start up in less than 10 seconds and you will see the Main screen as 
shown in Figure 2: Main Screen Overview above. 
 

Note: 


A microSD card must be inserted into toolbox before you can get started. All presets are stored on 
the microSD card. Preset changes are only saved when you choose to save them. 

Connect a Gate Output to a Sound Generating Module 

Toolbox itself does not generate sound. It generates MIDI and Control Voltage signals that drive other sound 
generating modules, such as bitbox, synthbox and third party drum and synthesizer modules. In order to hear an 
example of the output of toolbox, connect a patch cord between Gate Sequencer output jacks 1, 2, 3 or 4, and an 
external module.  For example, you could connect it to a control voltage trigger on synthbox or bitbox. Configure the 
receiving module to play a sound when the gate signal is triggered.  

Connect a MIDI Controller Input 

Toolbox allows you to record Note Sequences from a MIDI input. If your MIDI controller has a mini TRS audio jack 
connector, then you can try to plug it directly into the MIDI Input Jack using a standard patch cable. However, there 
are competing standards for implementing mini TRS audio jacks for MIDI, so you may need to use a MIDI adapter. If 
it has a 5 Pin DIN connector, use an appropriate MIDI Adapter.  Read the blog post Mini TRS Audio Jacks for 
MIDI Connections Compatibility Guide on our website at 

https://1010music.com/stereo-minijacks-

midi-connections-compatibility-guide

 for more details about the MIDI adapter.  

 
Toolbox accepts input from all MIDI channels.  

Play Settings 

There are several global settings that apply to all of the sequencers and function generators.  Follow these steps to 
configure these settings: 

Figure 3: Ribbon Cable 

Orientation on Module


Содержание Toolbox

Страница 1: ...Toolbox User Manual 11 23 17 10 32 AM Copyright 1010music LLC 2017 P 1 Toolbox User Manual ...

Страница 2: ...8 Mute Mode 8 Use the Sequencers and Function Generators 8 Use the Gate Sequencer 8 Use the Note Sequencer 9 Use the LFO Function Generators 11 Use the Control Voltage Sequencer 12 Apply Modulation 13 Synchronizing with Other Modules 13 Preset Management 14 Select a Preset 14 Save a Preset 14 Copy a Preset 14 Rename a Preset 14 Delete a Preset 15 Use Save As to Save Current Changes to a Preset as ...

Страница 3: ... Next we will quickly discuss basic preset usage and muting capabilities Then we will walk you through how to use each of the sequencers and function generators followed by a discussion of using modulators with the sequencers Then we will cover how to synchronize toolbox with other modules Finally we will go into more depth about preset management tasks and discuss how to upgrade your firmware If ...

Страница 4: ...Overview The front panel of toolbox contains a touch screen control knobs HOME and INFO buttons MIDI input and output jacks and CV input and output jacks as shown in Figure 1 The INFO and HOME buttons at the top of the front panel of toolbox are used to navigate the screens Press INFO to view the information screen for the current selection In some cases you can press INFO more than once to get to...

Страница 5: ...d In Displays the state of the external control voltage modulation inputs in rows 1 through 3 Row 4 displays the state of CV Mod In 4 that controls playback 2 Gate Sequencers Displays a small representation of the four gate sequences Touch each row to configure the corresponding sequencer 3 Note Sequencers Displays a small representation of the note sequences Touch each row to configure the corres...

Страница 6: ...ted into the Memory Card Slot Most modules come with the microSD card already inserted The card should be inserted with the notched edge down Now you can power up the rack The module should start up in less than 10 seconds and you will see the Main screen as shown in Figure 2 Main Screen Overview above Note A microSD card must be inserted into toolbox before you can get started All presets are sto...

Страница 7: ...start creating our own sequences lets make sure the module is setup properly by playing back some content from a preset that comes with the module Select a Preset A preset is a set of pre configured sequences function generators and modulators You can use the 1010music presets or create your own To select a preset 1 Press the HOME button to display the Main screen if needed 2 Cycle through the pre...

Страница 8: ...s allows you to turn different components on and off during the course of playback or to isolate a single component while creating the sequence To use Mute Mode to temporarily disable playback of toolbox components 1 Press HOME to return to the Main screen if needed 2 Press HOME to toggle Mute Mode on and off In Mute Mode the colors of the screen components change to green and red 3 Touch boxes on...

Страница 9: ...tputs The CV output is in the form of a pair of gate and pitch signals for each Note Sequencer The CV Output is monophonic and will play back the most recently entered note for each step in the sequence The CV gate signals for each Note Sequencer are output through Gate Outputs 5 8 labeled Note Sequencer Gate Outputs in Figure 1 Front Panel Overview The CV Pitch signals are output through CV Outpu...

Страница 10: ... the MIDI Input Jack with each successive MIDI input note adding a note to the next step in the sequence Touch Step again to stop recording 3 You can use the Control Knobs and touch gestures to zoom and scroll through the sequencer Action Result Turn the top left control knob Moves the current note position cursor Turn the top right control knob Scrolls the piano roll up and down Turn the bottom l...

Страница 11: ...ternative input as the clock signal By default the toolbox internal clock INT will be used INT EXT1 EXT2 EXT3 GATE1 GATE2 GATE3 GATE4 MIDI Ch The MIDI channel that this sequencer will use for output 1 through 16 Quant Size Defines precisely when to restart the sequence when using the internal clock When the sequence ends toolbox will wait until the start of the next Quant Size interval to restart ...

Страница 12: ...ence is playing the cursor will move across the step bars to show the current playback position Touch a step bar to set the value at the height selected Turn the left control Beat Sync Controls the operation of the rate parameter On Off Parameter Description Range of Values Step Len The length of each step in the sequence 1 64 1 32T 1 32 1 16T 1 16 1 8T 1 8 1 4T 1 2T 1 bar 2 bars 4 bars 8 bars T T...

Страница 13: ...the Note Sequencers to display the Note Sequencer screen 2 Press the INFO button to display the Note Sequencer Parameters screen 3 The parameters that can be modulated will have three black boxes below them This allows you to apply up to three modulators to each of these parameters Touch one of the boxes below a parameter to open the Modulation Selection Screen 4 Adjust the modulation parameters b...

Страница 14: ...ed preset and go back to the Main screen Save a Preset Toolbox does not automatically save your changes to presets You have to manually save by following these steps 4 From the Main screen touch the preset name to display the Preset Selection screen 5 Touch Edit to display the Preset Edit Submenu 6 Touch Save to save the changes to the preset and return to the Main screen Copy a Preset If you pref...

Страница 15: ...copy over to your microSD Card Install New Firmware Here are the steps required 1 Download the toolbox firmware onto your computer You can find the latest firmware image in the Firmware Downloads sub forums at https forum 1010music com NOTE You must be a registered member of the forum in order to access the firmware download sub forums 2 Unpack the zip file Some browsers do this automatically for ...

Страница 16: ...ck 1010music products are compatible with cables that use the following mapping of MIDI signals between female MIDI connectors and mini TRS audio jacks MIDI Signal MIDI Connector Mini TRS Audio Current Source Pin 4 Tip Current Sink Pin 5 Ring Shield Pin 2 Sleeve Table 1 MIDI Connector to Mini TRS Audio Jack Mapping For more information on the use of adapters read the blog post on our website Mini ...

Отзывы: