ZKTeco ZM100, User Manual
The ZKTeco ZM100 is a cutting-edge access control and time attendance terminal. Maximize the use of this device by downloading the free user manual from our website. Stay informed on how to operate and set up your device with the comprehensive manual available for download at manualshive.com.
Share
Download


Reviews:
No comments
Related manuals for ZM100
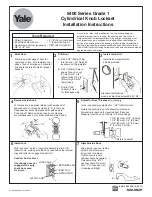
5400 Series
Brand: Yale Pages: 2

93670-011
Brand: RB RELIABILT Pages: 2

Cencon 4
Brand: Kaba Mas Pages: 54

ED93F-CVRW Series
Brand: INOX Pages: 2

OR-ZS-816
Brand: Orno Pages: 17

GS3-MT PIN
Brand: Stanley Pages: 48

MULTI-PURPOSE LOCK – 1 PIECE
Brand: KIKKA BOO Pages: 2

Powerbolt2
Brand: Kwikset Pages: 2

NIAGARA
Brand: tell Pages: 2

Ultraloq LATCH 5 FINGERPRINT
Brand: U-tec Pages: 6

SafeTLock Cobra 1000
Brand: SafeTech Pages: 2

TSA Zipper Lock
Brand: Conrad Pages: 2

FOS 550
Brand: Abus Pages: 6

49688/01
Brand: Weiser Pages: 2

C8723
Brand: Stock Loks Pages: 1

CodeLock
Brand: Digitus Biometrics Pages: 10

XEVS500
Brand: hager Pages: 4

SMART DEADBOLT
Brand: Maco Pages: 20


