


WI-FI MONITORING SYSTEM ZMB-01
USER MANUAL
ZAMEL
sp. z o.o.
ul. Zielona 27, 43-200 Pszczyna, Poland
Tel. +48 (32) 210 46 65, Fax +48 (32) 210 80 04
www.zamel.com
, e-mail: [email protected]
plik: ZMB-01_inst_gar_gb | modyfikacja: 11.01.2021
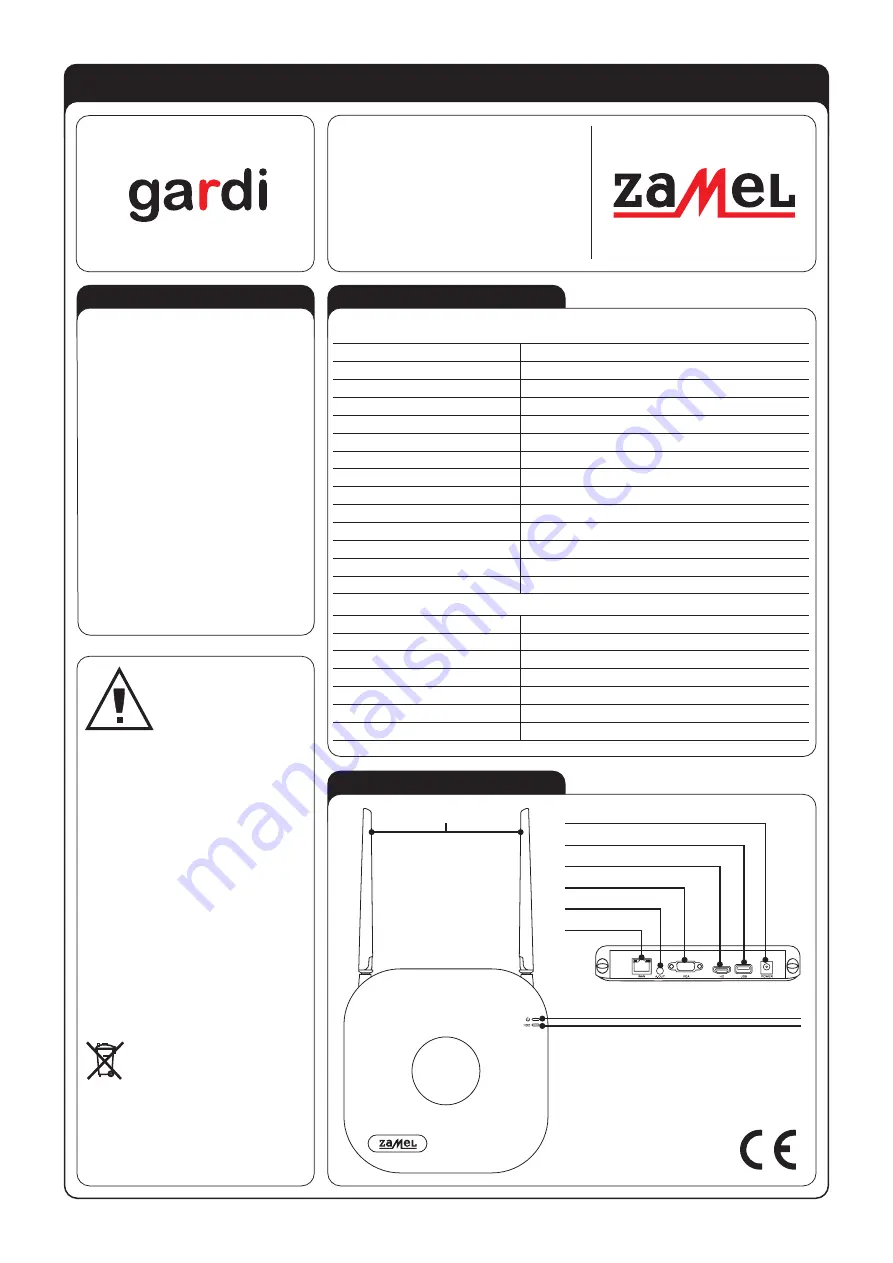
APPEARANCE
TECHNICAL DATA
DESCRIPTION
RECORDER
Power supply: 12 V DC
Power consumption: 4.1 W
Frequency: 2.4 GHz
Maximum number of cameras: 9
Compression method: H.265/H265+, H264/H264+
Recorded image resolution: 1920x1080
Range: up to 300 m in open area
Video outputs: 1x HDMI, 1xVGA
Plug-in socket: 1xRJ45 (10M/100M)
Hard drive socket: SATA
USB slot backup, mouse plug-in
Remote access: ANDROID and iOS application or online
Weight (without the hard drive): 479 g
Dimensions: 215 x 230 x 180 mm (with the antennas unfolded)
CAMERA
Power supply: 12 V DC
Power consumption: 1.7 W
Matrix type: 2MP (1080p), 1/2.9” CMOS Sensor HISILICON Hi3516C
Infrared: 20 LEDs of ca. 25 m in light range
Housing protection rating: IP66
Weight: 284 g
Dimensions: 73 x 160 x 160 mm (with the antenna unfolded)
The ZMB-01 system is used for simulta-
neous viewing images from 9 wireless
cameras and recording them on a hard
drive (the system includes 2 cameras,
while the remaining items can be or-
dered separately as ZMB-01/C, depend-
ing on the needs). After connecting a
recorder to the Internet, the user can ac-
cess the device online using an Android
or iOS application.
The system includes:
• Recorder - 1 item,
• 2 MP camera - 2 items,
• 12 V / 2 A recorder power supply - 1
item,
• 12 V / 0.5 A camera power supply - 2
items,
• Expansion plugs and culverts for the
cameras.
• Mouse, RJ45 cable.
The device should be
connected to a one-phase
network in accordance
with legally binding stand-
ards. The connection
method is described in
this manual. Any activities
related to installation, connection, and
adjustment should be performed by qual-
ified electricians who have read this us-
er’s manual and familiarised themselves
with device functions. Removing the
enclosure voids the warranty and poses
a risk of electric shock. Before installa-
tion, make sure that there is no voltage
on connection cables. To install the de-
vice, use a cross-head screwdriver with
a diameter of 3.5 mm. The proper opera-
tion of the device is affected by how the
device is transported, stored, and used.
It is not advisable to install the device in
the following cases: lack of any compo-
nents, damage to or deformation of the
device. If the device operates improp-
erly, please contact the manufacturer.
Do not dispose of this device in
the trash can with other waste! In
order to avoid harmful effects on the
environment and human health, store
used device in specially designated
places. Household electronic waste
can be returned for free and in
any amount to the collection point
established for this purpose, and
also to the shop when buying new
equipment.
NOTE
Power supply socket
Antennas
USB port
HDMI monitor socket
VGA monitor socket
Audio output
LAN socket
Power status signaling
Hard drive status signaling


