background image

P/N YRD420-KD-F Rev A
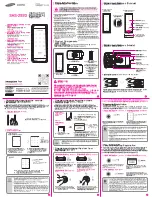
Assure Lock 2 Touch

Keyed YRD420-F

Trusted Every Day

Download Yale Access App

Create an account if you don’t already have  

one, and tap “Set Up a Device”.

Note: If you have an account with the August App, use the same username and 
password for the Yale Access App.

Install and Set Up Your Lock

Follow the step-by-step Installation and Setup Guide in this manual, or 

refer to the app installation guide with helpful videos.

Note: If you use the app, please tear off the Door Checker and the Marking 
Template (pages 5-8) to use when prompted.

Use Your Lock

Unlock with your fingerprint, create permanent or temporary entry 

codes, set up Auto-Lock and more.

ISL-2225-00-100

Summary of Contents for Assure Lock 2 Touch

Page 1: ...name and password for the Yale Access App Install and Set Up Your Lock Follow the step by step Installation and Setup Guide in this manual or refer to the app installation guide with helpful videos No...

Page 2: ...P N YRD420 KD F Rev A...

Page 3: ...5 Attach Wire Cable to Interior Lock 16 Install Interior Lock 17 Test Thumbturn and Key 18 Install Yale Smart Module Optional 19 Install DoorSense Optional 20 Install Batteries and Set Up with App 23...

Page 4: ...djustable Deadbolt Key 5 Manual 6 Reset Pin 7 Mounting Plate 8 AA Batteries 9 Screws a Strike Plate and Deadbolt Screws b Teal Screw Set B c Black Screw Set C d Silver Screw Set D e Optional Security...

Page 5: ...of box latch setting F 2 3 4 backset adjust latch setting Step 2 point 1 of this manual Greater than A B C or D Equals E or F Less than A Less than B or greater than D Doesn t equal E or F Your door...

Page 6: ...diameter and depth Equals I Greater than I Greater than H Adjust diameter to G or H Adjust diameter to I Your door is not a match Your door is not a match Edge Bore Door Strike Pocket Frame Diameter D...

Page 7: ...mm Edge Bore Center of 1 25mm Edge Bore Centerline Center of 2 1 8 54mm Face Bore Center of 2 1 8 54mm Face Bore I H 1 3 8 35mm Door Thickness B 2 3 8 60mm Backset E 1 3 4 44 5mm Door Thickness C 2 3...

Page 8: ...mm Edge Bore Centerline Center of 1 1 2 38mm Face Bore Center of 1 1 2 38mm Face Bore 1 1 2 I G 1 3 8 35mm Door Thickness B 2 3 8 60mm Backset E 1 3 4 44 5mm Door Thickness C 2 3 4 70mm Backset F Tear...

Page 9: ...warranty and could lead to failure of the product to provide access 1 Phillips Head Screwdriver 2 Door Checker tear off pages 5 6 of this manual 3 Tape Measure 4 Drill 5 Marking Template tear off page...

Page 10: ...Door Keep your old deadbolt until your new lock has been successfully installed 1a Remove Existing Deadbolt If you have a new door please proceed to step 1b If you have a deadbolt on your door use the...

Page 11: ...g Template Tear off the Door Checker pages 5 6 and follow the guidelines on both sides to measure each aspect of your door and frame There are some cases when existing holes cannot be adjusted to be c...

Page 12: ...e solid lines as a template for 1 3 4 door thickness 3b Use dashed lines for 1 3 8 door thickness 4 Choose your preferred backset It should match either the shape with solid outlines 2 3 4 or the one...

Page 13: ...s 3 Make sure UP arrow on the deadbolt is facing upwards 4 Deadbolt latch must be in an unlocked position Note If the deadbolt latch is extended use a small flathead screwdriver to rotate slot until d...

Page 14: ...off the body of the lock Note Removing the adapter might also help if your face bore and edge bore are of irregular shape or are not properly aligned 2 Remove the plastic cover from the keypad 3 Make...

Page 15: ...eypad 4 Slide tailpiece through the designated slot in the mounting plate 5 Tighten screws with a screwdriver to secure the mounting plate As you tighten the screws make sure the mounting plate and th...

Page 16: ...by pulling it upwards off the body of the interior lock 2 Make sure the side of the cable end with the ridges and the marked line faces outward 3 Push cable into the designated slot until you hear a c...

Page 17: ...the tailpiece through the designated slot on the back of the thumbturn 3 Press the lock against the mounting plate adjusting its position until it clicks into place and the bottom of the lock is held...

Page 18: ...rom the inside Ensure that the deadbolt latch is centered in the face bore hole Ensure that the tailpiece is positioned horizontally and inserted through deadbolt latch slot step 3 point 3 into the th...

Page 19: ...l does not include a Smart Module please proceed to step 9a Insert Yale Smart Module into the designated slot at the top of the body of the lock Note If you purchased your module separately check comp...

Page 20: ...des a cleaner look with more robust performance but requires drilling For surface mount instructions please proceed to step 9b For flush mount instructions please proceed to step 9c 9a Install DoorSen...

Page 21: ...dges of the device and the screw holes 3 Remove the remaining backing from the adhesive 4 Determine mounting location For optimal performance DoorSense should be mounted within 1 1 2 from the edge of...

Page 22: ...The distance from the center of the strike plate to the center of the DoorSense should be 2 making the DoorSense in line with the logo on the battery cover of the lock 6 Mark a hole that s horizontal...

Page 23: ...tap on Set Up a Device and follow the in app setup instructions Note If the lock exits pairing mode simply press the Yale logo to restart 5 With the battery cover off locate the setup QR code on the s...

Page 24: ...o ensure successful HomeKit setup make sure they are online and connected Enabling the HomeKit integration allows you to connect your lock and control it from your iPhone with the Apple Home app 11 Se...

Page 25: ...to register a fingerprint or create an entry code 2 Tap on existing users in Guest List to register new fingerprints create new entry codes or manage existing credentials You can register and manage f...

Page 26: ...erprint With entry code Press Enter entry code Press Interior Lock 1 Exterior LED Indicator 2 Wake One Touch Locking Fingerprint Scanner 3 Warnings Menu 4 Submit Entry Code 5 Thumbturn 6 Passage Butto...

Page 27: ...on you can be away from home and use your app to operate your lock monitor who s coming and going and create or manage entry codes To connect your lock to your Wi Fi network you will need a module ava...

Page 28: ...lash red Jammed lock Gear flashes white Pairing Gear flashes red during pairing Pairing failure Interior Lock Alerts LED indicator flashes blue Low battery levels 1 2 and 3 LED indicator flashes red L...

Page 29: ...App you should reset it using the app Go to your lock s settings and choose Factory Reset 1 Remove one battery 2 Insert reset pin into the designated reset hole 3 Press and hold the reset pin 4 While...

Page 30: ...long as 30 minutes When using the Auto Lock feature with DoorSense your door will not lock until it is closed Auto Lock can be set up in the lock settings of the app Auto Unlock Auto Unlock knows when...

Page 31: ...the app Automation Auto Lock Door will automatically lock either when door is closed with DoorSense or on a timer Auto Unlock Door will automatically unlock when you arrive home DoorSense Allows you...

Page 32: ...iming Default 60 sec The lock will shut down for the set period of time and not allow operation after the wrong code entry limit has been reached Wrong Code Limit Default 5 times After the set number...

Page 33: ...ock is on for a while then shows no reaction Lights dim Batteries do not have enough power Replace batteries Lock chimes indicating code acceptance but door will not open Check for any foreign objects...

Page 34: ...rify entered code is a valid previously programmed 4 to 8 digit code Vacation mode might be on Only an admin user can switch vacation mode to normal in the app Upon entering an entry code and pressing...

Page 35: ...tch Adjust your existing knob lever or handleset strike plate Latch engagement into the strike is the main component used for door alignment To adjust knob lever handleset strike plate 1 Remove plate...

Page 36: ...d used in accordance with the instructions may cause harmful interference to radio communications However there is no guarantee that interference will not occur in a particular installation If this eq...

Reviews: