WD SATA Hard Drive
Quick Install Guide
Before Getting Started
This poster is designed to aid in the quick installation of your
WD SATA hard drive. If you experience problems following
these procedures or need further information regarding your
drive, visit
support.wdc.com
to search our online knowledge
base for frequently asked questions and other common
troubleshooting tips and to download the full version WD SATA
Hard Drive Installation Guide.
Kit Contents
WD SATA Hard Drive
Mou nting Screws
Docume ntation
Quick Instal
l
Wes
tern
Digita
l
Har
d D
rive
Hard
war
e inst
all a
tion
for yo
ur
Wes
te rn
Digita
l ha
rd d
rive
Befo
re G
ettin
g St
ar
This
doc
ume
nt w
as d
esig
ned
to
aid
in th
e qu
ick in
stal
you
r We
stern
Dig
ital ha
rd d
ri ve
. If y
ou e
xpe
rien
ce p
robl
em
follo
wing
the
se p
roce
dur
es o
r ne
ed f
u rthe
r in f
orm
atio
n
rega
rdin
g yo
ur d
ri ve
, do
wnlo
ad t
he f
ull
vers
ion
West
ern D
igita
l
Har
d Dr
ive I
nsta
llatio
n Gu
ide f
rom
our
Web
site
at
ww
w.w
este
rnd
igita
l. co
m . O
r yo
u m
ay c
onta
ct W
este
rn D
igita
l
Tec
hnic
al S
upp
o rt
(see
the
bac
k pa
ge
for c
onta
ct in
form
atio
n) .
NOT
E:
Inst
alla
tion
inst
ru c
tions
for
the
Ma
cint
osh
sys
tem
are
loca
ted o
n th
e to
p po
rtion
of th
e ba
ck p
ag
e.
Kit Co
nten
ts
Mou
ntin
g Sc
rew
s
and
a Ju
mper
Shu
nt
Data
Lifeg
uard
Too
ls Di
ske
tte
Ultra
Ins
Hard
driv
es la
rger th
an 13
7 GB
inc
lude
the
fol
S/M: WM XXXXX
XX
X
MDL: WD XXXX
XX
X
DCM: XXXXX
X
Weste
rn D
igita
l Ha
rd D
ri ve
(10-pin
jump
er bloc
k)
Ultra
ATA
Con
trolle
r Ca
rd
WD SATA Cable
with SecureConne ct
(for use only with WD S ATA hard d rives)
™
Data Lifeguard Tools CD
(for WD 7200 RPM S ATA hard d rive kits)
™
Set the Jumpers
The default setting for WD SATA hard drives varies depending on the model. To determine the default setting for
your drive, look at the drive label on the top of the drive.
DO NOT change the default setting if you intend to use the drive in a desktop computer.
Change the jumper settings ONLY if you intend to use the drive in an enterprise storage environment. For more
information on these advanced settings, obtain the full version WD SATA Installation Guide at
support.wdc.com
.
SSC_DIS Mode (Default)
— Enable or disable the spread spectrum clocking feature. Default setting is disabled.
OPT1
— Only for factory use.
OPT2
— Only for factory use.
1
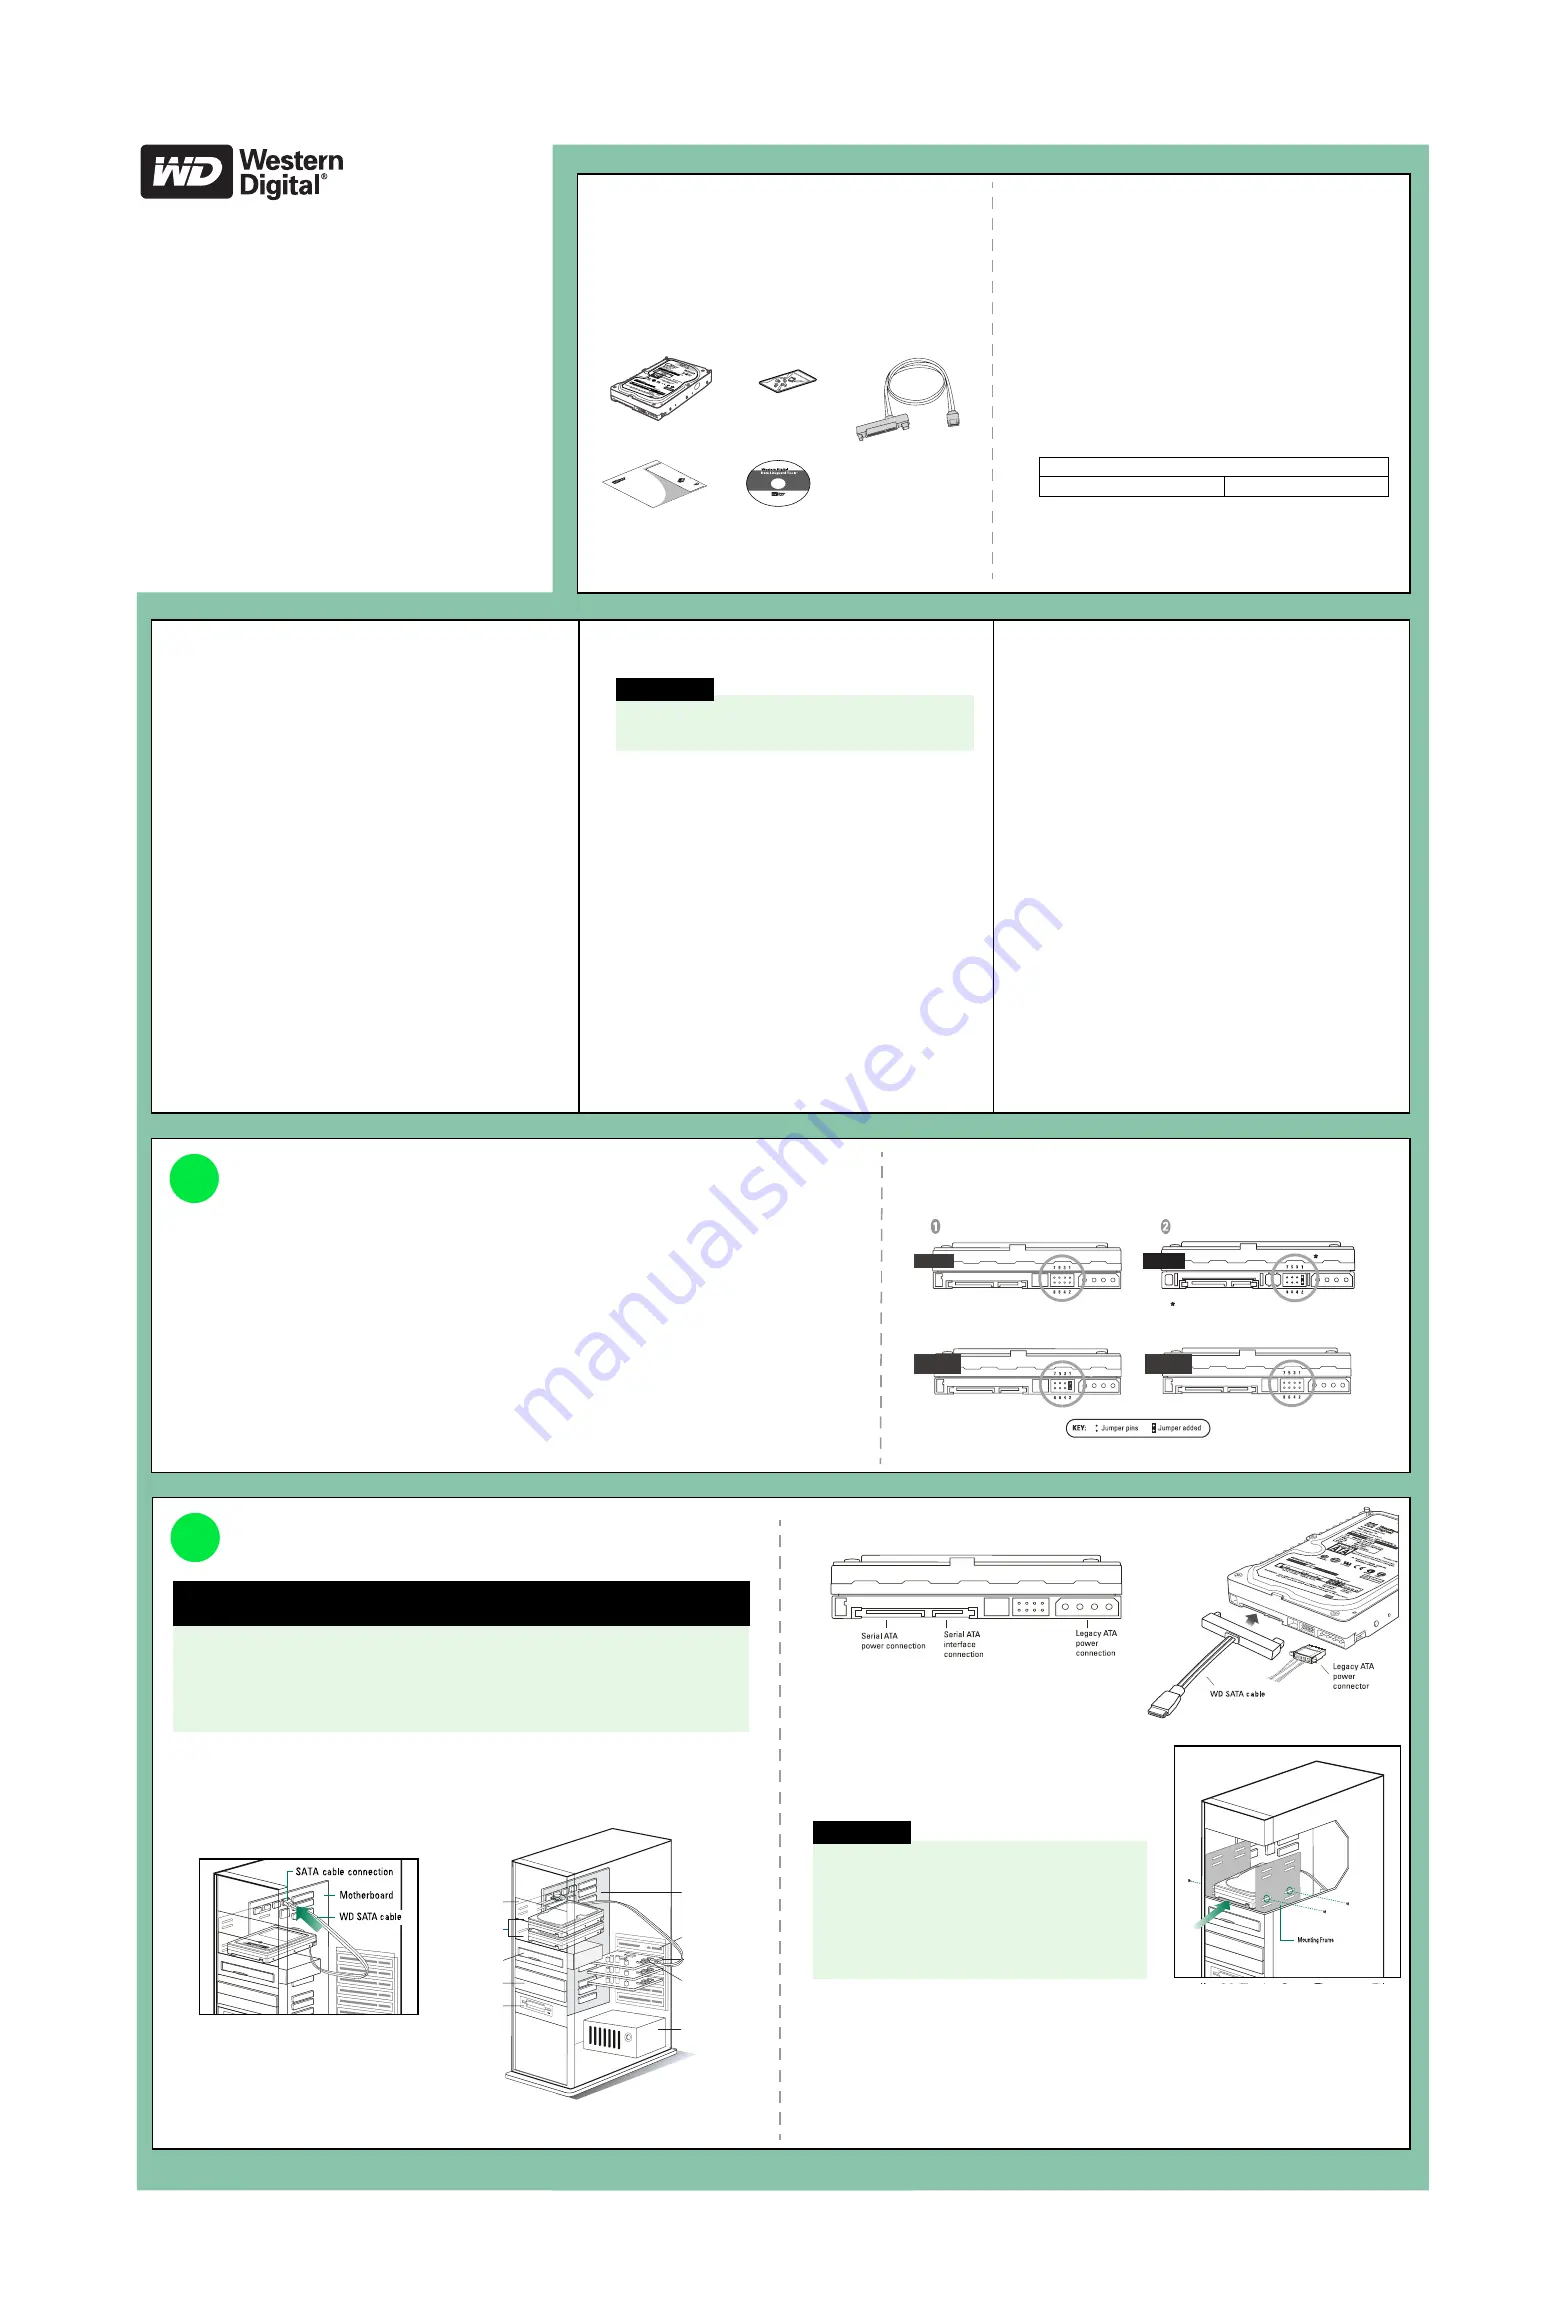
Install the SATA Hard Drive
1. Connect the smaller connector on the WD SATA cable to the SATA connector on the
motherboard or SATA controller card.
NOTE:
If using a SATA controller card, be sure to follow the instructions that came with the card
to install SATA host drivers.
2. Attach the larger end of the WD SATA cable
directly to the SATA interface on the back of the
WD drive as shown above. SATA connectors are
keyed to ensure proper insertion. Also attach the
legacy 4-pin power connector.
3. Slide the hard drive into an available 3.5-inch drive
bay and secure the drive with the four mounting screws
(two on each side). For proper grounding, install the screws in the hole positions as shown.
4. Verify all cable connections. Replace and secure the system cover. Reconnect the power cord
and power up the computer.
5. If your WD SATA drive came with a Data Lifeguard Tools
™
CD, see “Set Up Your Hard Drive” on
the reverse side of this poster to set up your new hard drive. If your hard drive kit did not
include a Data Lifeguard Tools CD, see “Alternate Instructions for Installing a Drive” on the
reverse side of this poster.
2
IMPORTANT: Only for WD 7200 RPM SATA hard drive kits; all other WD SATA
hard drive kits, skip to step 1 below.
If installing your new WD drive as an upgrade from a previously installed hard drive:
To ensure the optimal settings for your drive configuration, WD recommends
running the Installation Tutorial in the Windows version of Data Lifeguard Tools
before hardware installation to generate your custom installation instructions. See
“Data Lifeguard Tools” on the reverse side of this poster.
Hard Drives
(in 3.5-inch Bay)
CD-ROM Drive
3.5-inch
Floppy Drive
5.25-inch Bay
Faceplate
Expansion Slot
SATA Connector
on Controller Card
Power Supply
Motherboard
SATA Controller Card
SATA Controller Card Configuration
SATA Motherboard Configuration
with SecureConnect
CAUTION
The WD SATA cable with SecureConnect
™
does not
supply power to the drive. When using the WD SATA
cable, you must also attach the legacy ATA 4-pin
power connector to the SATA drive. When using a
standard SATA interface cable (not included)
instead, DO NOT connect both the standard SATA
cable (not included) and legacy ATA 4-pin power
cable at the same time or the drive may malfunction.
Unpacking and Handling Procedures
WD hard drives are precision instruments and must be handled with
care during unpacking and installation. Hard drives can be damaged
by rough handling, shock and vibration, or electrostatic discharge
(ESD). Be aware of the following precautions:
!
Do not unpack your hard drive until you are ready to install it.
Your hard drive is packaged in an anti-static bag.
!
Handle the hard drive only by the sides. Avoid touching circuit
board components on the bottom of the drive.
!
To avoid ESD problems, ground yourself by touching the metal
chassis of the computer or by wearing a grounding strap before
handling the hard drive. Articles of clothing generate static
electricity. Do not allow clothing to come in direct contact with
the hard drive or circuit board components.
!
Do not stack hard drives or stand your WD drive on its edge.
!
Do not drop, shake, or knock down the hard drive.
!
Save the original packaging materials and antistatic bag in case
you need to return your hard drive. Your warranty will be void if
your returned drive is shipped in anything other than the original
packaging or WD-approved materials.
Standard configuration 1 (no jumper added - spread
spectrum clocking disabled).
Spread spectrum clocking enabled.
SSC enabled
Default 1
Default 2
Standard configuration 2 (jumper across pins 1-2 - spread
spectrum clocking disabled).
SSC enabled
PM2 enabled
Spread spectrum clocking enabled.
Neutral storage placement. In this position, the jumper has no effect on
hard drive operation.
Note:
WD SATA drives ship from the factory with either Default 1 or Default 2 (see below) set as the standard configuration.
Default 1
SSC enabled
Operating Systems
The following operating systems are supported:
!
Windows
®
XP
!
Windows 2000
System Requirements
!
SATA interface connector on motherboard, or
SATA controller card (sold separately) installed
in an available 32-bit PCI expansion slot (2.1- or
2.2-compliant).
!
3.5-inch internal drive bay
Online Product Registration
Take advantage of WD offerings by registering your drive at
https://www.westerndigital.com/en/products/registration
.
Technical Support
If you need additional information or help during installation or
normal use of this product, visit our product support Web site
at
support.wdc.com
and choose from these topics:
"
Warranty Services —
Obtain warranty information,
warranty status, extended warranty, product replacement,
RMA status, and shipping and packaging information.
"
Downloads Library
— Download installation software
and drivers.
"
Technical Information
— Access product specifications,
technical tips, and the online forum.
"
Knowledge Base
— Explore our expert knowledge base
and frequently asked questions (FAQs).
"
Service Partners
— Find available WD-approved service
and support in your region.
"
Contact Support
— Contact a support representative by
phone or e-mail.
"
Rebates
— Check the status of rebate submissions.
"
Localized Support
— Display service and support
information in various languages.
WARNING
Using an operating system not listed below
may result in data loss.
Necessary materials and tools:
"
Computer system manual
"
Operating system manual
"
Operating system installation CD
"
Phillips and flat-blade screwdrivers (if applicable)
1. Before performing any hardware installation, back up
your existing data.
2. Before handling the drive or system components, discharge
static electricity by touching the metal chassis of your
computer case or using an antistatic wrist strap.
3. Locate the WD serial number, model number, and date code
on the label on top of your drive, and record them below.
4. Power down the computer and unplug the power cord.
5. Remove the system cover (refer to your system manual for
instructions).
Serial Number:
Model Number:
Date:
MOUNTING THE HARD DRIVE