TMDW60
Smart Digital Wall Switch Timer Instructions
ASTRONOMICAL TIMER INSTRUCTIONS
After time, date, location and sunrise/sunset information is entered, this timer will automatically adapt
to seasonal changes in daylight hours without reprogramming.
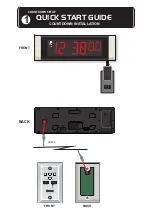
BUTTON DESCRIPTIONS
ON/OFF:
Timer Override (Push to turn ON/OFF); if timer is on currently, it will be turned off; if timer is off currently, it will be turned on.
If the timer door is closed during normal operation Pressing on the door will activate the ON/OFF, timer override switch.
RESET:
Push to clear all settings.
q
/RND:
During normal program operation, push once to randomly, vary ON/OFF times within 2-30 minutes of programmed times.
q
or
p
: Use during programming to scroll through menu options or increase and decrease time and date settings
AUTO:
Push when programming is complete to activate timer.
SETUP:
Push once to set Calendar/Clock; push twice to set or change programming.
ENTER:
Push to confirm menu selections during programming.
Note: if no button is pressed for 30 seconds, timer will get back to current timer.
PROGRAMMING
Initial setup
Setting the calendar , Clock, DST, Zone
1. On initial power-up, use a paper clip or pen to press the
RESET
button, and clear the program in the timer. When the reset button is released, the
screen will be flashing 12:00 AM.
2. Press the
SETUP
button and
CAL
will be flashing on the screen. Press
ENTER
to begin setting the Calendar.
3. The year will be flashing. Use the
q
or
p
buttons to select the year. Press
ENTER
to confirm the setting.
4. The month will be flashing. Use the
q
or
p
buttons to select the current month. Press
ENTER
to confirm selection.
5. The day will flashing. Use the
q
or
p
buttons to select the current day. Press
ENTER
to confirm selection.
6. The screen should be blinking
CLK
for Clock. Press
ENTER
to begin setting the clock.
7. The hour and
AM
or
PM
should be blinking. Use the
q
or
p
to select the correct hour. If you pass 11 to 12, you will change the AM to PM. Once the correct hour is found, press
ENTER
to confirm the selection.
8. The minutes should be blinking. Use the
q
or
p
to select the correct minute. Press
ENTER
to confirm.
9. The screen should be blinking
DST
for “Daylight Savings Time”. Press
ENTER
to select
DST
.
10.
DST
is either ON or OFF.
DST
will automatically reset the times in the timer to match the time change. Use the
q
or
p
button to select the desired
DST
setting, and press
ENTER
to confirm the selection.
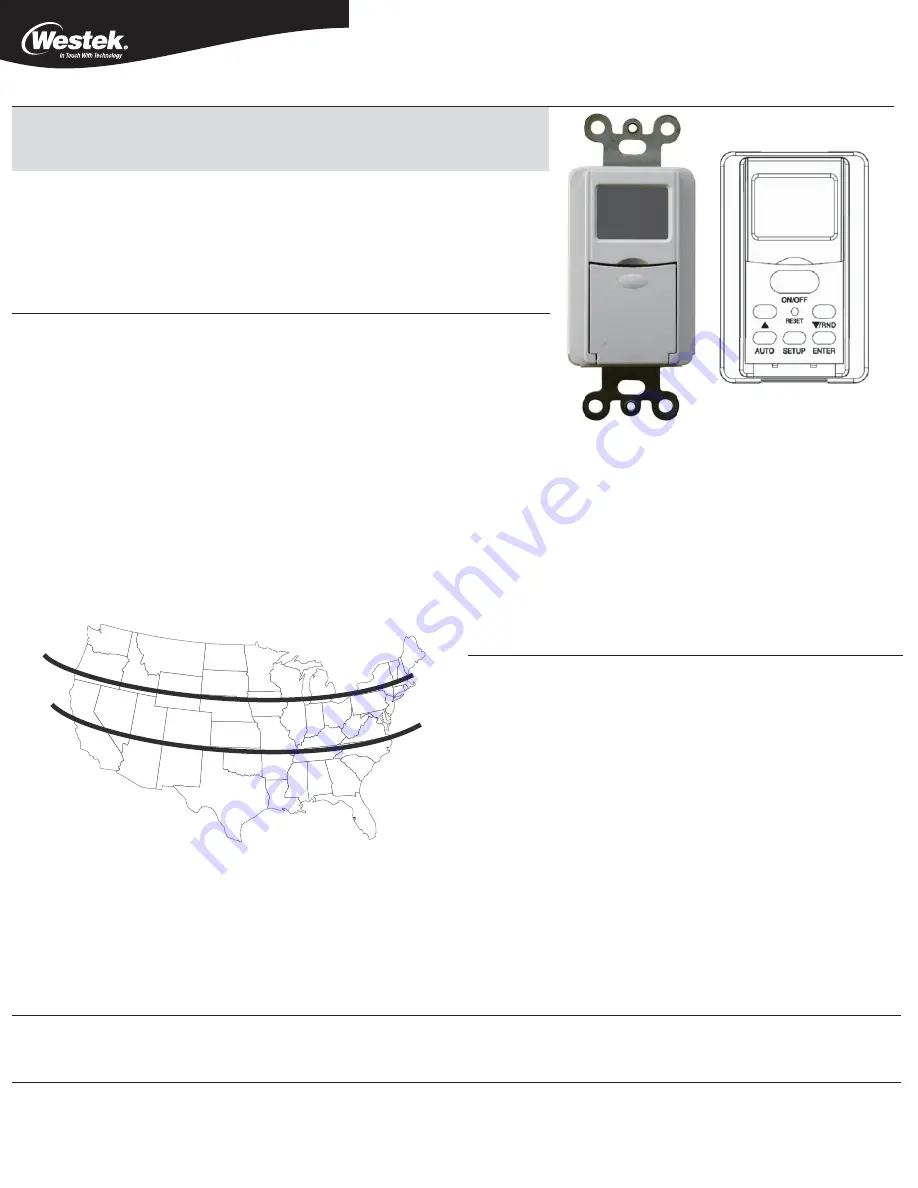
11. The screen should show the word
ZONE
blinking. Press
ENTER
to select your
ZONE
. Look at the map below and determine which zone best fits your location. Use the
q
or
p
to scroll through the available zones in the timer, and stop when you find
the zone which describes the location where the timer is being installed. Press
ENTER
to confirm the selection.
The screen will show
DAWN
(Sunrise) and a time with the hour blinking. This is the timer’s preset time for Dawn. If the hour is not correct, use the
q
or
p
buttons to adjust the hour to match DAWN for your area. Once the hour is correct, press
ENTER
to confirm the selection and move to the next step. The minutes are now blinking. If the minutes are not correct, use the
q
or
p
buttons to adjust the minutes to match DAWN for your area. When the minutes are correct, press
ENTER
to
confirm the selection.
The screen will now show DUSK (Sunset) and a default time with the hour blinking. This is the timer’s preset time for
DUSK. If the hour is not correct, use the
q
or
p
buttons to select the correct hour to match DUSK for you area. Press
ENTER
to confirm the hour. The minutes are now blinking. If the minutes are not correct, use the
q
or
p
buttons to
change the minutes to match DUSK for your area. Press
ENTER
to confirm the selection.
12. The screen will now say
SAVE
. Press
ENTER
to save today’s date, time and location data to the timer.
Programming ON/OFF Events:
1. To begin programming ON/OFF times, press
SETUP
twice.
2.
P1 ON
(Program 1) ON will show on screen, and
1
should be blinking. Press
ENTER
to begin setting P1 ON time, OR you may also use the
q
or
p
buttons to scroll any one of the 7 available programs.
3. After pressing
ENTER
, the screen will show
SET
. If you wish to set a time, press
ENTER
to confirm. You may also use the
q
or
p
buttons
to scroll to
DEL
. If you press
ENTER
on
DEL
, you will delete the program you are on.
If you push
ENTER
at
SET
for
P1
, the screen will show
PRG
,
P1 ON
, and the days of the week will be blinking. Use the
q
or
p
buttons to scroll
through the options in which the timer will be active. The options are:
Mo, Tu, We, Th, Fr, St, Su (default);
Individual days;(Choose a single day)
Mo, We, Fr;
Tu, Th, St;
Mo, Tu, We, Th, Fr;
St, Su;
Select the days you want the program to be active and press
ENTER
to confirm the selection.
Now that you have chosen the days, the timer will function, and the next step is to choose the time. The screen should show
DAWN
blinking. Use the
q
or
p
to scroll through the three switching time options which are
DAWN, DUSK (the programmed times selected during timer setup)
or
TIME
(to set custom time).
If you would like the timer to turn on at the preset time for
DAWN
, press
ENTER
and move to
P1 OFF
setting.
If you would like the timer to turn on at the preset time for DUSK, use the
q
or
p
buttons to change the option on the screen to
DUSK
, and press
ENTER
, and move to
P1 OFF
setting.
If you would like to choose a custom time other than DAWN or DUSK, use the
q
and
p
buttons to change the option on the screen to
TIME
, and press
ENTER
. The hour should be blinking. Use the
q
or
p
buttons to set the correct hour. If you pass 11 to 12, you will change the AM to PM. Once
the correct hour is selected, press
ENTER
to confirm. The minutes should be blinking. Use the
q
or
p
buttons to set the correct minute, then press
ENTER
to confirm selection. The screen will show
PRG P1 OFF
, and the days of the week will be blinking. Choose the days you want the program to
be active, and press
ENTER
. Now that you have chosen the days, the timer will function, and the next step is to choose the time the program will turn off. Use the
q
or
p
buttons to scroll through the 3 options
DAWN
,
DUSK
, or
TIME
, and precede the same as you did for
PROG1 ON
.
After programming the
P1 OFF
time, press
ENTER
to confirm. The screen will now say
SAVE
. Press
ENTER
to save program 1 to the timer.
P2 ON
(Program 2 on) should be blinking. Press
ENTER
to begin setting
P2 ON
. You may also use the
q
or
p
buttons to scroll through all 7 programs, or
push
AUTO
to complete the programming and start the timer.
Random Security Option:
The random feature
RND
will delay turning the lights off. The delay of 2 to 30 minutes is randomly selected by the timer each day to give the house a more lived in appearance while the occupant is away.
1. Push
RND
(Random) button to activate the Random feature. The screen will change from
AUTO
to
RND
.
2. Push
AUTO
to button to de-activate the Random feature and return the timer to its current programming.
North
Central
South
North
Central
South
Alaska
Hawaii
1 Year Limited Warranty
AmerTac warrants to the original purchaser that this product will be free from defects in materials and workmanship for a
period of 1 year from the date of purchase. Additional details are available at www.amertac.com.
PROP. 65 WARNING:
This product contains chemicals known to the State of California to cause cancer, birth defects or other reproductive harm.
Questions, ¿Preguntas?, Questions? 201-661-9945
©2013 AmerTac™
250 Boulder Drive
Breinigsville, PA 18031
www.amertac.com
Made in China/Fabriqué en Chine/ Hecho en China
I13-0030-A