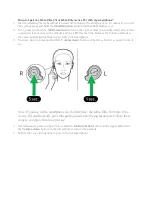
background image

Warwick Acoustics Ltd 

Mira Technology Park, Suite 1.02, NW05, Watling Street, Nuneaton, Warwickshire, CV10 0TU, United Kingdom 


The 

APERIO


Electrostatic Headphone System


USER MANUAL


March 2020 

Version 1.0 


Summary of Contents for APERIO

Page 1: ...Warwick Acoustics Ltd Mira Technology Park Suite 1 02 NW05 Watling Street Nuneaton Warwickshire CV10 0TU United Kingdom The APERIO Electrostatic Headphone System USER MANUAL March 2020 l Version 1 0 ...

Page 2: ...reproduced or transmitted in any form or by any means electronic mechanical or otherwise including photocopying and recording or in connection with any information storage or retrieval system without written permission from Warwick Acoustics Ltd REVISION HISTORY VERSION DATE DESCRIPTION 1 0 03 2020 First public release ...

Page 3: ...HONES 16 CONNECTING THE HEADPHONE CABLE 16 DETACHING THE HEADPHONE CABLE 17 CONNECTING THE HEADPHONES TO THE AMPLIFIER 17 CONNECTING INPUT SOURCES TO THE AMPLIFIER 18 CONNECTING THE POWER SUPPLY UNIT 19 POWERING THE UNIT ON 20 CHAPTER 3 21 OPERATION 21 SOURCE OUTPUT SELECTION 21 CHAPTER 4 23 CARE AND MAINTENANCE 23 POWER DOWN 23 CLEANING 23 REPLACING EAR PADS 23 CHAPTER 5 24 TROUBLESHOOTING 24 CHA...

Page 4: ...ucto o incluidas en la documentación Aviso Leia e siga todos os avisos e instruções assinalados no produto ou incluídos na documentação Avviso Leggere e seguire tutti gli avvisi e le istruzioni presenti sul prodotto o inclusi nella documentazione Warning Do not block any ventilation openings Install in accordance with the manufacturer s instructions Avertissement Ne bloquez aucune ouverture de ven...

Page 5: ...oches et une troisième broche pour la mise à la terre La broche large ou la troisième broche sont fournies pour votre sécurité Si la prise fournie ne s insère pas dans votre prise femelle consultez un électricien pour le remplacement de la prise femelle obsolète Warnung Der Sicherheitszweck des gepolten bzw Schukosteckers ist zu berücksichtigen Ein gepolter Stecker verfügt über zwei Pole von denen...

Page 6: ...positivo di sconnessione deve rimane prontamente accessibile e operabile Warning Protect the power cord from being walked on or pinched particularly at plugs convenience receptacles and the point where they exit from the device Avertissement Protégez le cordon d alimentation pour que l on ne marche pas dessus ou qu on le pince en particulier au niveau des prises mâles des réceptacles de convenance...

Page 7: ... du châssis ne peut être réparé par l utilisateur La garantie sera annulée si le châssis est ouvert par toute autre personne qu un technicien d un centre de service ou d un établissement agréé Warwick Acoustics Warnung Öffnen Sie das Gehäuse nicht Keine der Geräteteile können vom Benutzer gewartet werden Durch das Öffnen des Gehäuses wird die Garantie hinfällig es sei denn solche Wartungsarbeiten ...

Page 8: ... APERIO has no user serviceable parts To remove power from the unit remove the power connector to ensure disconnection Refer all servicing to qualified service personnel Servicing is required when the device has been damaged in any way such as power supply cord or plug is damaged liquid has been spilled or objects have fallen into the device the device has been exposed to rain or moisture does not...

Page 9: ...lizador Para retirar a energia da unidade retire o conector de energia para assegurar a desconexão Indique toda a manutenção para pessoal de manutenção qualificado A manutenção é necessária quando o dispositivo tiver sido danificado sob qualquer forma como por exemplo se o cabo eléctrico ou de alimentação foi danificado líquido foi derramado ou objectos caíram sobre o dispositivo o dispositivo foi...

Page 10: ...tions 1 This device may not cause harmful interference and 2 this device must accept any interference received including interference that may cause undesired operation CANADIAN ICES STATEMENTS Canadian Department of Communications Radio Interference Regulations This digital apparatus does not exceed the Class B limits for radio noise emissions from a digital apparatus as set out in the Radio Inte...

Page 11: ...riate measures Achtung Dieses ist ein Gerät der Funkstörgrenzwertklasse B In Wohnbereichen können bei Betrieb dieses Gerätes Rundfunkstörungen auftreten in welchen Fällen der Benutzer für entsprechende Gegenmaßnahmen verantwortlich ist Attention Ceci est un produit de Classe B Dans un environnement domestique ce produit risque de créer des interférences radioélectriques il appartiendra alors à l u...

Page 12: ...sion Electrostatic Laminate HPEL transducer 2 Injected magnesium ear cups for strength and lightness 3 Handmade Cabretta sheepskin ear and headband pads 4 Custom low capacitance headphone cable 5 Discrete FET Class A energizing amplifier 6 32 bit 384 kHz ESS SABRE Reference DACs 7 32 bit 384 kHz AKM Premium ADCs 8 Custom 64 bit fixed point double precision Digital Signal Processing 9 Ultra low pha...

Page 13: ... LIABILITY WAIVER The APERIO Headphone System has been designed for home use only Warwick Acoustics Ltd will not accept liability for any damage or injury arising from improper use misuse of this product ...

Page 14: ...and dustproof Pelican case The following items can be found inside 1x APERIO headphone 1x headphone cable 1x Complete APERIO Quick Start Guide 1x APERIO energizing amplifier DAC unit 1x Universal power supply unit 1x IEC power cord region specific 1x USB cable 1x Ethernet cable FRONT PANEL CONTROLS Volume Control Headphone Cable Input Input Selection High resolution colour LCD screen Output Select...

Page 15: ...new the inner band may be a little stiff Ensure that the same length of inner band is visible on both sides of the headphone so that they sit level on your head There should be no gap between the top of your head and the underside of the headband Pro Audio Processor Digital Mixer Etc Pre Amp Pro Audio DAC Etc SPDIF COAX Pre Amp Power Amp Powered Speakers Etc For Unbalanced Balanced Inputs For Unba...

Page 16: ...he electrostatic transducer causing it to work like a microphone CONNECTING THE HEADPHONE CABLE As soon as you have properly adjusted the headband it will be time to connect the headphone cable to the headphones The headphone cable connects to the headphone via high precision self latching connectors The cable is colour coded and a small red band at the end of the strain relief indicates the right...

Page 17: ...is recommended that the amplifier is switched OFF before connecting disconnecting the headphone cables With the cable connected to both ear cups connect the headphone to the amplifier DAC unit by inserting the cables into the headphone sockets Be sure to align the red dots on each connector and the chassis Push the cables into the sockets until it latches If you need to detach the cables grasp the...

Page 18: ...CD BD to the coaxial S PDIF digital input Use a digital interlink fitted with RCA connectors Push the jack until it makes a firm connection To remove simply pull on the connector not the cable Connect the output of professional audio devices to the AES3 EBU input via the single high quality XLR socket marked AES3 EBU Push the connector until it makes a firm connection To remove simply unlatch then...

Page 19: ...lanced XLR line out connectors CONNECTING THE POWER SUPPLY UNIT Firmly insert the supplied IEC mains cable into the power supply unit When all audio sources and the headphones have been connected to the amplifier DAC unit it will be time to connect the power supply unit Before beginning it is recommended that the volume control is turned to its lowest position as shown Carefully insert the cable f...

Page 20: ... to the up position Topower OFF simply depress the switch to the down position Your APERIO system is then ready to use If the amplifier DAC detects a fault condition the screen will state the error fault In this case first power the unit OFF and re check all the connections If the problem persists please refer to the Troubleshooting section ...

Page 21: ... amplifiers and loudspeakers The output mode needs to be selected on the front panel switch The orange input indicator lamp will confirm your choice ANALOGUE INPUT SELECTION UNBALANCED Choose between Low and Hi on the unbalanced analogue input by means of the rear panel switch The inputs will accept the following maximum signal input levels Hi Gain Position Max Vin 2 1 Vrms Low Gain Position Max V...

Page 22: ... recommend always powering ON OFF with the volume control at its minimum position The display alerts the user if an audio input signal exceeds the maximum permitted levels In this case the Clipping light is shown on the display and the volume should be reduced Note that clipping may occur simply as a result of variations in original source recording levels Clipping will not damage your product but...

Page 23: ...placement after years of extended use or if inadvertently damaged Replacement pads are available from your dealer or via the Warwick Acoustics website To remove the old pads carefully insert a finger into the ear cup so that it is behind the ear pad as much as possible Take care not to damage the webbing or electrostatic panel Then with your thumb firmly grasp the ear pad and pull it away from the...

Page 24: ...iminate breakages connection issues No sound via USB input First check whether the analog digital source selector is in the USB position If it is check whetherthe appropriate USB driver has been selected on your computer and in your playback software Check also whether the output has been muted within your playback software Stuttering glitching in USB playback Is the USB connection made via a USB ...

Page 25: ...ld be driven by source devices with up to 10dBu maximum output with the balanced input level switch on the back panel set to the LOW switch position and 18dBu on the HIGH position If a low level source is connected to either balanced or unbalanced inputs when the input level switch is set to HIGH there maynot be enough gain available The level switch should be set to LOW when low level source devi...

Page 26: ...t parts please contact our Customer Service team via one of the following methods Please provide as much detail as you can about the problem and your specific configuration Be sure toleave your name and contact details too E mail support warwickacoustics com Online www warwickacoustics com headphones support ...

Page 27: ...al Processing Digital Signal Processor DVD Digital Versatile Disc EN European Norm European Standard as developed by CEN FET Field Effect Transistor H Height HPEL High Precision Electrostatic Laminate Hz Hertz aka cycles second IEC International Electro technical Commission in Inch kg Kilogram kHz Kilohertz lb Pound weight M1 Model One MHz Megahertz mm Millimetre mV Millivolt OFHC Oxygen free High...

Page 28: ...an Square SACD Super Audio Compact Disc SMPS Switched mode Power Supply S PDIF Sony Philips Digital Interface Format USB Universal Serial Bus V Volt VA Volt Ampere W Width WASAPI Windows Audio Session Application Programming Interface ...

Page 29: ...alanced Analog Inputs Dual RCA jacks switchable high low input range 5 0 Vrms 2 1 Vrms USB Digital Input Type B jack USB 2 0 accepts digital audio formats up to 32 bit 384 kHz PCM and DSD DSD64 DSD128 DSD256 via DoP or Native Network Ethernet LAN Digital Input RJ45 jack DLNA compatible accepts digital audio formats up to 32 bit 384 kHz PCM and DSD DSD64 DSD128 DSD256 via DoP or Native AES3 AES EBU...

Page 30: ...lugged connections and malfunctioning wiring over temperature conditions and internal electrical faults DACs 2 x dual mono 32 bit 384 kHz DACs with balanced outputs for PCM DSD inputs Amplifier Energizer Balanced discrete MOSFET high bias single ended Class A output dual mono topology including power supply 1800 VDC bias charge voltage Distortion Noise 0 001 Bandwidth 65 kHz Enclosure CNC machined...

Page 31: ...related to manufacturing parts materials and or workmanship under normal and accepted use The conditions under which this warranty ceases to be applicable are detailed in the next section WHAT IS NOT COVERED This warranty does not cover fair wear and tear defects resulting from improper or unreasonable use or maintenance cosmetic damage including but not limited to scratches dents and broken parts...

Page 32: ...riginal purchase or the original purchaser has registered the product with Warwick Acoustics WARRANTY PERIOD FOR REPAIRS REPLACEMENTS All warranty repairs replacements are guaranteed for 90 days or until the original warranty end date whichever is longer SHIPPING TO WARWICK ACOUSTICS Following submission of a Warranty Claim a customer will be issued a Return Merchandise Authorization RMA and a ret...

Reviews: