DE6271U
1
AXS
AXS
AXS
AXS-10
-10
-10
-10 PRO
PRO
PRO
PRO
Single-Door Proximity Access Control System
User Guide
1
11
1. INTRODUCTION
. INTRODUCTION
. INTRODUCTION
. INTRODUCTION
The Visonic Networks AXS-10 PRO is an electronic access
control system designed for a single access point, such as a main
door in an apartment building or individual office doors. The
system control unit relay activates a lock or electromagnetic strike
lock (EMS), when a valid proximity key (tag or card) is presented
to the reader located outside the protected area.
The use of a proximity (non-contact) key makes the installation of
the AXS-10 PRO system an attractive possibility in harsh
environments and in places with poor lighting conditions. The
proximity keys are totally sealed and are wear resistant. The
reader reads the key’s ID, whenever the key is presented.
A second proximity reader may be connected to the AXS-10 PRO
to control both sides of a door. An optional magnetic stripe card
reader may be connected instead of a proximity reader.
The separate weatherproof readers give added security and
flexibility allowing outdoor or indoor installation.
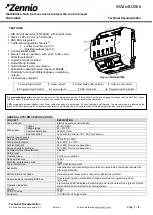
The AXS-10 PRO control unit (see figure 1) includes a 3-digit
display, 3 visual indicators (LEDs) and 4 buttons. An internal
proximity reader located in the upper right corner of the control
panel allows fast and easy programming of access keys. The
buttons are used for entering the password and for programming
the unit.
Figure 1 - System Functional Presentation
RDR-3
Proximity
Reader
CRD-1
Prox. Card
TAG-1
Prox. Tag
AXS-10 PRO
Control Unit
Figure 2 - System Components
A new Toggle mode feature is added to the AXS-10 PRO
controller. By using this feature, presenting a valid tag
arms/disarms an alarm system or activate/deactivate an electrical
device (such as air conditioner).
The AXS-10 PRO has a memory capacity of 300 keys. Adding
keys simply involves presenting new keys to the controller while
the system is in ADD mode.
The user can delete keys in the DELETE mode by presenting
them to the reader or, if a tag/card is not available, by typing in its
number (the same one that appears when adding the key).
The AXS-10 PRO kit includes:
•
AXS-10 PRO controller
•
RDR-3 proximity reader with 1m (3 ft) 5-wire cable
•
Installation instructions
•
User Guide
•
Control unit base template, for wall installation
Additional tools and equipment that may be needed:
•
Proximity tags or cards (ordered separately)
•
Power supply for the controller - 12V AC/DC
•
Electromagnetic strike (EMS) unit
•
Request-to-exit push button or PIR, if “request to exit” option is
required.
2
22
2. USER PROGRAMMING
. USER PROGRAMMING
. USER PROGRAMMING
. USER PROGRAMMING
Note: While in any one of the programming modes, the AXS-10
PRO will not operate the reader or the lock.
2.1 Entering the Programming Menu
The master key enables the user to select the programming
menu and add or delete keys.
Note: Inactivity for more than 10 seconds will cause AXS-10 PRO
to exit the programming mode and revert to normal operation.
The AXS-10 PRO recognizes one master key and one password.
The master key cannot be used as a user key and will NOT unlock
the door. To use the master key for entering the programming
menu, press the “MODE” button and then present the master key to
the internal reader, located at the top right corner or the AXS-10
PRO controller, for 2 seconds. The reason for the 2 seconds delay
is to prevent inadvertent activation of the programming menu.
For setup functions such as “password”, “master key”, “unlock
time” or “erase all keys” an additional four-presses password is
needed. Each button press may involve pressing any one of the
four buttons or a combination of two.
Altogether, there are 10,000 password combinations (see “2.9
Setting the User Password”). The master key is also used to
confirm changes made to parameters.
2.2 Selecting the Programming Mode
The AXS-10 PRO recognizes 6 programming modes:
•
Adding User Keys
•
Deleting User Keys
•
Erasing All User Keys
•
Setting Unlock Duration
•
Defining Master Key
•
Setting User Password
To select the programming mode, press the “MODE” button and
present the master key to the reader until the green led (“ADD”
light) starts flashing for at least 2 seconds.
Press the “MODE” button to choose between Add, Delete and
Special Operations.
Adding User Keys is possible when the ADD light is ON.
Deleting User Keys is possible when the DELETE light is ON.
Set-up functions are available when the SPECIAL light is ON.
For set-up functions, enter the user’s password and select the
desired option by pressing the “MODE” button.