Vaisala HMP240 SERIES, User Manual
The Vaisala HMP240 SERIES offers precise and reliable humidity and temperature measurement. To ensure effortless operation, make use of the comprehensive User Manual available for free download at manualshive.com. Take advantage of detailed instructions and optimize your experience with this cutting-edge product.
Share
Download


Reviews:
No comments
Related manuals for HMP240 SERIES

WFT-E1
Brand: Canon Pages: 58

RAT 1
Brand: Xantech Pages: 10

500028-WP-UK
Brand: MuxLab Pages: 2

FT-2980R
Brand: Yaesu Pages: 80

DJ-G5T/E
Brand: Alinco Pages: 71

GE-PON OLT Transceiver OPEP-33-B4K3R
Brand: Delta Pages: 8

NAL Research Corporation 9602-NAL
Brand: Iridium Pages: 40

CTS2
Brand: M-system Pages: 3

40103/202/3/5/10
Brand: RCD Pages: 2

PA2530 Series
Brand: Labom Pages: 24
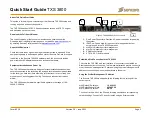
TXS 3800
Brand: Sencore Pages: 3

Domus 5000 CT
Brand: Gemini Pages: 2

MT-91P558
Brand: AFi Pages: 8

Bassinet
Brand: Kanga Products Pages: 26

WIT2410P
Brand: Cirronet Pages: 60

IC-F3022T
Brand: Icom Pages: 32

WST-802
Brand: Ecolink Pages: 2

TK-840
Brand: Kenwood Pages: 18


