


CMS
‐
2200
Quick
Start
Guide
Physical
Installation
1.
Remove
the
front
panel
of
your
projector
and
prepare
ESD
protection.
2.
Insert
the
CMS
‐
2200
into
the
IMB
slot
of
a
series
2
projector.
3.
Fully
seat
the
CMS
and
secure
the
2
included
screws
on
the
left
and
right
side
of
the
faceplate.
4.
Reassemble
the
projector
front
panel.
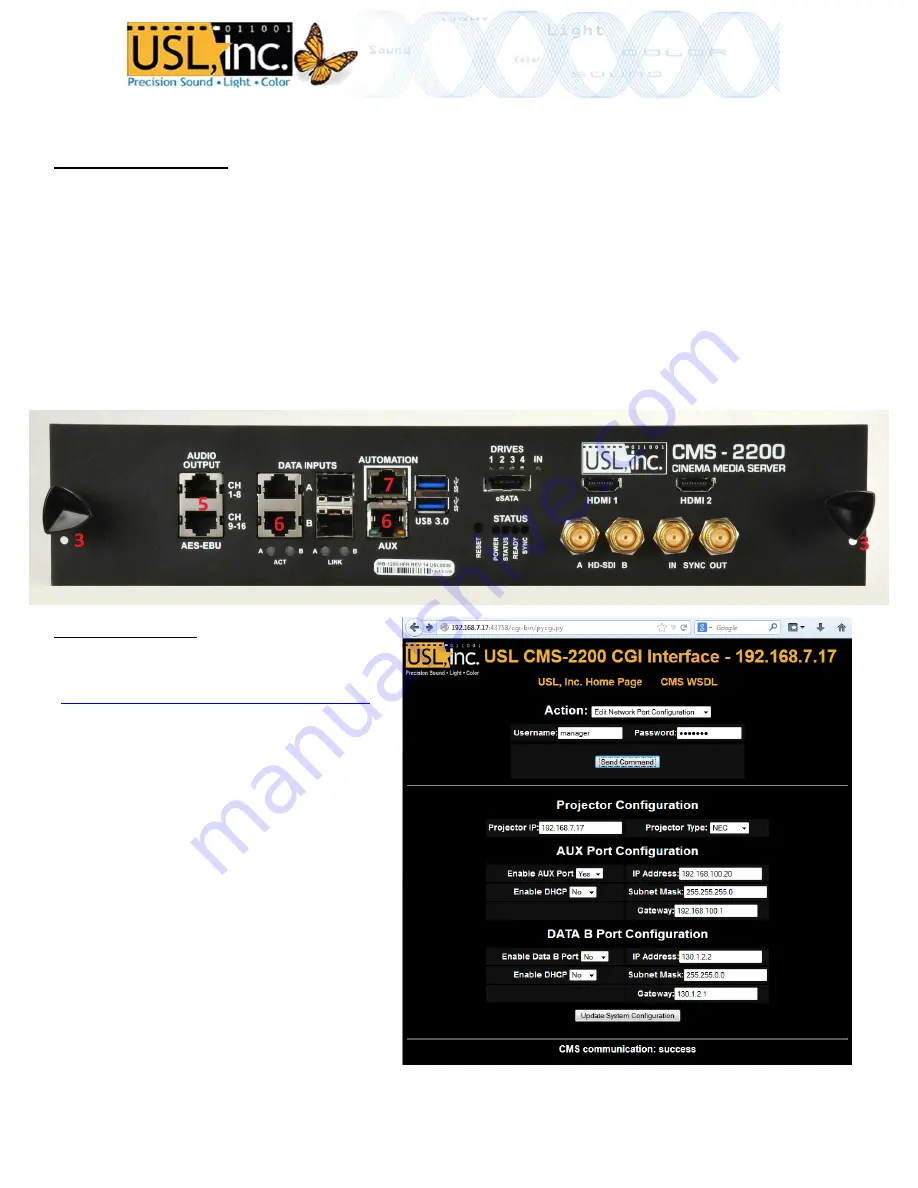
5.
Attach
Cat.
5
AES
audio
cables
from
the
CH
1
‐
8
and
CH
9
‐
16
AUDIO
OUTPUT
ports
to
your
sound
processor.
6.
Attach
network
cables
to
the
AUX
and
DATA
INPUT
B
ports
if
using
secondary
networks.
Closed
Captioning
will
be
played
via
the
AUX
port.
*Do
not
connect
the
AUTOMATION
port
to
a
network.
7.
Connect
the
AUTOMATION
GPIO
port
to
a
CMSA
with
a
Cat.
5
cable.
The
GPIO
pinout
is
below.
8.
Power
the
projector
and
perform
the
marriage
procedure.
IP
address
setup
1.
Open
the
web
tool.
Use
a
web
to
go
to:
http://ip_of_projector:43758/cgi
‐
bin/pycgi.py
2.
Select
“Edit
Network
Port
Configuration”
for
Action.
Enter
login
information
from
the
next
page
and
press
“Send
Command”.
3.
In
the
form
that
loads,
enter
the
IP
and
type
of
projector
in
the
first
section,
set
the
network
configuration
for
the
AUX
port
in
the
second
section,
and
the
DATA
B
port
in
the
3
rd
section.
4.
Save
these
settings
by
pressing
the
“Update
System
Configuration”
button
at
the
bottom
of
the
page.
A
reboot
of
the
projector
is
recommended
after
changing
these
settings.
Pg
1


