

I. Overview
UT330 Series Digital Hygro-Thermometers (hereafter referred to as “ the Meter”)
adopts highly-precise hygro-thermo sensor and super-low power consumption
micro-processor in its design,featuring high accuracy, manual and auto storage,
USB data transfer, suitable time display, etc, which cover various demand
for high-accuracy measurements and long-time hygro-thermo monitoring.
II. Unpacking Inspection
III. Safety Information
Operating Manual 1 pc
Warranty Card
1 pc
Battery
4 pcs
Disc
1 pc
USB Data Cable 1 pc
Do not clean the sensor located at top of the Meter. Turn to close the
protective sensor cover when not in use. To avoid damage to the device,
please use with care.
Before using the Meter inspect the case. Do not use the Meter if it appears
damaged. Look for cracks or missing plastic. Pay
insulation around the connectors.
Replace the batteries as soon as the battery indicator ( ) appears. The
of false readings can lead to personal injury.
Do not use the Meter if it operates abnormally. Protection may be
When in doubt, have the Meter serviced.
Do not operate the Meter around explosive gas, vapor, or dust.
Warning
A warning identified conditions and actions that pose hazards to the user. To
avoid electrical shock or personal injury, follow these guidelines:
When servicing the Meter, use only specified replacement parts.
Do not use the Meter with any part of the case or cover removed.
Never charge the battery;
Use the approved alkaline battery
(AAA 1.5V) only;
Pay attention to “+” and “-” marks
when installing the batteries.
Close the sensor cover and remove
the batteries if the instrument is not
used for a long time.
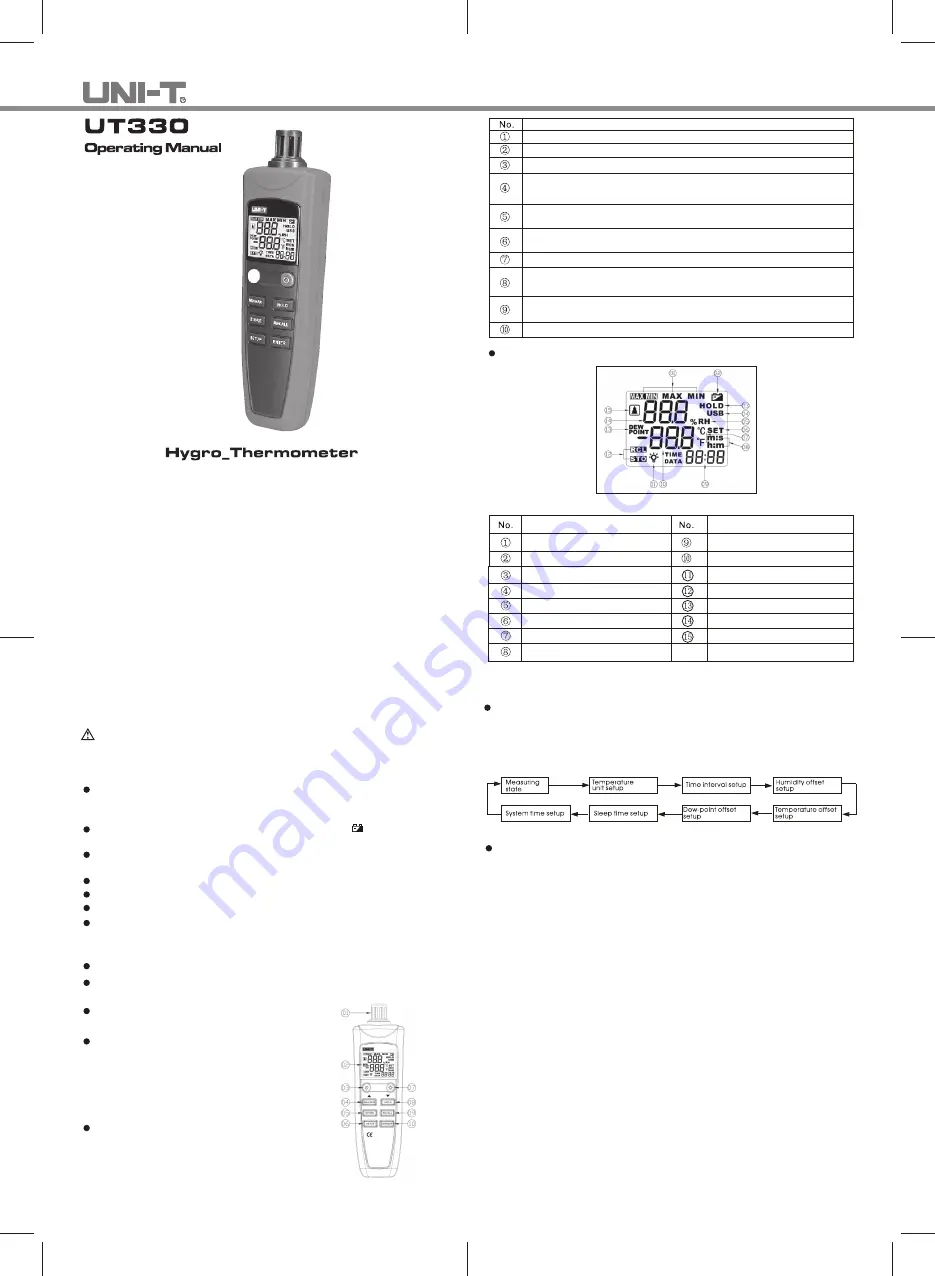
IV. Meter Description
Meter Structure(See Figure1)
Figure 1
Description
Protective cover of sensor (turn to open or close).
Display screen.
Turn on/off the power save mode.
Press to display Max/Min value among current readings. Long press to exit
the function(also used ▲ button).
Press to save data. It is used together with ▼▲. See "Using the Meter --
Store and Recall Data" for details.
Turn on/Turn off the background light.
Press to freeze the displayed readings. Press again to exit the function.(also
used as ▼ button).
Press to view data. It is used together with ▼▲ buttons. See "Using the
Meter -- Store and Recall Data" for details.
Dew-point temperature selection key (also used as confirm button).
To set the meter. It is used together with ▼▲ buttons. See "Setting the
Meter" for details.
particular attention to
the
possibility
Display Screen (See Figure 2)
Figure 2
Description
Max/Min function indicator
Battery indicator
Description
Time display zone
Temperature display zone
Display of holding time
Online indicator
Humidity unit
Indicator of setup mode
Temperature unit
Indicator of time format
Backlight indicator
Data recall/store indicator
Dew-point temperature
Humidity display zone
Power save mode
V. Setting the Meter
SETUP Options
Press SETUP button to enter into setting mode, “SET” flashes on LCD, continue
to pressthe button to step through and save the following setup options and exit
the mode.
Performing the Setups
1. Setting Temperature Unit
Press SETUP to access Temperature Unit setup mode, “Unt” shows on LCD.
Press ▼(HOLD)/▲(Max/Min) to select
℃
or
℉
unit.
2. Setting Time Interval
Press SETUP to switch to time interval mode, “int” shows on LCD. Press▼▲ to
change the interval for automatic data storage. Long press ▼▲ to increment
the time quickly.
The interval can set up to 59:59 and down to 00:00(auto data storage disabled
at 00:00).
3. Setting Humidity Offset
Press SETUP to switch to humidity offset mode, “H-O” icon shows. Press ▼▲
to change the offset value that ranges within -6~+6.
4. Setting Temperature Offset
Press SETUP to switch to temperature offset mode, “t-o” icon shows. Press ▼
▲ to change the offset value that ranges within -6~+6.
5. Setting Dew Point Offset
Press SETUP to switch to dew point offset mode, “d-o” icon shows. Press ▼▲
to change the offset value that ranges within -6~+6.
6. Setting Sleep Mode
Press SETUP to switch to sleep offset mode, “SLP” icon shows. Press ▼▲ to
set up sleep time(5~60mins). Long press ▼▲ to increase the time quickly;
When the set time is
<
5mins, “OFF” icon shows and sleep function is disabled.
impaired.


