


PAGE 1 OF 33
1219 IH-8105
OHAUS DEFENDER
TM
5000
DIGITAL SCALE
1-800-295-5510
uline.com
π
H-8105, H-8106
H-8107
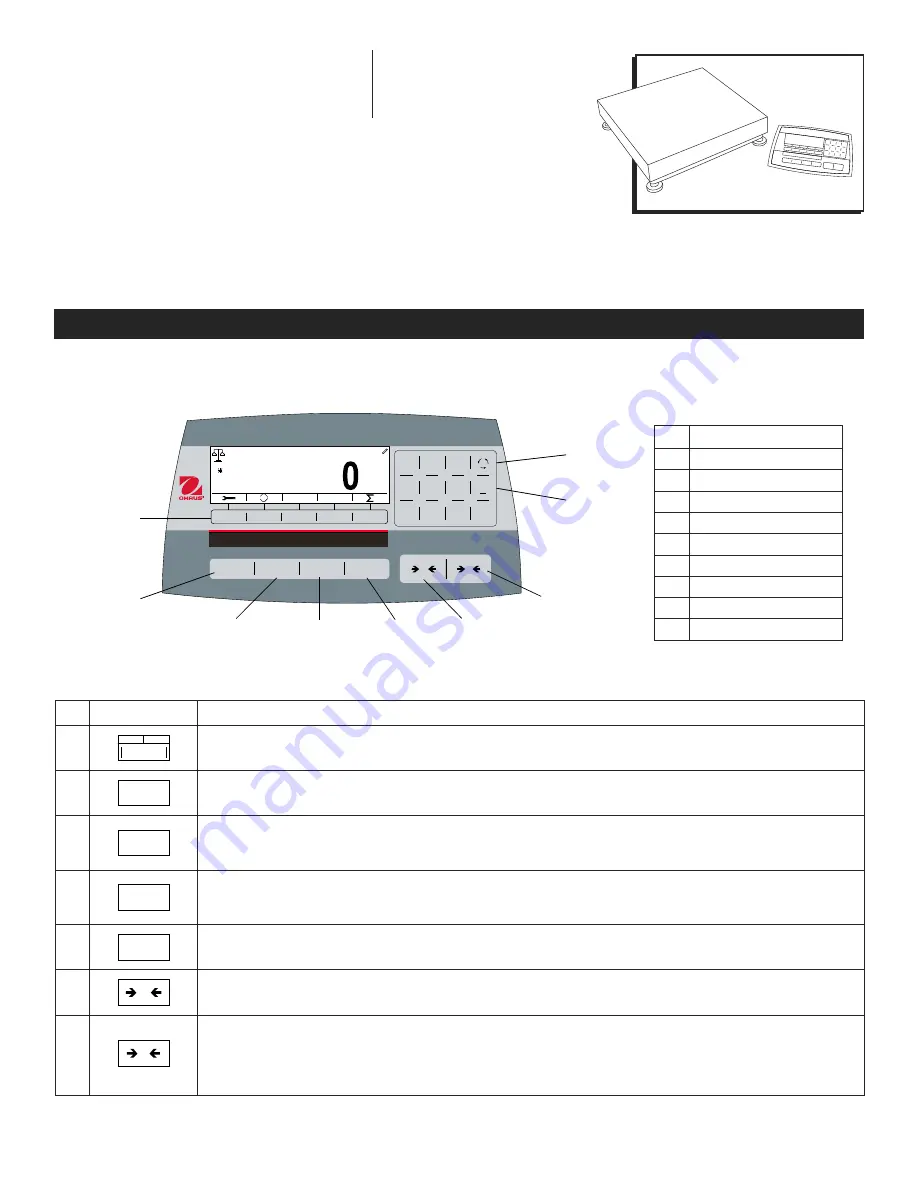
OVERVIEW OF CONTROLS
CONTROL PANEL
#
DESCRIPTION
1
Softkey Function Buttons
2
On/Clear Off Button
3
Print Units Button
4
Library Mode Button
5
User Menu Button
6
Function Mode Button
7
Tare Menu Button
8
Numeric Keypad
9
Input Modes Button
CONTROL PANEL PARTS
ID
>0<
Off
Units
Mode
Menu
On/CLR
D
EFENDER
5000
Library
User
1
2
ABC
#./
+/-
A
1
a
DEF
JKL
GHI
MNO
TUV
PQRS
WXYZ
3
4
5
6
7
8
9
.
0
T
0
g
Max
2017/08/15 11:37
10000
1
g
g
d=
123
1
2
3
4
5
6
7
9
8
CONTROL FUNCTIONS
#
BUTTON
ACTION
1
The five softkeys correspond to several icons at the bottom of the display area. These icons display for each softkey
function specifically available for configuration and operation of the mode.
2
Off
On/CLR
Short press: if the terminal is off, power on the terminal; if the terminal is on, clear the data input.
Long press: Power off the terminal.
3
Units
Short press: Send the current display value to the RS-232 port or option when properly enabled.
Long Press: Change the current weighing unit. Press and hold the key to scroll through the list of enabled units.
Release the key to switch to the unit selected.
4
Mode
Library
Short press: Press the key to enter the library.
Long press: Press and hold the key to change weighing modes. Press and hold the key to scroll through all weighing
modes. Release the key to switch to the mode selected.
5
Menu
User
Short press: Press the key to enter user profile.
Long Press: Press the key to enter user menu.
6
0
Short press: When the load on the pan is within the zero range, press the key to set the display to zero.
7
T
Short press: When a container is on the pan, press this key to store the weight of the container as the tare value.
Short press: Enter the known weight of a container using the numeric keypad, then press this key to establish preset tare value.
Short press: When a tare has been entered, empty the pan and press this key to clear the tare value.
Long press: If a preset tare has been entered, press this key to view the preset tare value.


