PAGE 1 OF 9
0721 IH-9471
SMOKE AND CARBON
MONOXIDE DETECTOR,
AA BATTERY
1-800-295-5510
uline.ca
H-9471
NOTE: This combination smoke/CO detector
was designed to be mounted on the ceiling or
wall. It is not a tabletop device.
Find the pair of self-adhesive
labels included with this smoke/CO
detector. On each label, write in
the phone numbers of emergency
responder (like 911) and a qualified
appliance technician. Place one
label near the smoke/CO detector
and the other label in the fresh air
location that user plans to go if the
detector sounds.
CAUTION! Do not connect this unit to any other
detector or auxiliary device. It is a single-
station unit that cannot be linked to other
devices. Connecting anything else to this unit
may prevent it from working properly.
CAUTION! Do not install this unit over an
electrical junction box. Air currents around
junction boxes can prevent smoke from
reaching the sensing chamber and prevent the
unit from alarming. Only AC-powered units are
intended for installation over junction boxes.
1. If locking the smoke/CO detector to the mounting
bracket, please read the "Locking Feature
(Optional)" section.
2. Hold base firmly and twist the mounting bracket
counterclockwise to separate it from the unit.
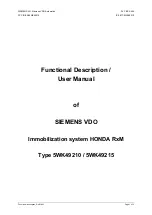
3. Hold the mounting bracket against the ceiling
(or wall) so the two clusters of universal mounting
slots are aligned approximately at the 9 o'clock
and 3 o'clock positions. (See Figure 1) Choose one
of the three sets of slots shown, A, B or C, and trace
around one of the sets with a pencil. Be sure to
choose a top and bottom slot on opposite sides to
rotate the universal mounting bracket into position
later. This will make it easier in the future to remove
the mounting bracket without completely removing
the screws.
Mounting Slots
Mounting Bracket
A
C
B
B
C
A
Figure 1
INSTALLATION
TOOLS NEEDED
Pencil
Hammer
Drill
3/16" Drill Bit
Flathead Screwdriver
Para Español, vea páginas 4-6.
Pour le français, consulter les pages 7-9.