

54_0378 Re
vA
Setting Up TriSat
Troubleshooting
Troubleshooting
Quick Start Guide
KVH HDTV Converter
for DIRECTV
®
KVH Industries, Inc.
50 Enterprise Center
Middletown, RI, 02842-5279
Phone: +1 401 847-3327
Fax: +1 401 849-0045
E-mail: [email protected]
Internet: www.kvh.com
©Copyright 2006, KVH Industries, Inc., All rights reserved.
KVH and TracVision are registered trademarks of KVH Industries, Inc.
DIRECTV is a registered trademark of DIRECTV, Inc.
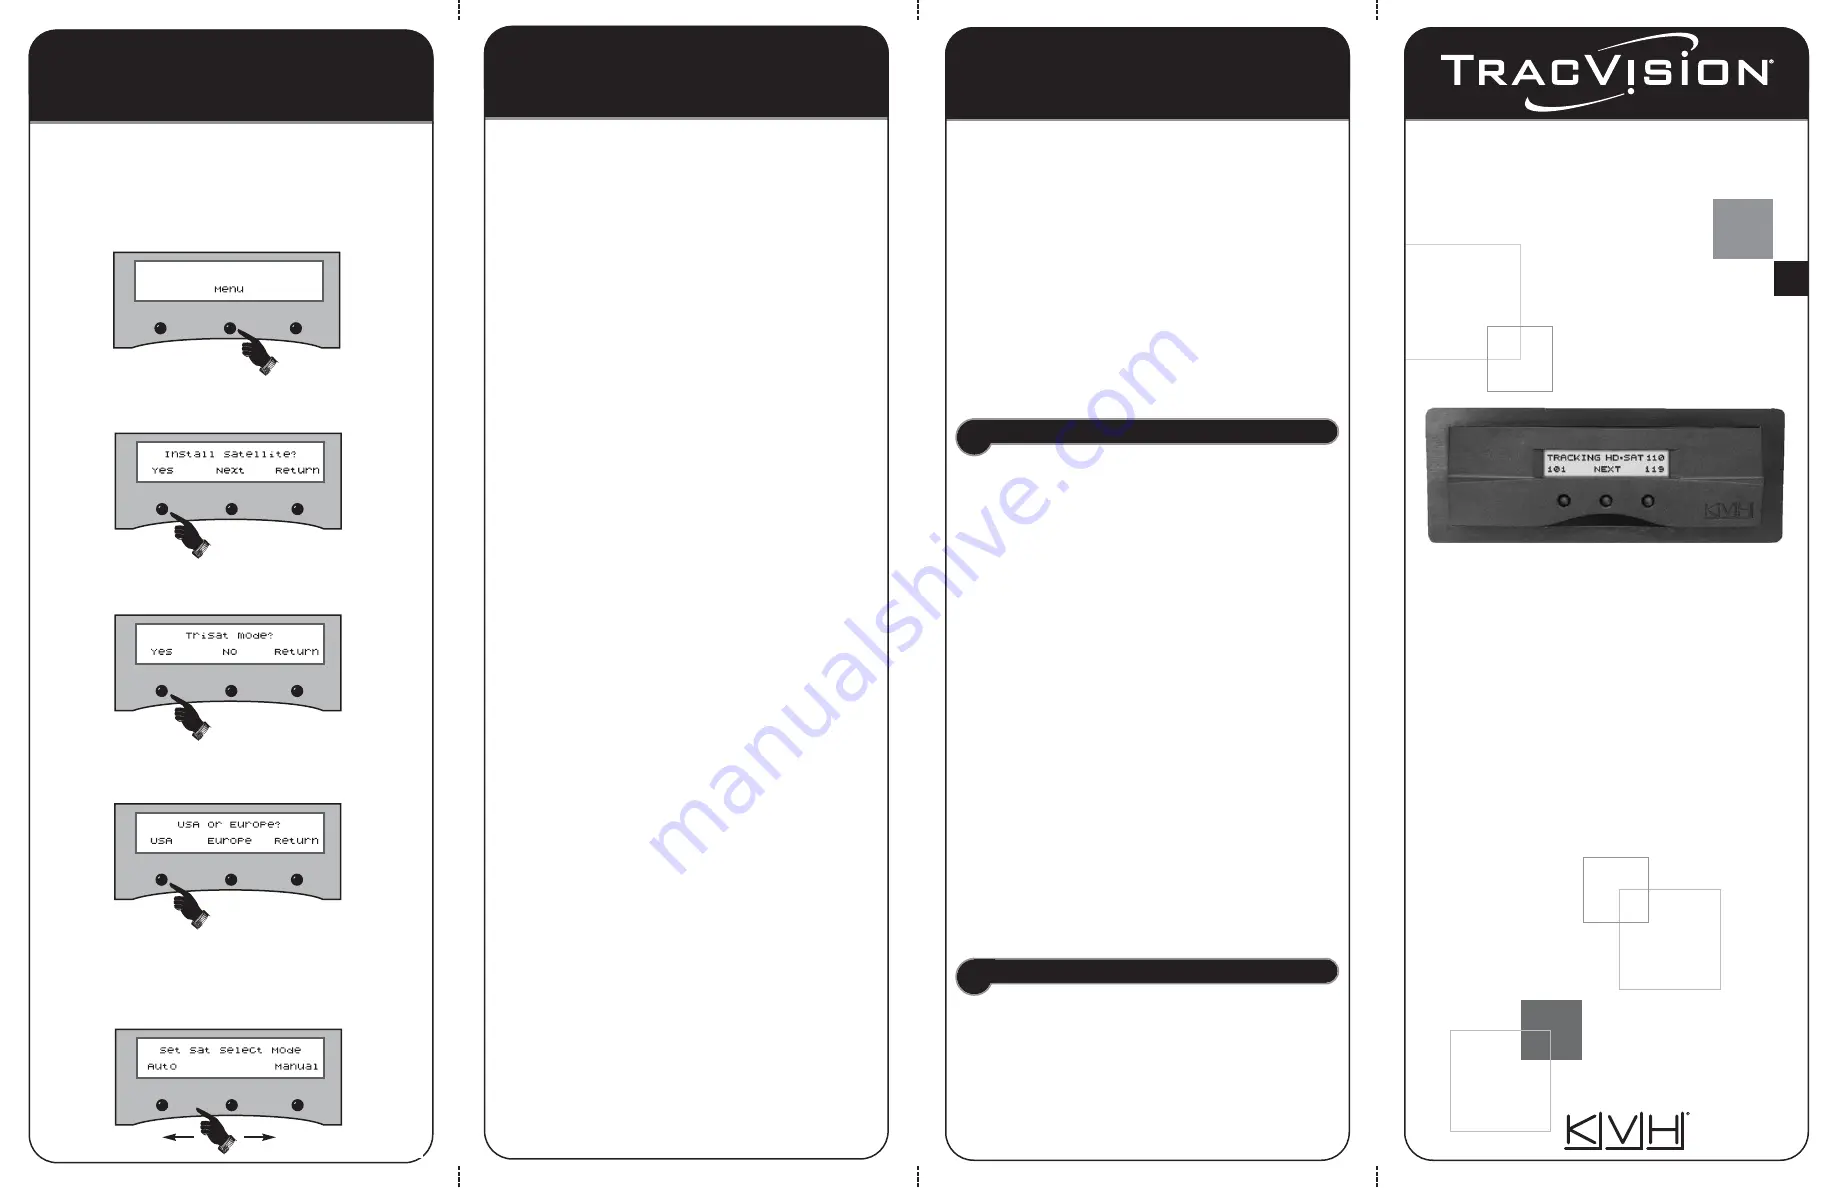
Follow the steps below to set up your TracVision antenna
for TriSat operation.
The antenna must be set up for TriSat
in order to receive DIRECTV’s HDTV programming.
1.
Press MENU
.
2.
Press YES to view the Install Satellite menu
.
3.
Press YES to select TriSat mode.
4.
Press USA to select the TriSat mode for DIRECTV.
5.
The antenna installs the 101, 119, and 110 satellites
then asks you to choose a Sat Select Mode. See
“Selecting Mode” on the reverse side of this guide.
If you are experiencing a problem receiving HDTV
programming, first check the basics listed here.
Is the Antenna Tracking the Right Satellite?
If the antenna is tracking the wrong satellite, one of
the following will appear on the TV:
•
The wrong programming
•
A “Channel Not Available” message
•
A “Buy Now” message
•
A “Program Not Available in this Area” message
If you see one of these indications, try switching to a
different satellite (see “Switching Satellites”).
Is the Antenna Turned On?
Check the switchplate’s power switch or the circuit
breaker to ensure the TracVision antenna is turned on.
Is Anything Blocking the Antenna?
The antenna requires an unobstructed view of the
southern sky to receive TV signals. Common causes
of blockage include trees, buildings, and heavy rain.
Is the Receiver Activated for HDTV?
High-definition channels are not included with basic
DIRECTV service; you need to add these special
channels to your programming package. Premium HD
channels, such as HBO HD, must also be ordered
separately. For activation assistance, call KVH at
1-888-584-4163 (Mon-Fri 8:30 am-5:00 pm ET).
Is the Receiver Set Up for “Oval, 3 LNB”?
To receive channels from all three DIRECTV satellites,
the receiver must be configured for an “Oval, 3 LNB”
dish (antenna) type. Refer to your receiver’s user
manual for details on setting dish type.
Does the TV Show “Please Call Ext. 722”?
If you can only access the DIRECTV preview channels,
such as channel 100, while all other channels show a
message to call Ext. 722, the receiver may have lost
its activation data. To fix this problem, call DIRECTV
at 1-800-DIRECTV (347-3288).
Be sure the antenna is
tracking the satellite when you call.
Is the Channel Listed in the Program Guide?
If you’re unable to tune to a particular channel, check
the program guide. The program guide lists all of the
channels that are available on every DIRECTV satellite.
If the channel you want to watch does not appear in
the guide, the receiver has not finished downloading
the guide. The receiver will not recognize a channel
until it is defined in the guide.
The receiver begins downloading the program guide
on startup. Please be patient – it might take 20
minutes or more to load the entire guide.
Technical Support
If you do not find the solution to your problem, please
contact an authorized dealer or service center.
To find an authorized dealer located near you, visit
www.kvh.com/wheretogetservice
. If an authorized
dealer is not located nearby, please contact KVH
Technical Support:
Phone:
1-401-847-3327
E-mail:
Speeding Up Acquisition – Optional*
If you know the latitude and longitude of your current
location, you can enter it into the antenna to speed up
satellite acquisition.
When the antenna knows where
it is, it knows where to start looking for the satellite.
For optimum performance, enter your position
whenever you’ve traveled further than 500 miles.
Follow the steps below to enter your position data.
1.
Press MENU.
2.
Press NEXT until “Operations Mode” appears.
3.
At “Operations Mode,” press YES.
4.
Press NEXT until “Control Antenna” appears.
5.
At “Control Antenna,” press YES.
6.
Press NEXT until “Set Lat/Long” appears.
7.
At “Set Lat/Long,” press YES.
8.
Using +/- and ENTER, enter your latitude.
9.
Using +/- and ENTER, enter your longitude.
10.
Press RETURN until you exit the menu.
* Does not apply to TracVision G8, which has built-in GPS


