Toshiba BV410D-GS02-QM-S, Owner'S Manual
The Toshiba BV410D-GS02-QM-S is a high-performance electronic device that offers you a seamless user experience. This sleek device comes with a convenient Owner's Manual, ensuring easy setup and optimal usage. Download the free manual from our website to unlock the full potential of your Toshiba BV410D-GS02-QM-S.
Share
Download


Reviews:
No comments
Related manuals for BV410D-GS02-QM-S

T12
Brand: Gallagher Pages: 13

TC1200
Brand: Datalogic Pages: 160

Charge Analyzer 711
Brand: 3M Pages: 26

BC2604
Brand: Baracoda Pages: 23

appLS07DESK
Brand: aqprox! Pages: 39

Magellan 2200VS omega
Brand: PSC Pages: 382

ALH-900h
Brand: Alien Pages: 41

DynaPAD
Brand: Magtek Pages: 2

E01FL
Brand: Billow Pages: 90

BluScan
Brand: IDTECH Pages: 137
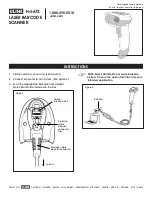
H-6672
Brand: U-Line Pages: 3

20789
Brand: Lindy Pages: 60

XT5-40 Series
Brand: BIXOLON Pages: 2

04-0106-EN
Brand: Intratone Pages: 2

04-0108
Brand: Intratone Pages: 4

PRX-2
Brand: Viking Pages: 4

OPR 3101
Brand: Opticon Pages: 2

SCANTEAM 3470 CCD
Brand: Welch Allyn Pages: 11


