

Front and back panels shown are for illustration only.
Your DVR’s back panel may appear different, with the same ports in different locations.
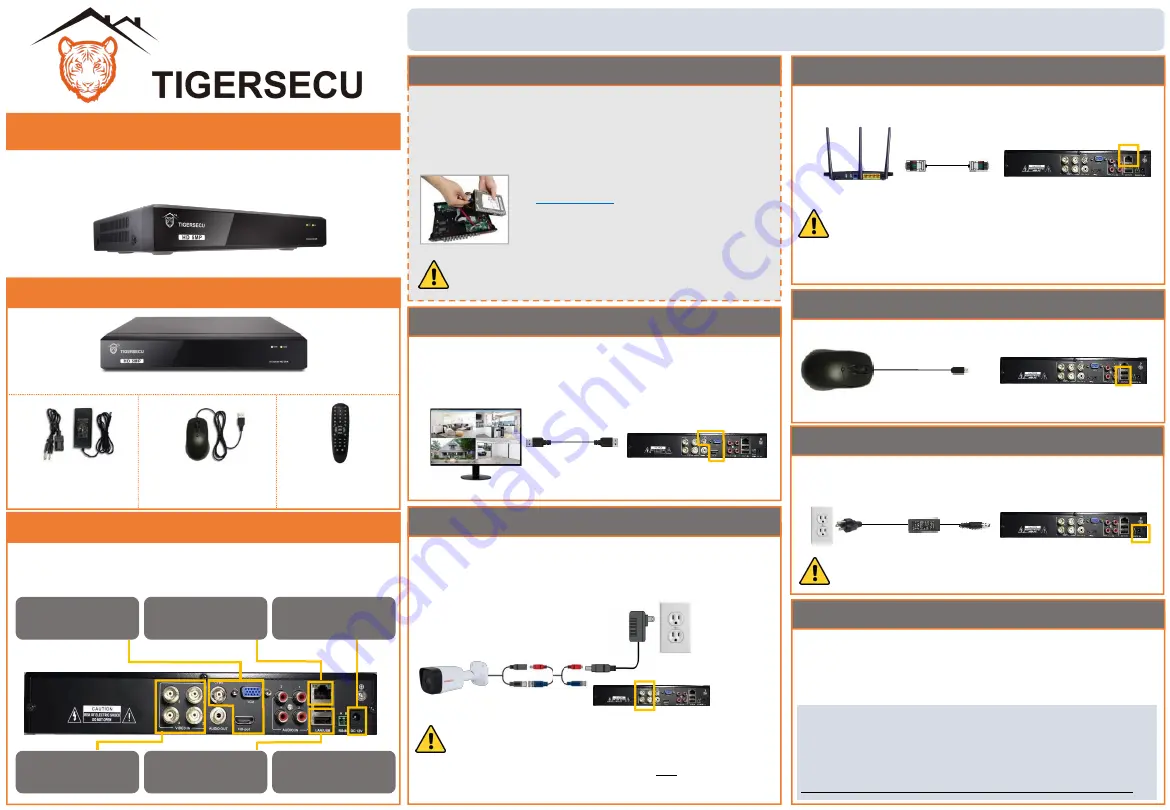
Set Up Your DVR
See the steps below (expanded instructions on the right) to
complete the initial setup of the DVR:
STEP 2:
Connect cameras
STEP 4:
Connect mouse
STEP 6:
Startup Wizard
STEP 1:
Connect monitor
STEP 3:
Connect router
STEP 5:
Connect power
STEP 6: Startup Wizard
The TIGERSECU Startup Wizard will begin when you first
power up your DVR. The Startup Wizard will help you
configure core DVR settings.
After completing the Startup Wizard, create a new DVR
password at
Configuration Menu > User. Record your
password below and store in a secure place:
STEP 3: Connect router
Connect the DVR to your router using an Ethernet cable
(not included).
Router
DVR
High speed internet connection and a router (not
included) are required to enable remote viewing
and receive firmware updates. Internet is not
required for local viewing.
STEP 4: Connect mouse
Connect the included mouse to a USB port on the DVR.
Wireless mouse (not included) is also supported.
STEP 5: Connect power
Use the included power adapter to connect the DVR to an
electrical outlet.
The Power Supply included with the DVR is
designed ONLY for use with the TIGERSECU DVR.
STEP 1: Connect monitor
Connect the DVR to a TV or desktop computer monitor
using an HDMI, VGA, or CVBS cable (not included). Multiple
monitors may be connected to the DVR at the same time.
Monitor
DVR
```
STEP 2: Connect cameras
Test your cameras prior to selecting a permanent
mounting location by temporarily connecting the
cameras and cables to your DVR.
Wired
Camera
BNC Cable
DVR
Camera
power
supply
(not included)
(Optional) Install/replace hard drive
Skip this step if you have a DVR with pre-installed hard
disk drive (HDD). Install a surveillance HDD (WD purple
hard drive is recommended) to record video footage. Or
upgrade your HDD to add extra recording space.
Ensure DVR is powered off and power adapter is
disconnected before installing/replacing HDD.
•
See the Installation chapter of the
User Manual
for detailed instructions.
•
Format HDD during
STEP 6 Startup
Wizard
.
Quick Start Guide
5MP Super HD DVR Series
Package Contents
5MP Super HD Security DVR
DVR Power Supply
*only for use with DVR
USB Mouse
Remote Control
This DVR works with 5MP (2560 x 1920 pixels) HD-
TVI, AHD, CVI, and ONVIF 2.0+ IP cameras, and
analog cameras. This DVR does not work with SDI
cameras.


