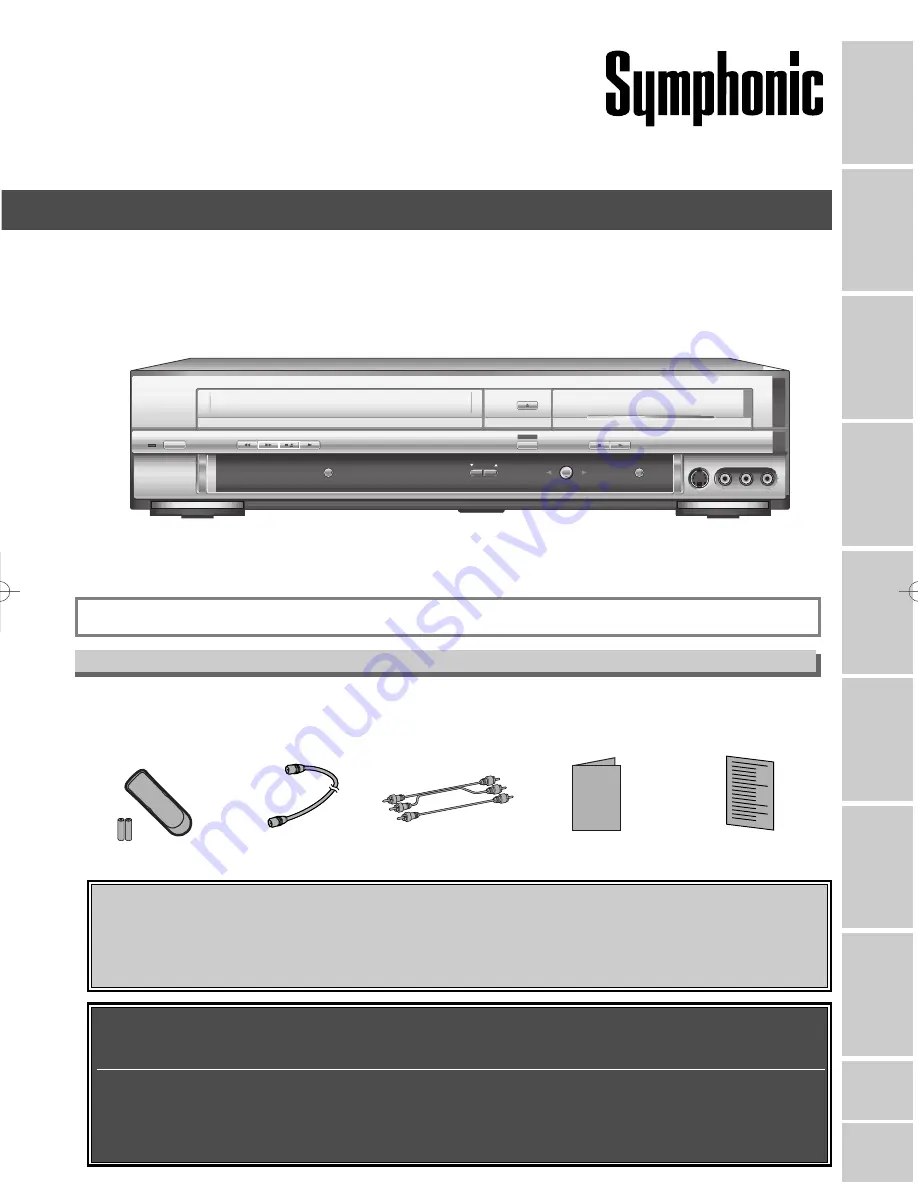
background image

• Remote control

(NB108UD) 
with two AA batteries

• RF cable

(WPZ0901TM002)

• Audio/Video  cables 

(WPZ0102TM015 or

WPZ0102LTE01)

• Owner’s Manual

(1VMN20208)

• Quick Use Guide

(1VMN20003)

Owner's Manual

Bef

or
e y
ou star

t

If you need additional operating assistance after reading this owner’s manual or to

order replacement accessories, please call

TOLL FREE : 1-800-605-8453

or visit our web site at http://www.funai-corp.com

Before you use this unit , you need to complete connections. Refer to
“Connections” on pages 13-15.

To record a program easily, refer to “Easy DVD recording” on pages 16-17
after connections are completed.

(You CANNOT record on any copyright protected DVD disc with this unit.)

SR90VE

INSTRUCCIONES EN ESPAÑOL INCLUIDAS.

Owner’s Manual

DVD Recorder with Video Cassette Recorder

Supplied Accessory

Español

Recor

ding

Pla

ying discs

Editing

Connections

Getting star

ted

Changing the SETUP men

u

VCR functions

Others

CHANNEL

OUTPUT SELECT

VCR

DVD

DVD

RECORD

VCR

RECORD

S-VIDEO

VIDEO

L - AUDIO - R

OPEN/CLOSE

PLAY

REW

POWER

F.FWD STOP/EJECT

STOP

PLAY

DUBBING

E9411UD.qx3  04.6.14  11:12 AM  Page 1

Summary of Contents for SR90VE

Page 1: ...is unit you need to complete connections Refer to Connections on pages 13 15 To record a program easily refer to Easy DVD recording on pages 16 17 after connections are completed You CANNOT record on...

Page 2: ...ar installation If this equipment does cause harmful interference to radio or television reception which can be determined by turning the equipment off and on the user is encouraged to try to correct...

Page 3: ...venience receptacles and the point where they exit from the appliance 13 Outdoor Antenna Grounding If an outside antenna or cable system is connected to the product be sure the antenna or cable system...

Page 4: ...unit Indicates that you need to select the DVD mode by pressing DVD button on the remote control before proceeding next step Indicates that you need to select theVCR mode by pressingVCR button on the...

Page 5: ...arch 95 Time Search 96 Other operations 96 Others 97 Troubleshooting 97 RF converter output 101 Glossary 102 Specifications 103 Language code 103 Espa ol 104 Before you start 2 Precautions 2 Table of...

Page 6: ...in tracks record ed in Dolby Digital format Quick search for what you want to watch You can easily find the part you want to watch using search func tion Search for a desired point on a disc by title...

Page 7: ...o start a One Touch Recording 19 PLAY button VCR Press to start playback 20 STOP EJECT button VCR EJECTbutton Press to remove the tape from the unit STOP button Press to stop the tape motion Press to...

Page 8: ...have been set press to set the unit in timer standby mode Press to cancel the timer standby mode and turn the unit on 2 Number buttons DVD VCR Press to select channel numbers Press to select a title c...

Page 9: ...kinds of battery together although they may look similar different batteries may have different voltages Make sure that the plus and minus ends of each battery match the indications in the battery co...

Page 10: ...eed 6 Channel To adjust the channel setting of the unit as you prefer 1 Edit Turns on a title list When a disc with VR mode is inserted Original or PlayList is available which shows the recorded title...

Page 11: ...ly one disc type is indicated as an example 2 Indicates a recording mode and possible recording time 3 Indicates a current channel number 4 Indicates a title number chap ter number and the time elapse...

Page 12: ...ars when a DVD RW disc is inserted in the disc tray Appears when the timer recording is proceeding in VCR Appears whenVCR is in the timer recording stand by mode Appears duringVCR to DVD duplication p...

Page 13: ...VIDEO OUT VIDEO OUT VIDEO IN L Y IN OUT CB CR L R L R R OUT DVD DVD VCR ANTENNA IN AUDIO OUT AUDIO IN S VIDEO AUDIO OUT DIGITAL AUDIO OUT COAXIAL COMPONENT VIDEO OUT VIDEO OUT VIDEO IN L Y IN OUT CB...

Page 14: ...ange this unit s RF output to channel 4 Refer to RF converter output on page 101 2 At the TV select channel 3 or 4 the same channel as you have selected at step 1 3 At the cable box or satellite box s...

Page 15: ...Digital decoder and set Dolby Digital to Stream for the Digital Out setting in the SETUP menu Refer to pages 90 91 The audio source on a disc in a Dolby Digital 5 1 channel surround format cannot be r...

Page 16: ...Ver 1 2 2 4x CPRM com patible For example when you want to record repeatedly on the same disc or when you want to edit the disc after recording select the rewritable DVD RW type disc When you want to...

Page 17: ...ent edit functions which are possible only with DVD R RW discs You can edit the following from a title list Putting names on titles Setting pictures for thumbnails VR mode Setting clearing chapter mar...

Page 18: ...o Preset Manual Preset TV Audio Select Stereo VCR DVD Setup Playback Setting Note If the auto presetting is can celled during presetting some channels not yet preset may not be received The selection...

Page 19: ...l Preset Manual Preset CH18 Add Delete CH2 Add Delete Setup Channel Preset Manual Preset Adding deleting channels The channels you no longer receive or seldom watch can be deleted from the memory You...

Page 20: ...tup Menu 4 Select TV Audio Select using K L buttons then press ENTER button Option window will appear 5 Select Stereo or SAP using K L buttons then press ENTER button Stereo Outputs main audio SAP Sec...

Page 21: ...select Auto using K L buttons then press ENTER button If you know your PBS chan nel number select Manual using K L buttons then press ENTER button Enter your PBS channel number using Number or K L bu...

Page 22: ...ttons to move the cursor 6 Enter the time hour minute using K L buttons Press B buttons to move the cursor Setup Clock Clock Setting Auto Clock Setting Daylight Saving Time Auto JAN 12 2004 MON 09 24...

Page 23: ...R SETUP CM SKIP TIMER PROG RETURN 1 2 3 4 5 6 7 8 0 9 STOP PLAY CH VIDEO TV SLOW PAUSE ABC DEF GHI JKL MNO PQRS REC OTR REC MONITOR MENU LIST CLEAR C RESET SEARCH MODE ENTER DISPLAY TUV WXYZ DVD 8 7 4...

Page 24: ...on the first Sunday in April and move back one hour on the last Sunday in October 1 Press SETUP button to dis play SETUP DISC menu SETUP DISC menu will appear Screen 2 Select SETUP using B buttons th...

Page 25: ...using K L buttons then press ENTER button 6 Press SETUP button to exit Setup Playback TV Aspect Parental Lock Disc Menu Language Audio Language Subtitle Language Digital Out Dynamic Range Control Fast...

Page 26: ...the recording time becomes longer Restrictions on recording You cannot record copy protected video using this unit Copy protected video includes DVD Video discs and some satellite broadcasts If copy...

Page 27: ...scs in other DVD recorders Disc type format Copy free Copy once Copy prohibited Recordable Not Recordable DVD RW DVD RW VR DVD RW DVD RW Video DVD R DVD R ver 1 1 ver 1 1 CPRM compatible ver 1 1 ver 1...

Page 28: ...Video mode or VR mode using K L buttons then press ENTER button The recording mode will be set Setup Recording Auto Chapter Timer Programming Video mode DVD Player Compatibility mode VR mode Editing p...

Page 29: ...ter marks will be put as you specified 8 Press SETUP button to exit SETUP menu Setup Recording Auto Chapter Timer Programming DVD RW Recording Format VR mode 10 minutes Dubbing Mode VCR DVD DVD OFF 5...

Page 30: ...atting will start 6 Formatting is complete 100 will be indicated This operation may take a while to be completed Formatting 100 Formatting 58 Disc Edit Format Finalize Yes No Disc Protect OFF ON Are y...

Page 31: ...the recording format is set to the desired mode Refer to Formatting a disc on pages 28 30 When a DVD RW disc is loaded You can choose Video mode or VR mode from SETUP menu Video mode has been selected...

Page 32: ...want to change the recording speed press REC SPEED button repeatedly The recording speed will be changed as you press the button as shown Refer to Recording speed on page 26 You cannot change the reco...

Page 33: ...n pages 28 30 When a DVD RW disc is loaded You can choose Video mode or VR mode from SETUP menu Video mode has been selected as the default Refer to Choosing the recording format of a blank disc on pa...

Page 34: ...MON FRI L SAT L FRI L SUN L L Setup Recording Timer Programming Date Start End CH Speed JAN 01 AM AM CH8 DVD DVD VCR Setup Recording Timer Programming Date Start End CH Speed DVD VCR Setup Recording A...

Page 35: ...display 2 Press TIMER PROG button Timer Programming list will appear 3 Check the information on the list you will need 4 To clear the timer programming select your desired program using K L buttons th...

Page 36: ...ttings will be lost If a disc is not on the tray the DVD indicator on the front panel flashes and timer recording cannot be performed Please insert a recordable disc If a tape with a record tab is not...

Page 37: ...uttons then press ENTER button 5 Select the input jack type to connect using K L buttons then press ENTER button If you want to use S VIDEO INPUT select S Video In If you want to use VIDEO INPUT Compo...

Page 38: ...the remote control or the CH K L buttons To use the input jacks on the front of this unit select L2 position by pressing 0 0 2 on the remote control or the CH K L but tons 4 Select a recording speed...

Page 39: ...B buttons then press ENTER button Recording menu will appear 4 Select Dubbing Mode using K L buttons then press ENTER button Option window will appear Setup Recording Auto Chapter Timer Programming Du...

Page 40: ...D VCR VCR Setup Recording Auto Chapter Timer Programming Dubbing Mode Video mode VCR DVD DVD RW Recording Format OFF VCR DVD VCR DVD VCR DVD DVD to VCR VCR VCR Setup Recording Auto Chapter Timer Progr...

Page 41: ...eo mode to play in other DVD players Details are on pages 26 27 1 Press SETUP button to dis play SETUP DISC menu SETUP DISC menu will appear Screen 2 Select DISC using B buttons then press ENTER butto...

Page 42: ...Disc Edit Format Finalize Disc Protect OFF ON Yes No Disc Edit Format Finalize Disc Protect OFF ON Setup Menu DVD RW DVD RW VR POWER REC SPEED AUDIO ZOOM SKIP SKIP OPEN CLOSE TOP MENU SPACE VCR SETUP...

Page 43: ...n your DVDs If these region symbols do not appear on your DVD you cannot play the DVD in this unit The number inside the globe refers to region of the world Region 1 represents the United States Canad...

Page 44: ...n Video mode VR mode MENU LIST button 5 Select a desired title using K L B buttons then press ENTER button Playback will start 6 Press STOP C button to stop playback To eject the disc press OPEN CLOSE...

Page 45: ...rt Connections Getting started Changing the SETUP menu VCR functions Others Espa ol 1 Press POWER button then press DVD button When you are playing a DVD or an audio CD turn the TV on and be sure to s...

Page 46: ...screen 2 Select an item using K L B buttons then press ENTER button to confirm Continue this step to set up all the features you want or to start playing the disc from the menu MENU LIST button Displ...

Page 47: ...le may appear on the TV screen 2 Select a title to play using the K L B buttons then press ENTER button Playback will begin at the title you selected TOP MENU button Displays the Title menu of a DVD d...

Page 48: ...with sound For MP3 files approximate speed is fixed at x8 To return to the normal playback press PLAY Bbutton x20 Normal speed playback x2 x20 x5 x40 x40 g h g h g h g h g h g h MP3 MP3 MP3 CD CD CD D...

Page 49: ...CM SKIP button once forwarding 30 seconds Playback will restart automatically B CM Skip 30 sec DVD RW DVD RW VR DVD RW DVD RW Video DVD R DVD R Pause 1 During playback press PAUSE F button Playback wi...

Page 50: ...D or E button Every time you press D or E button approximate speed will be changed as follows To return to the normal playback press PLAY B button x1 8 Pause x1 16 x1 8 x1 16 x1 2 x1 4 g h g h g h g...

Page 51: ...tup This feature allows you to assign a specific point on a disc to be called back later 1 During playback press DIS PLAY button The display menu will appear Screen 2 Select icon using B buttons then...

Page 52: ...ton T for title will be highlighted Title Enter a desired title number to search using K L buttons or number buttons then press ENTER button Title search will start Chapter To move to C for chapter pr...

Page 53: ...MENU SPACE VCR SETUP CM SKIP TIMER PROG RETURN 1 2 3 4 5 6 7 8 0 9 STOP PLAY CH VIDEO TV SLOW PAUSE ABC DEF GHI JKL MNO PQRS REC OTR REC MONITOR MENU LIST CLEAR C RESET SEARCH MODE ENTER DISPLAY TUV...

Page 54: ...rrent group will be played repeatedly MP3 only OFF Title Chapter A B 1 1 01 23 45 DVD Video 1 1 01 23 45 DVD Video MP3 MP3 MP3 CD CD CD DVD RW DVD RW VR DVD RW DVD RW Video DVD R DVD R DVD V DVD V POW...

Page 55: ...tons then press ENTER but ton CD Playback Mode menu will appear 3 Select Program Play using K L buttons then press ENTER button Program play list will appear 4 Select a desired track using K L button...

Page 56: ...sub audio R or a mix of both L R 1 During playback press DIS PLAY button The display menu will appear Screen 2 Select icon using B buttons then press ENTER button Audio menu will appear DVD Video DVD...

Page 57: ...ually tells you which subtitle languages are available You can switch subtitle languages anytime during playback 1 During playback press DIS PLAY button The display menu will appear Screen 2 Select ic...

Page 58: ...s ENTER button Your setting will be activated This function reduces noise in the playback picture When playing back discs recorded in long time mode such as SLP or SEP mode select Type 1 or Type 2 Typ...

Page 59: ...dit 6 Time status bar of the title 7 The arrow icon which means the title list includes a next or a previous page Press Bor button by following direction of the icon 8 Playback status of the current d...

Page 60: ...dit as you prefer without losing original titles The following items you can edit with a playlist Deleting titles Refer to page 74 Deleting parts of titles Refer to pages 75 76 Putting names on titles...

Page 61: ...g K L buttons then press ENTER button Option window will appear 5 Select Yes using B but tons then press ENTER but ton Title will be deleted 6 After writing to disc is com pleted press SETUP button to...

Page 62: ...isc Edit 1 Title Delete Edit Title Name Chapter Mark 0 01 25 JAN 1 1 00AM CH12 XP Disc Edit 1 1 3 2 5 4 JAN 1 1 00AM JAN 1 4 00AM JAN 1 2 00AM JAN 1 3 00AM JAN 1 5 00AM Disc Edit Format Finalize DVD D...

Page 63: ...d for the title 7 After writing to disc is com pleted press SETUP button to exit DISC menu This operation may take a while to be completed Disc Edit Edit Title Name 1 A B C a b c 1 2 3 abc Yes No Writ...

Page 64: ...a desired time using K L buttons then press ENTER button Option window will appear 6 Select Yes using B but tons then press ENTER but ton A chapter marker will be added 7 After writing to disc is com...

Page 65: ...hen press ENTER but ton Title will be deleted 7 After writing to disc is com pleted press SETUP button to exit DISC menu This operation may take a while to be completed 1 Title Delete Scene Delete Edi...

Page 66: ...inal PlayList menu will appear Screen 3 Select Original using B buttons then press ENTER button Original list will appear 4 Select a desired title using K L B buttons then press ENTER button Original...

Page 67: ...e names on the titles and change the names from this menu The names you put on the titles will be displayed on a titlelist First 1 Press SETUP button Select DISC using B buttons then press ENTER butto...

Page 68: ...ame 1 0 01 25 A B C a b c 1 2 3 JAN 1 1 00AM CH12 XP Disc Edit Original 1 Title Delete Scene Delete Edit Title Name Chapter Mark Index Picture Set Protect OFF JAN 1 1 00AM CH12 XP 0 01 25 ON Disc Edit...

Page 69: ...Chapter Mark using K L buttons then press ENTER button Option window will appear 6 Select Add or Delete using K L buttons then press ENTER button Option window will appear Add 1 0 01 25 Title Delete S...

Page 70: ...2 F Note If a selected picture for a thumbnail is deleted by delet ing a part of a title a default picture will be selected You can set a picture to each title for a thumbnail It helps you to remem b...

Page 71: ...ion may take a while to be completed Disc Edit Original 1 Yes No Title Delete Scene Delete Edit Title Name Chapter Mark Index Picture Set Protect OFF ON Writing to Disc JAN 1 1 00AM CH12 XP Disc Edit...

Page 72: ...sc Protect from Disc menu then select Yes This operation may take a while to be completed Disc Edit Original 1 Yes No Writing to Disc JAN 1 1 00AM CH12 XP ON Title Delete Scene Delete Edit Title Name...

Page 73: ...pleted press SETUP button to exit DISC menu This operation may take a while to be completed Disc Edit Original 2 Yes No Writing to Disc JAN 1 2 00AM CH12 XP OFF Title Delete Scene Delete Edit Title Na...

Page 74: ...m pleted press SETUP button to exit DISC menu This operation may take a while to be completed Disc Edit Playlist 1 Title Delete Scene Delete Edit Title Name Chapter Mark Index Picture Set Yes No Writi...

Page 75: ...ill appear 5 Select Scene Delete using K L buttons then press ENTER button Option window will appear 6 Press ENTER button to decide a start point then press ENTER button to decide an end point A curso...

Page 76: ...ENTER button DISC menu will appear 2 Select Edit using K L but tons then press ENTER button Original PlayList menu will appear Screen 3 Select PlayList using B buttons then press ENTER button Playlis...

Page 77: ...01 25 A B C a b c 1 2 3 JAN 1 1 00AM CH12 XP Disc Edit Playlist Edit Title Name 1 0 01 25 A B C a b c 1 2 3 JAN 1 1 00AM CH12 XP Disc Edit Playlist 1 Title Delete Scene Delete Edit Title Name Chapter...

Page 78: ...ete using K L buttons then press ENTER button Option window will appear Add 1 0 01 25 Title Delete Scene Delete Edit Title Name Chapter Mark Index Picture Set Add Delete Yes No JAN 1 1 00AM CH12 XP Di...

Page 79: ...1 1 00AM CH12 XP Disc Edit Playlist Chapter 2 2 F Note If a selected picture for a thumbnail is deleted by delet ing a part of a title a default picture will be selected Setting pictures for thumbnail...

Page 80: ...cene Delete Edit Title Name Chapter Mark Index Picture Set Writing to Disc JAN 1 1 00AM CH12 XP Disc Edit Playlist Disc Edit Playlist 1 0 01 25 Yes No Title Delete Scene Delete Edit Title Name Chapter...

Page 81: ...to disc is com pleted press SETUP button to exit DISC menu To delete a title from Playlist refer to Deleting titles on page 74 To delete a Playlist refer to Deleting a Playlist on page 82 Disc Edit Pl...

Page 82: ...ENTER but ton A Playlist will be erased 6 After writing to disc is com pleted press SETUP button to exit DISC menu Disc Edit Playlist Add New Title Delete Playlist 1 1 3 2 5 4 JAN 1 2 00AM JAN 1 3 00A...

Page 83: ...TER button Option window will appear 5 Select Yes using B but tons then press ENTER but ton Title will be deleted 6 After writing to disc is com pleted press SETUP button to exit DISC menu This operat...

Page 84: ...e Name 1 0 01 25 A B C a b c 1 2 3 JAN 1 1 00AM CH12 XP Disc Edit Edit Title Name 1 0 01 25 A B C a b c 1 2 3 JAN 1 1 00AM CH12 XP Disc Edit 1 Title Delete Edit Title Name Chapter Mark 0 01 25 JAN 1 1...

Page 85: ...nt the screen saver turn on Set the type of sound signal which outputs from the digital audio output jack Set whether the sound recorded in 96kHz will be down sampled in 48kHz Compressing the range of...

Page 86: ...ic Range Control Fast Forward with Audio 4 3 Letter Box All English Original OFF ON OFF DVD Setup Playback Setting Setup Menu Note Only the languages supported by the disc can be selected Audio Langua...

Page 87: ...Setup Playback TV Aspect Parental Lock Disc Menu Language Audio Language Subtitle Language Digital Out Dynamic Range Control Fast Forward with Audio 4 3 Letter Box All English Original OFF ON OFF DVD...

Page 88: ...using K L buttons then press ENTER button Setup Display OSD Background Transparency OSD Background Color OSD Language Screen Saver 10 minutes 1 English 35 DVD Setup Playback Setting Setup Menu POWER...

Page 89: ...ver 10 minutes English Fran ais Espa ol OSD Background Transparency Default 35 Set the background transparency of OSD screen You can choose one among 0 through 100 Select a setting using K L buttons t...

Page 90: ...ic Range Control Fast Forward with Audio 4 3 Letter Box All English Original OFF ON OFF DVD Setup Playback Setting Setup Menu POWER REC SPEED AUDIO ZOOM SKIP SKIP OPEN CLOSE TOP MENU SPACE VCR SETUP C...

Page 91: ...he digital audio output Select a setting using K L buttons then press ENTER button Option window will appear Proceed to steps A or B Select a setting using K L buttons then press ENTER button Your set...

Page 92: ...M SKIP SKIP OPEN CLOSE TOP MENU SPACE VCR SETUP CM SKIP TIMER PROG RETURN 1 2 3 4 5 6 7 8 0 9 STOP PLAY CH VIDEO TV SLOW PAUSE ABC DEF GHI JKL MNO PQRS REC OTR REC MONITOR MENU LIST CLEAR C RESET SEAR...

Page 93: ...tton to exit SETUP menu A password has been set already Setup Playback TV Aspect Parental Lock Disc Menu Language Audio Language Subtitle Language Digital Out Dynamic Range Control Fast Forward with A...

Page 94: ...ng Before recording make sure The desired channel is selected by pressing Number buttons on the remote control or CHAN NEL K L buttons on the front panel of the unit There is a tape with a record tab...

Page 95: ...TR REC MONITOR MENU LIST CLEAR C RESET SEARCH MODE ENTER DISPLAY TUV WXYZ DVD 1 One touch timer recording 0 30 1 00 Normal recording 7 30 8 00 Search 1 1 1 An index mark will be assigned at the beginn...

Page 96: ...ure Search Still Slow mode press PLAY button VCR functions Search cont d Hi Fi Your Selection Type of recorded tape non Hi Fi tapes Hi Fi tapes recorded in Hi Fi stereo Hi Fi tapes recorded second aud...

Page 97: ...re by pressing CHANNEL o p buttons on this unit or CH o p buttons while you are playing a video tape TV program pictures are distorted Adjust TV antenna Adjust the picture see the TV s instruction man...

Page 98: ...22 23 Disconnect the AC power cord from the AC outlet and connect it again The program contains copy protection signals that restricts copying The timer setting overlapped with another setting that w...

Page 99: ...layback This program is not allowed to be recorded Recording Error This program is not recordable inVideo mode This program is not allowed to be recorded on this disc Unplayable disc is inserted in th...

Page 100: ...tles comes up to the maximum 99 You are trying to record onto a VR mode DVD RW disc on which the number of recording chapters comes up to the maximum 999 This disc has no space to write the Control In...

Page 101: ...hannel of the unit to CH 4 by pressing VIDEO TV button for 3 seconds The RF output channel will alternates between CH3 and CH4 as follows Changing the RF output channel is available only when the unit...

Page 102: ...files on this unit Finalize To make DVD discs which have done recording possible to play in DVD players With this unit it is possible to finalize DVD R DVD RW discs PCM Pulse Code Modulation The most...

Page 103: ...sh 5160 Esperanto 5161 Estonian 5166 Faroese 5261 Fiji 5256 Finnish 5255 French 5264 Frisian 5271 Galician 5358 Georgian 5747 German 5051 Greek 5158 Greenlandic 5758 Guarani 5360 Gujarati 5367 Hausa 5...

Page 104: ...ia Para abrir Para cerrar Formato del disco Coloque el disco en el grabador Haga el formato del disco del men SETUP existen los formatos de video modo deVideo o de grabaci n de video modo VR seg n el...

Page 105: ...ionando borrando marcadores de cap tulos Borrado de partes de t tulos o escenas Modo VR Title Delete Esto borra permanentemente una escena completa del disco Scene Delete Esto permite que el usuario e...

Page 106: ...uc ci n 5 Presione el bot n STOP C para detener la reproducci n 6 Presione el bot n STOP EJECT C A en el panel frontal de la unidad para expulsar la cinta VCR VCR VCR VCR VCR Nota Cuando se coloca una...

Page 107: ...ZOOM SKIP SKIP OPEN CLOSE TOP MENU SPACE VCR SETUP CM SKIP TIMER PROG RETURN 1 2 3 4 5 6 7 8 0 9 STOP PLAY CH VIDEO TV SLOW PAUSE ABC DEF GHI JKL MNO PQRS REC OTR REC MONITOR MENU LIST CLEAR C RESET S...

Page 108: ...enance commercial use such as hotel rental or office use of this prod uct or damage which results from fire flood lightning or other acts of God THIS WARRANTY DOES NOT COVER PACKING MATERIALS ANY ACCE...

Reviews: