


VISTAPOOL CONTROL SYSTEM
INSTALLATION GUIDE 2016
Our modules allow connection remote control of all our
devices via the Internet.
The client monitors, controls and adjusts all components
and parameters of the pool from anywhere in the world.
Professional pool maintenance controls all of them remotely.
The pool automatically generates statistics about the history
of its parameters.
The WIFI Module must be within the
scope of coverage of the wireless
network that will be connected.
WIRELESS NETWORK
COVERAGE
WIFI NETWORK REQUIREMENTS AND RECOMMENDATIONS
DHCP AUTOMATIC IP ASSIGNMENT
The DSL router has to be configured to enable this service for new connections. The WIFI module uses this protocol to automatically obtain an IP address from the router. If you have experienced problems with your WIFI Module
configuration and the box does not automatically connect to the router, check if DHCP is enabled. To do so, enter the router web address with a web browser (it is usually 192.168.1.1 or 192.168.0.1) and gain access to the control
panel by setting the user and password required by the router. Enter the DHCP option and enable it. Finally save and apply the configuration change to let the router work with the new configuration.
WIFI ENCRYPTION
Swimming pool water filtering is a very delicate operation, and its control must have a certain degree of protection against unwanted access and even malicious intrusions. Therefore it is strongly recommended to use a strong
encryption protocol when installing a swimming pool connection using the WIFI network. Several tests and documents have shown that WEP encryption have some security flaws and therefore should be replace it with WPA
encryption protocol. Nevertheless, many homes and companies still uses WEP encryption. If you have WEP as encryption protocol, change it by connecting to the router control panel, as explained in the previous section. Then enter
“Wireless settings” and change the WEP encryption to WPA. You can always use the same password as in the WEP encryption. Always remember to erase and create again your wireless network connection on your PC.
2
WIFI MODULE CONFIGURATION
2.5
2.6
2.3
2.4
2.7
2.9
2.10
2.8
12:30
25º
man
off
man
off
Cover Pol 1
LOW
00
gr/h
%
hydrolysis / electrolysis
Pr on
Pol 1
Pol 2
250
mA
pH
7.5 OFF
AL3
7.0
7.2
Rx
mV
700 OFF
AL3
FL1
700
Cl
ppm
1.00 FL2
FL1
1.00
Cu/Ag ionization
measures
1 2 3 4
TANK
2.2
2.1
A
red
(12V)
green
(COM-B)
black
(GND)
yellow
(COM-A)
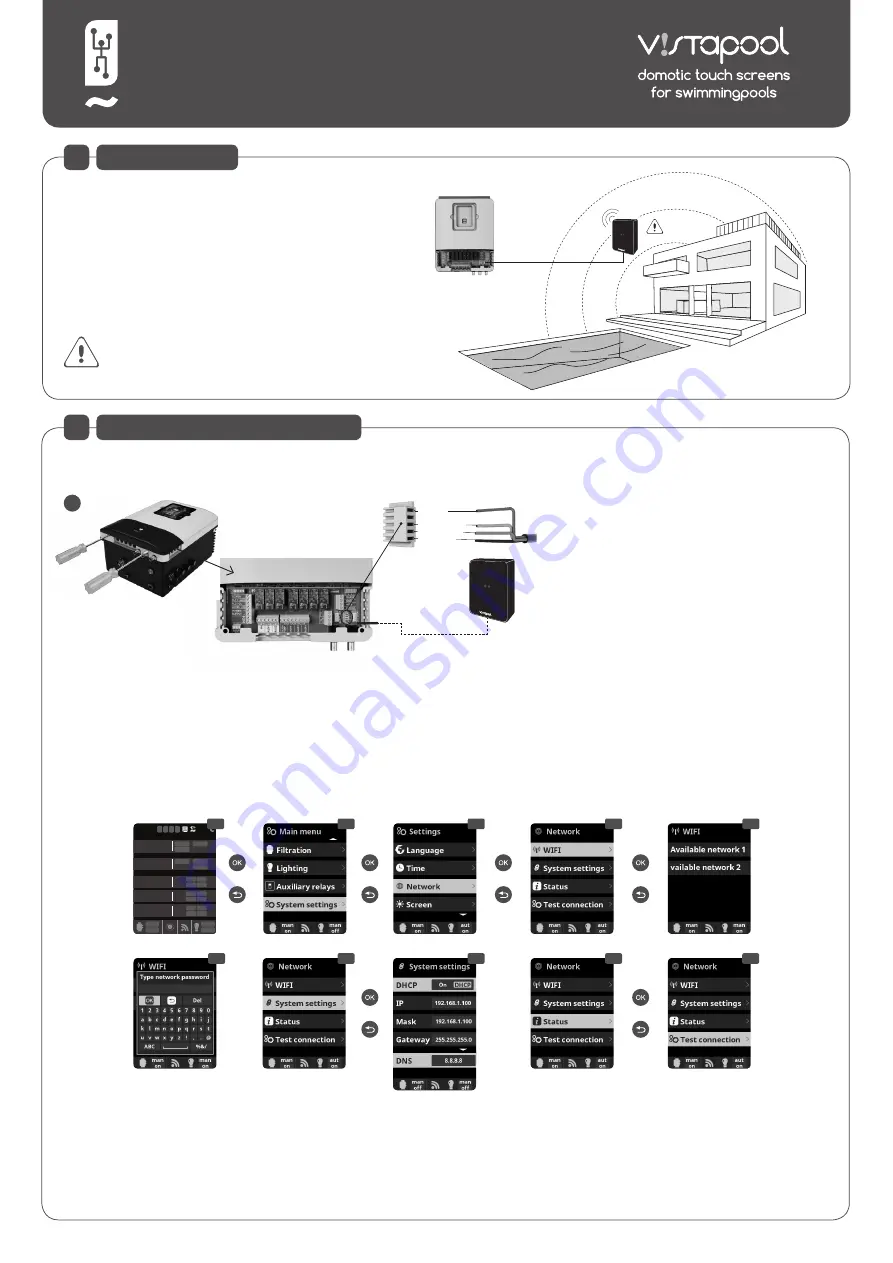
• Turn off the device by pressing the ON/OFF
switch and disconnect it from the plug.
• Take off the connectors lid using a screwdriver.
• Plug the WIFI Module into the corresponding
connector (WIFI) of the electronic circuit, with
the red wire positioned at the top.
• If the WiFi Module is properly connected, one
of the green LEDs will blink and the other will
remain on.
Once the WIFI module is connected, restart your unit. In the
System Settings
menu will appear the
Network
option.
pantalla
2.4
WIFI:
Select
WIFI
to scan the available networks accessible to the module. The search will be done automatically.
pantalla 2.5
Select the desired network accessible to the WIFI module.
pantalla 2.6
Enter the password in the pop-up keyboard. Scroll up and down with the
up/down
keys and left to right with the
plus/minus
keys. To select a letter press the
OK
.
pantalla 2.7
Configuration:
For a more detailed configuration enter this menu or contact your installer.
pantalla 2.9
Status:
Check the status of your connection.
pantalla 2.10
Test connection:
Check that your connection has been successfully established..
INTRODUCTION
1


