background image

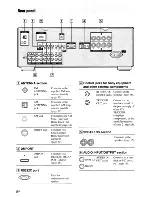
Summary of Contents for STR-DA1500ES

Page 1: ...SONY FM Stereo FM AM Receiver Operating Instructions STR DA1500ES 2009 Sony Corporation 4 129 743 11 1 ...

Page 2: ...third prong are provided for your safety If the provided plug does not fit into your outlet consult an electrician for replacement of the obsolete outlet 10 Protect the power cord from being walked on or pinched particularly at plugs convenience receptacles and the point where they exit from the apparatus II Only use attachments accessories specified by the manufacturer ENERGY STAR is a U S regist...

Page 3: ...ed in accordance with the instructions may cause harmful interference to radio communications However there is no guarantee that interference will not occur in a particular installation If this equipment does cause harmful interference to radio or television reception which can be determined by turning the equipment off and on the user is encouraged to try to correct the interference by one or mor...

Page 4: ...ibe the controls on the supplied remote You can also use the controls on the receiver if they have the same or similar names as those on the remote About area codes The area code of the receiver you purchased is shown on the lower right portion of the rear panel see the illustration below C I r I 4 XXX XXX XX AA r r Area code Any differences in operation according to the area code are clearly indi...

Page 5: ...tings for the tuner TUNER menu 27 Settings for the system SYSTEM menu 28 Tuner Operations Listening to FM AM radio 29 Presetting radio stations 31 Listening to Satellite Radio 33 Connecting a satellite radio tuner 34 Preparing to listen to a satellite radio 34 Selecting a channel of the satellite radio 37 Presetting satellite radio channels 38 Restricting access to specific channels Parental Lock ...

Page 6: ...Description and location of parts Front panel About the indicators on the display 8 SPA SPB 1 1 E j 21 ...

Page 7: ...ors tunes in radio stations or I DISPLAY Press repeatedly to select satellite radio stations information displayed on the CAT Lights up when the category display page 46 mode is set to ONE CAT lID MUTING Press to turn off the sound during the satellite radio temporarily operation Press MUTING again to SAT Lights up when the satellite restore the sound page 23 radio is connected and XM RADIO or SIR...

Page 8: ...ock not supplied page 34 TRIGGER OUT jack Connects to an interlock on off of the power supply of other 12V TRIGGER compliant components or the amplifier receiver of zone 2 page 28 SPEAKERS section lID AUDIO INPUT OUTPUT section Connects to the speakers page 13 Connects to a tape deck or MD deck etc page 14 AUDIO IN OUT jacks t white L t Red R Connects to a SiriusConnect Home tuner not supplied pag...

Page 9: ... You can use the supplied RM AAU056 Remote Commander to operate the receiver and to control the Sony audio video components that the remote is assigned to operate page 51 Connects to a VCR DVD player etc page 16 18 Connects to the component in zone 2 page 49 AUDIO IN OUT jacks VIDEO IN OUT jacks AUDIO OUT jacks VIDEO OUT jack White L Red R veliOW continued gus ...

Page 10: ...e brightness of the display Name ID BD DVD MENU rn DISC SKIP ID D TUNING ID ENTER MEMORY IQ AMP MENU D TOOLS OPTIONS g MUTING MASTER VOL a _ l HJ MENU HOME Function Press to display the menu of the DVD or Blu ray disc on the TV screen Then use and e lI to perform menu operations Press to skip a disc when using a multi disc changer Press to enter direct tuning mode Press to enter the value after se...

Page 11: ...ss to select preset stations preset channels of the VCR or satellite tuner TUNING 1 Press to scan a station CATEGORY Press to select the category MODE mode for satellite tuner page 37 FM MODE Press to select the FM monaural or stereo reception Function Press TV and the button with orange printing at the same time to enable TV operation Press to return to the previous menu exit the menu while the m...

Page 12: ...e time to select the TV channels Press to activate the Sleep Timer function and the duration which the receiver turns off automatically Press TV INPUT and TV c 1 at the same time to select the input signal TV input or video input Press ZONE I C to turn the zone 2 on or off a The number 5 MASTER VOL TV VOL and C buttons have tactile dots Use the tactile dots as references when operating the receive...

Page 13: ...disconnect the AC power cord mains lead Right speaker Left speaker Example of the speaker system configuration Left speaker Right speaker oSpeaker cords not supplied If you have an additional front speaker system connect them to the SPEAKERS IE terminals You can select the front speakers you want to use with SPEAKERS OFF AIB A B on the front panel page 21 13US ...

Page 14: ...n shows how to connect a Super Audio CD player CD player MD deck tape deck or turntable Before connecting the cords be sure to disconnect the AC power cord mains lead After connecting your audio component proceed to 3b Connecting the video components page 15 GAudio cord not supplied Note If your turntable has a ground earth wire connect it to the rh SIGNAL GND terminal 14US ...

Page 15: ...nent to be connected below for the pages which describe how to connect each component Before connecting the cords be sure to disconnect the AC power cord mains lead After connecting all your components proceed to 4 Connecting the antennas aerials page 19 Component to be connected Page Blu ray disc player DVD player 16 Satellite tuner Set top box 17 DVD recorder VCR 18 15US ...

Page 16: ...to change the factory setting of the BDfDVD input button on the remote so that you can use the button to control your DVD player For details see Changing button assignments page 51 You can also rename the BDfDVD input so that it can be displayed on the receiver s display For details see Naming inputs page 23 Blu ray disc player DVD player TV Audio signals Video signals Video signals oAudio cord no...

Page 17: ...ation shows how to connect a satellite tuner or a Set top box Connect audio and video cords according to the jacks of your components Satellite tuner Set top box TV Audio signals Video signals Video signals oAudio cord not supplied Q Video cord not supplied 17US ...

Page 18: ...D recorder VCR TV Audio signals AUDIO AUDIO Video signals Video signals oAudio cord not supplied 0Video cord not supplied Notes Be sure to change the factory setting of the VIDEO input button on the remote so that you can use the button to control your DVD recorder For details see Changing button assignments page 51 18US You can also rename the VIDEO input so that it can be displayed on the receiv...

Page 19: ...power cord mains lead supplied AC INLET terminal To the wall outlet Notes Before connecting the AC power cord mains lead make sure that metallic wires of the speaker cords are not touching each other between the SPEAKERS terminals Connect the AC power cord mains lead firmly AM loop antenna aerial supplied Notes To prevent noise pickup keep the AM loop antenna aerial away from the receiver and othe...

Page 20: ... Iitsettilll batteri iftt ttte remote Insert two R6 size AA batteries in the RM AAU056 Remote Commander Observe the correct polarity when installing batteries Notes Do not leave the remote in an extremely hot or humid place Do not use a new battery with old ones Do not mix manganese batteries and other kinds of batteries Do not expose the remote sensor to direct sunlight or lighting apparatuses Do...

Page 21: ...ted to the SPEAKERS mterminals The speakers connected to the SPEAKERS mterminals The speakers connected to the SPEAKERS mand mterminals parallel connection Light up SPA SPB SPA SPB To turn off the speaker output Press SPEAKERS OFF NB A B repeatedly until the SP A and SP B indicators on the display light off ALL OFF appears on the display for a while Note You cannot switch the speaker system by pre...

Page 22: ...ou turn the MASTER VOLUME on the receiver To turn the volume up or down quickly turn the knob quickly To make fine adjustment turn the knob slowly You can adjust the volume differently depending on the length of time you press and hold the MASTER VOL button on the remote To turn the volume up or down quickly press and hold the button To make fine adjustment press the button and release it immediat...

Page 23: ...t to create an index name for You can also use INPUT SELECTOR on the receiver 2 Press AMP MENU I LEVEL appears on the display 3 Press repeatedly to select 4 SYSTEM 4 Press 8 or to enter the menu 5 Press to select NAME IN 6 Press 8 or to enter the parameter The cursor flashes and you can select a character 7 Press to select a character then press to move the cursor to the next position If you made ...

Page 24: ... want 3 Press e or to enter the menu 4 Press repeatedly to select the parameter you want to adjust 5 Press e or to enter the parameter 24US 6 Press repeatedly to select the setting you want The setting is entered automatically To return to the previous display Press To exit the menu Press AMP MENU Note Some parameters and settings may appear dimmed on the display This means that they are either un...

Page 25: ... conditions Antenna Aiming page 35 XM radio IDalbl For details see Checking the ID XM ID number page 34 Parentallocka e OFF ON OFF PARENTAL Sirius lock code edita el For details see To change the lock CODE EDT code page 40 Sirius antenna aiming modealel For details see Checking receiving SR ANT conditions Antenna Aiming page 35 Sirius radio IDalel For details see Checking the ID SR ID number page ...

Page 26: ...eters FRT BAL Front speaker balance Lets you adjust the balance between front left and right speakers 26US Adjusting the equalizer EO menu You can use the EQ menu to adjust the tonal quality bass treble level of the front speakers Select 2 EQ in the amplifier menus For details on adjusting the parameters see Navigating through menus page 24 and Overview of the menus page 25 EQ menu parameters BASS...

Page 27: ... ANT XM antenna aiming mode This parameter helps you to aim the XM antenna for optimal signal reception For details see Checking receiving conditions Antenna Aiming page 35 XM 10 XM radio 10 Lets you check the XM Radio ID For details see Checking the ID number page 34 PARENTAL Parental lock Lets you restrict access to certain channels using your own lock code For details see Restricting access to ...

Page 28: ...m the output of 12V triggers on or off manually using the CIS command of the IR remote OFF Lets you tum offoutput of 12V triggers even when the main receiver is turned on 28US Tips Even when this receiver is in standby mode press 1 6 on the remote to turned off this receiver the receiver in zone 2 remains turned on To turn off all receivers press 1 6 and AV 1 6 on the RM AAU056 remote at the same ...

Page 29: ...the display To return to stereo mode press FM MODE repeatedly until the MONO indicator on the display does not light up 1 Press TUNER repeatedly to select the FM or AM band 2 Press TUNING or TUNING Press TUNING to scan from low to high press TUNING to scan from high to low The receiver stops scanning whenever a station is received TUNER Numeric buttons D TUNING ENTER TUNING I FM MODE 100 kHz 10 kH...

Page 30: ... or e You can also use MEMORYIENTER on the receiver If you cannot tune in a station Make sure you have entered the right frequency If not repeat steps 2 to 4 If you still cannot tune in a station the frequency is not used in your area 30US Chaingiidgtbe AM itllllilltl lale Model of area code UC only You can change the AM tuning scale to either 9 kHz or 10kHz using the buttons on the receiver 1 6 F...

Page 31: ...mber If MEMORY goes out before you select the preset number start again from step 3 5 Press ENTER You can also use MEMORYIENTER on the receiver The station is stored as the selected preset number If MEMORY goes out before you press ENTER start again from step 3 6 Repeat steps 1 to 5 to preset another station AMP MENU MEMORY ENTER PRESET TUNER 4 D Numeric buttons You can preset up to 30 FM stations...

Page 32: ...edly to select NAME IN 7 Press 8 or to enter the parameter The cursor flashes and you can select a character 8 Press to select a character then press to move the cursor to the next position If you made a mistake Press 1 until the character you want to change flashes then press 1 to select the correct character Tips You can select the character type as follows by pressing 1 Alphabet upper case Numb...

Page 33: ...joy the most popular programming among both services The Best of packages are not available to SIRIUS or XM Canada subscribers at this time Family friendly packages are also available to restrict channels featuring content that may be inappropriate for children To subscribe to XM U S customers should visit xmradio com or call 1 800 XMRADIO 1 800 967 2346 Canadian customers should visit xmradio ca ...

Page 34: ...re operating the system connect the XM Mini Tuner and Home Dock to the XMjack Note To ensure optimal reception of XM s satellite signal move your antenna to various window locations around your home to see where the best reception will be received Most XM customers place the antenna in a south facing window with a clear view to the sky TUNER AMP MENU TUNING 1 Press TUNER repeatedly to select XM RA...

Page 35: ...nd write it in the space provided here XM ID _ SR ID _ If you cannot read the characters or numbers on the display refer to the following table Display Description 2 two c S 5 five c 6 six 1 8 eight tI n o zero u 1 1 A B B D e 11 J 1 G u 0 H H C II K D n 0 nil M J I en n Q UI 7 Z t Checking receiving conditions Antenna Aiming 1 Press TUNER repeatedly to select XM RADIO or SIRIUS You can also use I...

Page 36: ...T 2 marginal WEAK 1 T L NONE 0 T O SIRIUS Signal Strength Signal Signal type Strength Satellite Terrestrial EXC excellent 3 T 3 GOOD 2 T 2 WEAK S I T l NONE 0 T o When you have finished Press AMP MENU 36US Receiving satellite radio broadcasts 1 Press TUNER repeatedly to select XM RADIO or SIRIUS You can also use INPUT SELECTOR on the receiver 2 Press TUNING or TUNING to select a channel You can al...

Page 37: ...m one category CAT is displayed on the display when you set to ONE CAT mode 3 Press CATEGORY or CATEGORY to select the category you want The category is selected and the channel with the lowest number in the specified category is selected 4 Press TUNING or TUNING to select the channel You can also press TUNING MODE on the receiver to select AUTO and then turn TUNING or TUNING to select a channel N...

Page 38: ...ning in the channel the display changes cyclically as follows Channel name Channel number Category name Artist namelFeature Song Program title Composer name SIRIUS only Signal strength Volume level 38US Presetting satellite radio channels You can select the channels you want directly by presetting them using the preset numbers You can preset up to 30 XM Radio channels and 30 SIRIUS Satellite Radio...

Page 39: ...Repeat steps 2 to 5 to preset another channel You can store channels from I to 30 Selecling the c hannel byusing the pre t numbers 1 Press TUNER repeatedly to select XM RADIO or SIRIUS You can also use INPUT SELECTOR on the receiver 2 Press PRESET or PRESET repeatedly to select the preset channel you want You can also press the numeric buttons to select the preset channel you want Then press ENTER...

Page 40: ...ENTAL 7 Press e or to enter the parameter S Press repeatedly to select ON then press e LOCK appears on the display 9 Enter your 4 digit lock code using the numeric buttons LOCKED appears on the display and the Parental Lock is set To delete the numbers you have entered repeat the procedure above from step 3 Select OFF in step 8 To change the lock code 1 Press TUNER repeatedly to select SIRIUS You ...

Page 41: ...the numeric buttons The channel is tuned in 4 Press AMP MENU I LEVEL appears on the display S Press repeatedly to select 3 TUNER 6 Press e or to enter the menu 7 Press repeatedly to select PARENTAL 8 Press e or to enter the parameter 9 Press repeatedly to select OFF then press e LOCK appears on the display 1OEnter your 4 digit lock code using the numeric buttons UNLOCKED appears on the display Not...

Page 42: ...n information LOADING The XM Mini Tuner is acquiring This message should disappear when the signal is strong If audio or program information you often see this message reposition the XM antenna for from the XM satellite signal better signal reception This message can also appear if To optimize the antenna position see Checking receiving the signal is too weak conditions Antenna Aiming page 35 OFF ...

Page 43: ...es Check the connection between the SiriusConnect Home tuner and the antenna Try moving the antenna to another location For details about the antenna location refer to the instructions supplied with the SiriusConnect Home tuner Check all the connections and then turn the system on again Also make sure if the AC adaptor supplied with the SiriusConnect Home tuner is connected to a wall socket The ch...

Page 44: ...the receiver For details refer to the operating instructions supplied with the DIGITAL MEDIA PORT adapter Notes Do not connect an adapter other than the DIGITAL MEDIA PORT adapter Before connecting the cords be sure to disconnect the AC power cord mains lead Do not connect or disconnect the DIGITAL MEDIA PORT adapter while the receiver is turned on Depending on the DIGITAL MEDIA PORT adapter video...

Page 45: ...TAL MEDIA PORT adapter from DMPORT jack OMPORT DC Press and hold both sides of the connector and then pull out the connector Notes When connecting the DIGITAL MEDIA PORT adapter be sure the connector is inserted with the arrow mark facing towards the arrow mark on the DMPORT jack Be sure to make DMPORT connections firmly insert the connector straight in As the connector of the DIGITAL MEDIA PORT a...

Page 46: ... check the volume level etc by changing the information on the display Be sure to use the buttons on the receiver for this operation Press DISPLAY repeatedly Each time you press the button the display changes cyclically as follows All inputs except the FM and AM band XM Radio and SIRIUS Satellite Radio Index name ofthe input Selected input Volume level FM and AM band Preset station name Frequency ...

Page 47: ...ver Refer to the operating instructions supplied with your recording component Recording Gnto J MipiQisc r audiotape You can record onto a MiniDisc or audio tape using the receiver Refer to the operating instructions supplied with your MD deck or tape deck 1 Press one of the input buttons to select the playback component You can also use INPUT SELECTOR on the receiver 2 Prepare the playback compon...

Page 48: ...e zone 2 other than the main zone For example you can watch the DVD in the main zone and listen to the CD in zone 2 When using an IR repeater not supplied you can operate both components in the main zone and Sony receiver in zone 2 from zone 2 Switching the output source for the ZONE 2 OUT jacks Switching the Sony receiver s power on or off in zone 2 The following operations are described for conn...

Page 49: ...ns Outputs sound from speakers in zone 2 using the receiver and another amplifier Main zone STR DA1500ES oAudio component oVideo component 8 IR repeater not supplied eSpeakers eSony Amplifier Receiver Zone 2 e o I e o 11 08 RM AAU056 49US o j CD ...

Page 50: ...on the receiver in zone 2 3 Press ZONE 1 9 The zone function is activated 4 Press ZONE INPUT repeatedly to select the source you want 5 Adjust to a suitable volume Adjust the volume using the receiver in zone 2 To finish the zone 2 operation Press ZONE I C 50US Tip Even when this receiver is in standby mode press I CJ on the remote to turned off this receiver the receiver in zone 2 remains turned ...

Page 51: ...tegories and the corresponding buttons Categories Press VCR command mode VTR 3 DVD player DVD recorder 2 command mode DVD1 a DVD recorder 3 command mode DVD3 a CD player 4 Euro Digital Satellite Receiver 5 DVR Digital CATV terminal 6 DSS Digital Satellite Receiver 7 Blu ray disc player 8 command mode BDOb BIu ray disc recorder 9 command mode BD3 b MD deck OlIO Tape deck 1 a Sony DVD recorders are ...

Page 52: ...e of the top side and bottom rises considerably To avoid burning yourself do not touch the cabinet 52US On placement Place the receiver in a location with adequate ventilation to prevent heat buildup and prolong the life of the receiver Do not place the receiver near heat sources or in a place subject to direct sunlight excessive dust or mechanical shock Do not place anything on top of the cabinet...

Page 53: ...om one of the front speakers Connect a pair of headphones to the PHONES jack to verify that sound is output from the headphones If only one channel is output from the headphones the component may not be connected to the receiver correctly Check that all the cords are fully inserted into the jacks on both the receiver and the component If both channels are output from the headphones the front speak...

Page 54: ...coaxial cable not supplied to connect the receiver to an outdoor FM antenna aerial as shown below If you connect the receiver to an outdoor antenna aerial ground it against lightning To prevent a gas explosion do not connect the ground earth wire to a gas pipe Outdoor FM antenna aerial Receiver F 750 COAXIAL Ground earth wire not supplied t To ground Radio stations cannot be tuned in Check that th...

Page 55: ...any obstacles in the path between the remote and the receiver Replace all the batteries in the remote with new ones if they are weak Make sure you select the correct input on the remote Error essages If there is a malfunction the display shows a message You can check the condition of the system by the message Refer to the following table to solve the problem If any problem persists consult your ne...

Page 56: ...Analog AUDIO OUT Equalizer Gain levels AM tuner section Tuning range Area code DC Voltage 150 mVIlO kohms 10 dB 1 dB step Tuning scale 10kHz step 9 kHz step 530 531 1 710 kHz 1 710 kHz I Measured under the following conditions Area code DC Power requirements 120 V AC 60 Hz Antenna aerial Loop antenna aerial Intermediate frequency 450 kHz Power output DIGITAL MEDIA PORT DC OUT 5 V 0 7 A MAX Frequen...

Page 57: ...al Quick Setup Guide I FM wire antenna aerial 1 AM loop antenna aerial 1 RM AAU056 Remote Commander I R6 size AA batteries 2 AC power cord mains lead 1 For details on the area code of the component you are using see page 4 Design and specifications are subject to change without notice Halogenated flame retardants are not used in the certain printed wiring boards 57US Q Q c J m J 0 l 3 m o J ...

Page 58: ...6 SYSTEM 28 TUNER 27 Muting 23 N Naming 23 32 58US p Parental Lock 40 R Recording onto a MiniDisc or audio tape 47 onto a recording media 48 Remote commander 9 RS232C Control 28 S Satellite tuner connecting 17 Selecting component 22 speaker system 21 Set top box connecting 17 SIRIUS Satellite Radio 33 Sleep Timer 47 Speakers connecting 13 Super Audio CD player connecting 14 T Tuner connecting 19 T...

Page 59: ...1I11111111111111111111111I11111111111 11111 1111111111111 4 1 2 9 7 4 3 1 1 1 Sony Corporation Printed in Malaysia http www sony netl ...

Page 60: ...para obtener mas informacion SON Ce guide d installation facile explique comment raccorder Ie lecteur de disques Blu ray Ie lecteur DVD Ie magnetoscope Ie tuner satellite ou Ie ctecodeur Ie televiseur et les enceintes aI ampli tuner Pour obtenir davantage d informations reponez vous au mode d emploi fourni avec I ampli tuner 1 Installing the speakers 1 Installation des enceintes 1 Instalaci6n de l...

Page 61: ...ss the input button on the remote to select the component you want to play back Refer to the operating instruction supplied with the receiver for details 4 Raccordez tous les cordons d alimentation en dernier lieu Raccordez Ie cordon d alimentation secteur it la prise murale Reportez vous ilia section Raccordemenl du cordon d alimentation secteur dans Ie mode d emploi fourni avec I ampli tuner 5 P...

Page 62: ...111111111111111I1I11111111 4 144 762 01 1 Walkman digital music player iPod iPhone cell phone and pc not included 2 Bluetooth v 2 0 A2DP Requires Bluetooth enabled cell phones and digital music players Bluetooth transmitter not included TDM BTl may not be compatible with some Bluetooth enabled devices 3 TDM NWl 0 is compatible only with select Sony Walkman players with WM PORT connector 4 Register...

Page 63: ......

Page 64: ...Sony pour reparation en tant qU element distinct Preuve de la date d achat La presente garantie limitee s applique au produit a compter de la date originale d achat au detail Par consequent Ie proprietaire doit presenter une preuve de date originale d achat au detail Produits vises par la presente garantie La presente garantie limitee s applique aux produits ESPIRIT de Sony La presente garantie li...

Page 65: ...anty applies to the product from the original date of purchase at retail Therefore the owner must furnish proof of original purchase at retail Subject Products This limited warranty is applicable to Sony s Espirit products This limited warranty may be applicable to other Sony products where the limited warranty is enclosed in the product s original packaging This limited warranty does not extend t...

Page 66: ...tware or other materials you may have stored or pre served on your unit It is likely that such data software or other materials will be lost or reformatted during service and Sony will not be responsible for any such damage or loss A dated purchase receipt is required For specific instructions on how to obtain warranty service for your product Visit Sony s Web Site www sony comlservice Or call the...

Reviews: