move this
switch to top
position to
shoot in Auto
mode.
43
Advanced
Recording
Operations
Shooting with manual adjustment
Under normal conditions, this unit automatically makes various adjustments as it
shoots. However, you can adjust the following functions manually to suit your
preference.
Functions you can adjust by setting the AUTO LOCK selector to the center (auto
lock release) position
Iris, gain, shutter speed, and white balance
Functions you can adjust in menu settings
Deactivating the SteadyShot
Functions you can adjust by using other selectors/rings
ND filter, zebra pattern, focus, AE shift, and zoom
The following describes how to adjust all the functions mentioned above except white
balance (p. 51), focus (p. 59), and zoom (p. 23).
AUTO LOCK selector
Set the selector as shown below to maintain or release the settings of the functions.
AUTO LOCK [a]
Select this position to let the unit adjust all the functions automatically.
HOLD [b]
Select this position after setting the functions manually to maintain the settings.
Manual position (AUTO LOCK release) [c]
Select this position to adjust the functions listed above manually.
If you use the video flash light (optional)
We recommend that you set the AUTO LOCK selector to AUTO LOCK.
Notes
•When you manually adjust more than two of the following functions during backlight
or spot light mode: iris, gain, and shutter speed, the backlight or spot light function
will be automatically canceled.
•The functions (iris, gain, and shutter speed) that are not adjusted manually will be
automatically adjusted according to shooting conditions.
AUTO
LOCK
HOLD
[a]
[b]
[c]
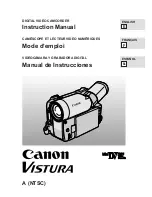
ATTACHING A BATTERY
(1) lift up viewfinder
(2) insert battery with contacts at the
bottom. (Click )
Removing the battery:
press Batt Release and
pull battery up and out.
THE ON BUTTON
set switch to CAMERA
Press red button once to record,
once to pause.
INSERTING A CASSETTE
2. press the blue eject switch to open the
cassette lid
3. cassette window faces out,
4. write protect tab faces up.
5. only press where it is indicated
CHECKING MIC CONNECTION
(1) plug mic into front plug INPUT 1
(2) REC CH SELECT to CH1•CH2
(3) INPUT LEVEL to MIC
(4) +48v to ON
10
Step 1 Installing the microphone
Install the supplied microphone. Be sure to connect the microphone plug to the INPUT1
connector.
(
1
)
Attach the wind screen to the microphone.
(
2
)
Loosen the microphone holder screw and open the cover.
(
3
)
Place the microphone into the holder with the model name (ECM-NV1) facing
upward, close the cover, and tighten the screw.
(
4
)
Connect the plug of the microphone to the INPUT 1 connector.
(
5
)
Set the INPUT LEVEL selector to MIC or MIC ATT. When set to MIC ATT, you
can reduce the volume by about 20 dB. And set the +48 V switch to ON.
(
6
)
Select the channel to be used, using the REC CH SELECT switch. When you
record a sound (signal), which comes from the microphone connected to the
INPUT 1 connector, only on the channel 1, set it to CH1. When you record both
on the channels 1 and 2, set it to CH1•CH2.
When the wind is blowing hard
Set CH1 or CH2 of WIND to ON in the menu settings according to the input (p. 105).
When you unplug the microphone plug
Unplug it while holding the PUSH button down.
1
2
3
4
5
6
CH1•CH2
REC CH
SELECT
INPUT
LEVEL
+48V
INPUT
LEVEL
+48V
CH1
LINE
MIC
ON
OFF
LINE
MIC
ATT
MIC
ATT
MIC
ON
OFF
INPUT1
INPUT2
REC CH
SELECT
INPUT
LEVEL
+48V
INPUT2
CH1•CH2
REC CH
SELECT
INPUT
LEVEL
+48V
INPUT
LEVEL
+48V
CH1
LINE
MIC
ON
OFF
LINE
MIC
ATT
MIC
ATT
MIC
ON
OFF
INPUT1
INPUT2
REC CH
SELECT
INPUT
LEVEL
+48V
INPUT2
Note: turn off +48v if using wireless mics
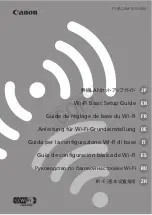
MENU SETTINGS CHECKLIST
Press Menu to turn on.
(use the wheel at the back to
move and press to select
menu items
D ZOOM - OFF
16:9 WIDE - ON *don’t mix 16:9 + 4:3
STEADY SHOT - ON
FRAME REC - OFF
INT. REC - OFF
WIND - OFF
REC MODE - DVCAM
AUDIO MODE - FS48K
MIC NR - OFF
AUDIO SET > AGC1/2 = ON
COLOR BAR - ON
•Record 20 seconds of colour bars
COLOR BAR - OFF
DATE REC - OFF ( never turn ON !!! )
Press Menu to turn off
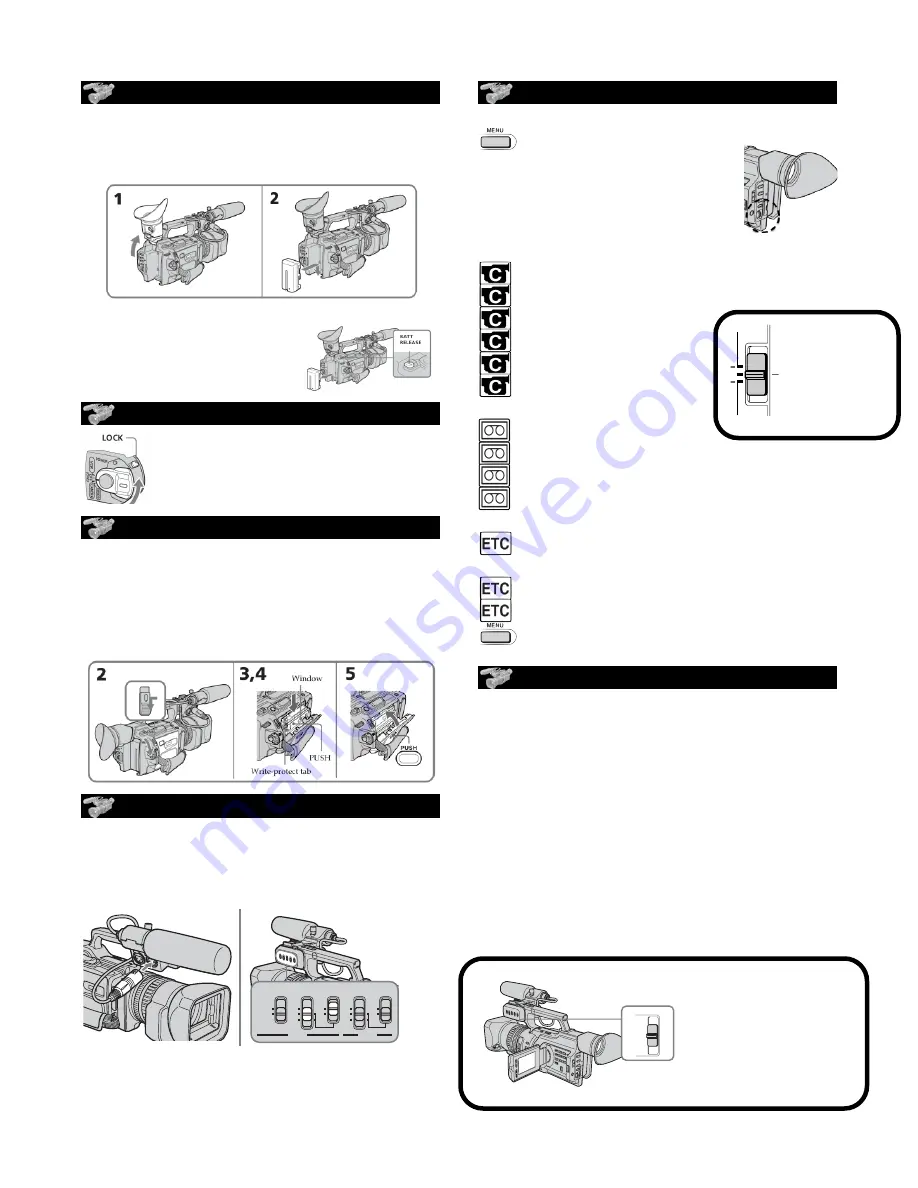
MANUAL CRITICAL FOCUS
* Is the lens clean?
by setting up your focus before you start
shooting, you can easily change your shot
size by zooming and the image will always
stay in focus.
1.switch focus switch to manual
2.close LED screen and look into viewfinder
3.adjust viewfinder for your eye
4.set up your shot
5.zoom in on subject’s eyes, focus
6.reframe your shot, and shoot.
Make sure the ND
filter is off - only use
in very bright
settings. Camera will
flash ND1 / ND2 on
screen if filter is needed
47
Advanced
Recording
Operations
Using the ND filter
Using the ND filter (the ND filter 1 setting corresponds to 1/4 of the quantity of light
and the ND filter 2 setting corresponds to 1/32 of the quantity of light), you can record
a picture clearly by adjusting light amounts, even if you shoot under too bright
conditions.
When the ND1 or ND2 indicator flashes on the LCD screen or in
the viewfinder
The ND filter is necessary.
When ND 1 flashes, set the ND FILTER selector to 1 so that the ND 1 indicator
disappears from the LCD or viewfinder screen.
When ND 2 flashes, set the ND FILTER selector to 2 so that the ND 2 indicator
disappears from the LCD or viewfinder screen.
When ND OFF flashes on the LCD screen or in the viewfinder
The ND filter is not necessary. Set the ND FILTER selector to OFF so that the indicator
disappears from the LCD or viewfinder screen.
The ND filter is now deactivated.
Notes
•If you set the ND FILTER selector to another positions during recording, the picture
may be blurred or audio noise may occur. We recommend that you check the position
of the ND FILTER selector before shooting.
•When shooting a too bright object, diffraction off the small aperture may cause slight
off set in focusing. This phenomenon is quite common with a use of a video camera
recorder. Using the ND filter will reduce influence of such phenomenon, and you can
attain a better shooting condition.
If you use the video flash light (optional)
Set the ND FILTER selector to OFF when you use the flash.
Shooting with manual adjustment
ND FILTER
1
2
OFF
PD 170 Orientation