TM
Thank you for your purchase of a SkylinkHome Plug-In ON/OFF Control
(In /Outdoor), Model PA-318. This receiver module allows you to wirelessly
TM
turn on and off connected lights or small appliances with the SkylinkHome
transmitters.
The Plug-In ON/OFF Control (In /Outdoor) PA-318 can communicate with
up to 8 transmitters, so user has the option to add more transmitters to the
system, such as more remote controls, or motion sensors etc.
TM
All wireless signal communications within the SkylinkHome System are
based on rolling code technology to ensure highest security is used.
The following items are included in this package:
-
Plug-In ON/OFF Control (In /Outdoor)
- Antenna
-
User's Instructions
1. INTRODUCTION
5. SET TIMER DURATION
2. SETUP
3. PROGRAMMING TRANSMITTERS
3. PROGRAMMING TRANSMITTERS (CONT)
Model PA-318
Plug-In ON/OFF Control (In/Outdoor)
Plug-In ON/OFF Control
(In /Outdoor)
PA-318
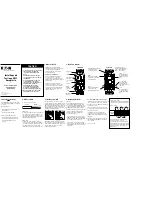
Insert the antenna to the Plug-In ON/OFF Control
(In/Outdoor) as shown. Place the antenna in
the upright position to have the best reception.
Simply plug the Plug-In ON/OFF Control (In/Outdoor)
to an electrical outlet, then plug in a light or home
appliance to the socket on the Plug-In ON/OFF
Control (In/Outdoor).
The Plug-In ON/OFF Control (In/Outdoor) is designed
to operate maximum load of 1500W at 120VAC.
In order to operate the Plug-In ON/OFF Control (In/Outdoor) remotely,
transmitter or sensor must be programmed to the Plug-In ON/OFF
Control (In /Outdoor). Each module can be operated by up to 8 different
transmitters (or 8 different command signals).
There are 2 operating modes with the Plug-In ON/OFF Control (In/Outdoor):
1)
On / Off Mode
- When a valid signal is received, it will turn on or off a
load.
2)
Countdown Timer Mode
- When a valid signal is received, the load will
be on for a specific period of time, either 1 minute, 5 minutes, 15 minutes,
30 minutes, or 60 minutes, then off. This is mainly for energy saving.
To program a transmitter into the Plug-In ON/OFF Control (In/Outdoor),
follow the instructions below:
Before you program a transmitter to the Plug-In ON / OFF Control (In/
Outdoor), decide the operating mode for this transmitter (On/Off Mode or
Countdown Timer Mode).
1. Plug in a load to the Plug-In Module (Indoor / Outdoor)
2. Plug in the module to an AC electrical outlet, the red LED flashes once
quickly. The connected load (i.e. light) should be in
off mode
.
3. Press and hold the "SET" button for about 3 seconds, the
red LED
flashes,
meaning it is in On/Off Mode programming sequence. Release the "SET"
button if you are programming a transmitter to operate in On/Off Mode.
4. If you are programming a transmitter to operate in Countdown Timer Mode,
continue to hold the "SET" button for about 10 seconds, until the red LED
is on steadily. Release the "SET" button once the LED is on steadily.
5. Transmit a "Learn" code from the transmitter. Refer to the manual of the
transmitter to transmit this "Learn" code.
6. Once the transmitter is programmed, the red LED flashes quickly then
stops flashing. You have successfully programmed the transmitter.
Red LED
3
1
2
LED Flashing: On/Off Mode
LED Steadily ON: Timer Mode
On / Off
Countdown Timer
Flashing
Steadily On
Note: You must complete the programming sequence within the
15-second interval, otherwise, the module will quit from programming
mode and you need to start again from step 3 if the red LED is off.
Number of Flashes
1
2
3
4
5
This section is for transmitters that are programmed for Countdown Timer
Mode.
The timer can be set to the following duration, meaning the light will stay
on for the following time: 1 minute, 5 minutes, 15 minutes, 30 minutes, or
60 minutes. Only one timer interval can be set. To set the timer duration,
follow the instructions below.
1. Plug in the module to an AC outlet, the red LED flashes once, so it is
powered on properly.
2.
Turn on
the connected load by a programmed transmitter. The load
must be on under
ON/OFF mode
in order to set the timer duration.
3. Press and hold the SET button for 3 seconds, the red LED flashes
once. The number of flashes indicates the timer duration:
Timer Duration
1 min.
5 min.
15 min.
30 min.
60 min.
Antenna
4. ON / OFF OPERATION
The PA-318 Plug-In ON/OFF Control (In/Outdoor) allows on / off operation,
when the programmed transmitter is activated.
Depends on the type of transmitter, different functions can be performed
such as:
- Individual On / Off, Zone On / Off, All On, All Off etc.
- Motion Activation
Refer to the user's instructions of the transmitter for detailed instructions .
Note:
When using the Plug-In ON/OFF Control (In/Outdoor) in outdoor, always
connect it to a wall socket so it is hanging down. Placing the unit on
ground level may cause serious damage due to water penetration.
4. Continue to hold the SET button until it reaches the desired setting. The
status will change every 6 seconds, i.e. hold the SET button, you will
see the number of flashes changes from 1 to 2, 2 to 3, etc.
LED Indication
during programming
Operating Mode