background image

skcinc.com 

Form 37171 Rev 200630 

Page 1 


AirChek Connect Sample Pump


Cat. No. 220-4000 
Operating Instructions 
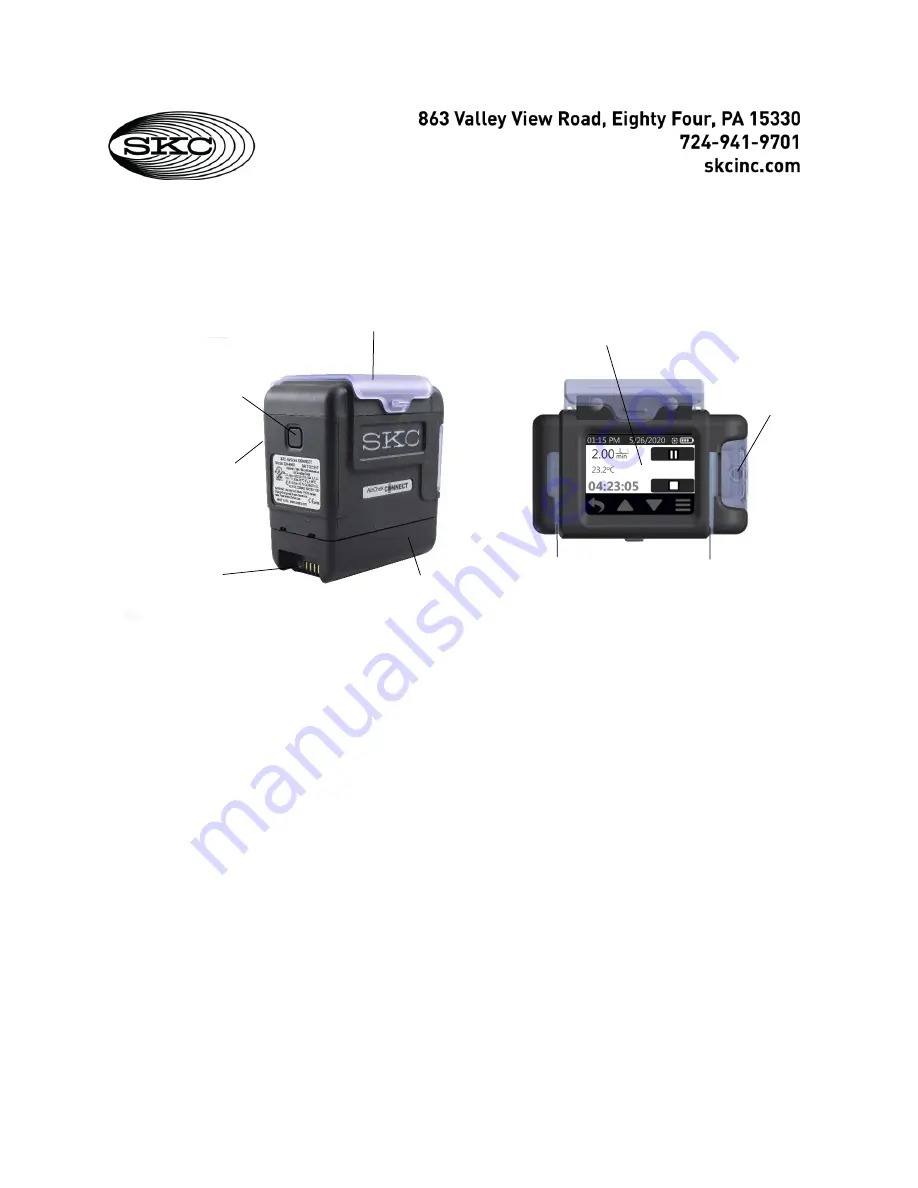


Figure 1. AirChek

®

 Connect Overview 


Table of Contents


Introduction ................................................................................................................................................ 3


Checking Pump Kit/Contents .................................................................................................................... 3


Getting Started ........................................................................................................................................... 4


Charging the Battery Pack......................................................................................................................... 4


Notes and Cautions ................................................................................................................................... 5


Turning Pump Power On/Off ..................................................................................................................... 5


Interpreting the Display .............................................................................................................................. 6


Determining Battery Charge Status ........................................................................................................... 6


Using the Touch Screen ............................................................................................................................ 7


Navigating Menus and Screens ................................................................................................................ 7


Determining Pump Status.......................................................................................................................... 9


Modifying Device Settings ......................................................................................................................... 9


Operation ................................................................................................................................................. 16


Protective screen cover 

On/off button 

Belt clip in back  

(not shown

Charging  

contacts 

Battery pack 

Front and side view 

Top view 

Inlet 
housing/filter 

Touch screen/display 

LED Indicator 

LED Indicator 

Summary of Contents for 220-4000

Page 1: ...ry Pack 4 Notes and Cautions 5 Turning Pump Power On Off 5 Interpreting the Display 6 Determining Battery Charge Status 6 Using the Touch Screen 7 Navigating Menus and Screens 7 Determining Pump Status 9 Modifying Device Settings 9 Operation 16 Protective screen cover On off button Belt clip in back not shown Charging contacts Battery pack Front and side view Top view Inlet housing filter Touch sc...

Page 2: ...tant Pressure Mode No All In One or CPC Required 21 Sampling 24 Flow Fault Mode and Display 29 Viewing History History Menu 30 Using Pump with DataTrac Pro for Bluetooth Connected Pumps Software 30 Maintenance 31 Replacing the Battery Pack 31 Replacing the Screen Cover 31 Replacing the Belt Clip 31 Replacing the Inlet Housing and or Inlet Filter 32 Troubleshooting 32 Pump Service 32 Accessories Re...

Page 3: ...y case 100 240 V 220 4000 KD Single High Low Flow Kit includes pump as described above Standard Charging Cradle power supply with cord filter cassette holders All in One adjustable tube holder and Type A protective tube cover in a soft sided nylon carry case 100 240 V 220 4000 K3D 3 pack High Low Flow Pump Kit includes 3 pumps as described above and 3 each Standard Charging Cradles and power suppl...

Page 4: ...or of Multi Cradle Power Supply Cat No 220 700 into the power port on the side of the last cradle in the chain Insert the wall cube into a 100 to 240 volt wall outlet 2 Align the contacts on the bottom edge of the pump with the contacts inside the cradle and insert the pump in the cradle Repeat for each additional pump cradle 3 Charge the battery completely approximately 3 hours The left LED on th...

Page 5: ...ignés non dangereux Maximum charge input voltage is Um 12 V CAUTION Risk of Fire and Burns Do Not Disassemble heat above 212 F 100 C or incinerate Keep battery out of reach of children and in original package until ready to use Dispose of used batteries promptly according to all state and local recycling or waste regulations User may replace external components such as the inlet filter battery pro...

Page 6: ...ll stop and power off eventually Run time data will be retained in history A fault icon will appear on the screen once the pump is restarted Displays while pump is running and screen lock dim is not activated Flow rate L min constant flow or inH2O constant pressure Calibration correction applied Scrolling display of accumulated sample volume L ambient temp F or C atmospheric pressure mbar inHg mmH...

Page 7: ...ur navigation buttons that access previous screens and Main Menu and increase decrease values Back button Returns to previous screen Up Arrow button Increases selected value or moves up a list range display Touch and hold to speed increment of flow or pressure settings Down Arrow button Decreases selected value or moves down a list range display Touch and hold to speed decrement of flow or pressur...

Page 8: ...ed to pump Advanced Menu Set Pressure Set Duration timer Run button Menus and screens contain the following navigational touch buttons Button General Function Check mark Saves a selected item Left and right movement Allows horizontal movement on a scale see below or moves left or right through fields activating each for entry of value Calibration flow adjustment Allows selection of an adjustment t...

Page 9: ...t the pump is out of flow tolerance just before entering flow fault mode and during each auto restart attempt while in flow fault mode Modifying Device Settings Note about default settings AirChek Connect is shipped with the default settings listed below that may be changed by the user from the Device submenus Dim On Auto Lock Off Secure Lock Off Temperature Units F Atmospheric Pressure Units inHg...

Page 10: ...flash and up down arrow buttons to toggle AM PM Touch check mark to accept new time and return to Clock Menu New time setting will display To change clock display format From Main Menu 12 Hour and 24 Hour buttons are displayed Touch desired setting to select and return to Clock Menu New clock display format will be displayed Touch Device Touch Clock Touch time displayed Touch Device Touch Clock To...

Page 11: ...crement decrement day Touch right arrow to advance to year will flash and up down arrow buttons to increment decrement year Touch check mark to accept new date and return to Clock Menu New date will display To change date display format From Main Menu Touch desired date display format to select and return to Clock Menu New date display format will be displayed Touch Device Touch Clock Touch Device...

Page 12: ...m Main Menu mbar inHG and mmHg buttons display Touch desired button to select and return to Units Menu Note Changing the display units affects only the display of atmospheric pressure on the pump screen and in Sample Summary and History Back pressure inlet pressure will always display in inH2O on the pump screen and in Sample Summary and History Touch Device Touch Units Touch Device Touch Units To...

Page 13: ...ing the On Off button If Auto Lock is set to On in combination with Dim the screen will dim and lock automatically when the pump is run The screen can be undimmed and unlocked by pressing the power on off button For more information on Auto Lock and Secure Lock see below This setting helps conserve battery usage If Dim is set to Off the screen backlight will stay on during the entire sample run To...

Page 14: ... the screen If Dim is set to On the screen will both lock and dim when the pump starts running a sample If Auto Lock is set to Off the screen will remain active The screen may be locked made inactive manually at any time during a sample run by pressing the power on off button on the side of the pump To unlock and reactivate the screen press the power on off button on the side of the running pump T...

Page 15: ...s You will be prompted to confirm the passcode Touch the screen keypad to enter the same four digit number combination Upon entering the last digit the passcode will be saved and you will be returned to the Screen Menu If Secure lock is set to On the user can lock the screen of a running pump by pressing the power on off button If Auto Lock is set to On concurrently the screen locks when the pump ...

Page 16: ... accept selection and return to Flow Menu with new flow setting displayed Setting Calibrating Flow Rate from 1 to 5 L min Allow pump to equilibrate after moving it from one temperature extreme to another Charge pump battery completely before calibration and sampling To achieve the best results run the pump for 10 to 15 minutes before calibration 1 Turn on the pump 2 Prepare the calibrator See cali...

Page 17: ...own arrow buttons to increment decrement calibration adjustment The calibration adjustment value will display beside the calibration icon Note The flow rate displayed on the calibrator will change as a result of this adjustment Touch check mark to accept the calibration adjustment value and return to the Flow Menu The flow rate displayed on the pump will remain unchanged 6 Disconnect the pump from...

Page 18: ...pare the calibrator per calibrator instructions 3 Using flexible tubing connect the calibrator outlet suction port to the pump inlet 4 Set pump flow rate to the following as appropriate see Setting Pump Flow Rate Single tube sampling 1 5 L min Multiple tube sampling the sum of all flows 15 Note Do not exceed 500 ml min flow rate per tube for multiple tube sampling 5 Disconnect tubing from the pump...

Page 19: ...ly Figure 4 Calibration Train 5 to 500 ml min for Single Tube Constant Flow Figure 5 Calibration Train 5 to 500 ml min for Multiple Tubes Constant Flow chek mate calibrator Pump All in One Tubing Tubing Sorbent tube Flow adjust screw Pump inlet Suction port chek mate Calibrator Pump chek mate Calibrator Pump CPC Pump inlet Tubing Dual adjustable low flow holder Tubing Suction port Flow adjust scre...

Page 20: ...librate Flow Rate with Dual Tri or Quad Adjustable Low Flow Tube Holder Constant Flow Mode See appropriate adjustable flow holder instructions 1 In the Flow menu touch the Run button to run the pump Note It is good practice to allow the pump to run for 10 to 15 minutes before calibrating flow rate 2 Using a small flat head screwdriver turn the brass flow adjust screw on the first active port clock...

Page 21: ...tant Flow mode is recommended if sampling requires a flow higher than 1000 ml min the pump can be used in Constant Pressure mode for flows up to 5 L min if the pressure drop does not exceed 20 inches H2O To use the pump in Constant Pressure mode the pressure drop across the sampling train should be between 1 and 20 inches H2O Note The pump will not work in Constant Pressure mode without a sampling...

Page 22: ...tant Pressure mode Using tubing connect the calibrator to the single sorbent tube or the first of multiple sorbent tubes Figure 6 Calibration Train 100 to 1000 ml min for Single Tube Constant Pressure Mode Figure 7 Calibration Train 100 to 1000 ml min for Multiple Tubes Constant Pressure Mode Tubing Suction port Sorbent tube Tubing Pump inlet chek mate Calibrator Pump Pump chek mate Calibrator Tub...

Page 23: ...e low flow tube holder in Constant Pressure mode Touch check mark to accept selection and return to Constant Pressure screen with the new pressure setting displayed 2 Disconnect representative sorbent tube from the calibrator Replace representative sorbent tube with newly opened unexposed method specified sorbent tube to complete the sampling train Proceed to Sampling Calibrate Flow Rate with Sing...

Page 24: ...le If using sample tubes as media calibrate verify pump flow rate before and after each sampling operation using the tube holder and pump used for sampling 1 After setting calibrating flow rate ensure that calibrator and tubing have been removed and representative method specified sample medium used for calibration has been replaced with newly opened unexposed method specified sample medium to com...

Page 25: ...tton on the screen to stop sampling A Sample Summary will be displayed accumulated data will be reset Note If pump is shut off or goes to sleep after a sample is completed and is powered on again the initial display will show the Sample Summary of the previous sample run Touch Sample Touch Flow or Advanced Touch Run button in Flow Menu to run pump in constant flow Touch Run button in Advanced Menu...

Page 26: ...screen remains inactive The screen may be locked made inactive at any time during sampling by pressing the power on off button on the side of the pump To unlock and reactivate the screen press the power on off button on the side of the pump This feature helps to reduce tap errors during sample runs Need display for secure lock code Enter CODE to unlock Secure Lock set to On locks inactivates the p...

Page 27: ... to advance to hour digit 2 will flash and up down arrow buttons to adjust hour digit 2 Repeat through minutes Touch check mark to accept new time and return to Clock Menu New time setting will display 2 Connect pump to sample train See Figure 8 3 Run sample as follows Touch Sample Touch Flow or Advanced Touch Time button in Flow Menu to set sample duration Touch Time button in Advanced Menu to se...

Page 28: ...onnect pump to sampling train See Figure 8 2 Select sample preset as follows From Main Menu Presets are created by the user in DataTrac Pro for Bluetooth connected Pumps Software and uploads them to the pump See DataTrac Pro for Bluetooth connected Pumps Software for details The start date for a preset with delayed start can be changed on the pump by touching the date on the Preset screen The pump...

Page 29: ...ee Options on pump screen during a sample run on page 26 3 When the Preset sampling period is complete the pump will automatically stop sampling which displays a Sample Summary and automatically resets the accumulated data Note If pump is shut off or goes to sleep after a sample is completed and is powered on again the initial display will show the Sample Summary of the previous sample run Flow Fa...

Page 30: ...th connected Pumps Software which is available as a download requires Internet connection Access Data for Bluetooth connected Pumps Software as follows 1 Check that the PC meets DataTrac Pro system requirements 2 Install the USB Bluetooth Adapter or dongle on laptop PC according to the instructions included with the adapter 3 Browse URL provided in adapter instructions and download and install the...

Page 31: ... pack housing Tighten the screws in an alternating fashion d Charge the new battery pack completely before use if reinstalling the existing battery pack ensure that it is charged to at least 25 battery status icon upon startup shows two bars See Charging the Battery Pack Replacing the Screen Cover 1 Remove the two screws from the top of the screen cover mounting block 2 Lift off the screen cover a...

Page 32: ...d filter 3 Insert the new or existing filter and O ring into the inlet recess Ensure that the O ring is fully flat 4 Align the new or existing inlet housing with the inlet recess 5 Insert the four screws into the inlet housing Tighten the screws only until the gap between the inlet housing and pump is closed TROUBLESHOOTING If the pump is not responding to touch or the pump screen displays uncommo...

Page 33: ...ter O rings pk 3 P4001 Screen Cover P20422 Use only SKC approved parts to ensure reliable performance and to maintain the UL Listing for intrinsic safety Failure to do so voids any warranty Use of a repaired or rebuilt battery pack VOIDS ANY WARRANTY SKC Limited Warranty and Return Policy SKC products are subject to the SKC Limited Warranty and Return Policy which provides SKC s sole liability and...

Page 34: ... 104 F 0 to 40 C Charging 32 to 113 F 0 to 45 C Storage 4 to 113 F 20 to 45 C Humidity ranges Operating 95 RH non condensing Storage 95 RH non condensing Altitude Corrects flow for changes in temperature 32 to 104 F 0 to 40 C and ambient pressure up to 15 000 feet 4572 meters above and down to 4500 feet 1372 meters below sea level Display parameters High contrast backlit LCD Time date battery stat...

Reviews: