SEWOO LK-B20 II, User Manual
The SEWOO LK-B20 II User Manual is available for free download on manualshive.com. This comprehensive manual provides step-by-step guidance on operating your SEWOO LK-B20 II printer. Whether you need troubleshooting tips, installation instructions, or product specifications, this manual is the ultimate resource for maximizing the potential of your printer.
Share
Download


Reviews:
No comments
Related manuals for LK-B20 II

Star Wars Stormtrooper
Brand: Uncanny Brands Pages: 8
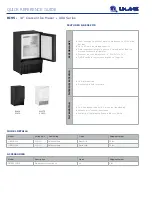
U-BI95B-00A
Brand: U-Line Pages: 2

Ice Undercounter Series Cubers ICEU070A
Brand: Ice-O-Matic Pages: 21

CMS4604
Brand: Smeg Pages: 35

CA343
Brand: Jata electro Pages: 20

LATTISSIMA PREMIUM
Brand: Nespresso Pages: 22

DMW001H
Brand: Dash Pages: 32

Starbucks UC100
Brand: Cornelius Pages: 16

PICKYOO
Brand: Yoo Digital Pages: 40

019 122
Brand: Lagrange Pages: 76

BrewStation Deluxe 47454C
Brand: Hamilton Beach Pages: 40

VIVA STYLE CHIC
Brand: Gaggia Pages: 182

CM5400D-SA
Brand: anko Pages: 12

BLMI-300A
Brand: Blueair Pages: 36

VPIM-1000
Brand: VALPRO Pages: 16

BM260
Brand: Kenwood Pages: 241

BM230
Brand: Kenwood Pages: 21

BM200 series
Brand: Kenwood Pages: 56


