

1 of 2
Acuity Brands | One Lithonia Way Conyers, GA 30012 Phone: 800.535.2465 www.acuitybrands.com © 2020-2021 Acuity Brands Lighting, Inc. All rights reserved. Rev. 0
4
/
18
/202
2
912-00148-00
3
SPODMRA JOT
Dimming Switchpod
Installation Instructions
PROVISSIONING JOT SYSTEM APP-LESS
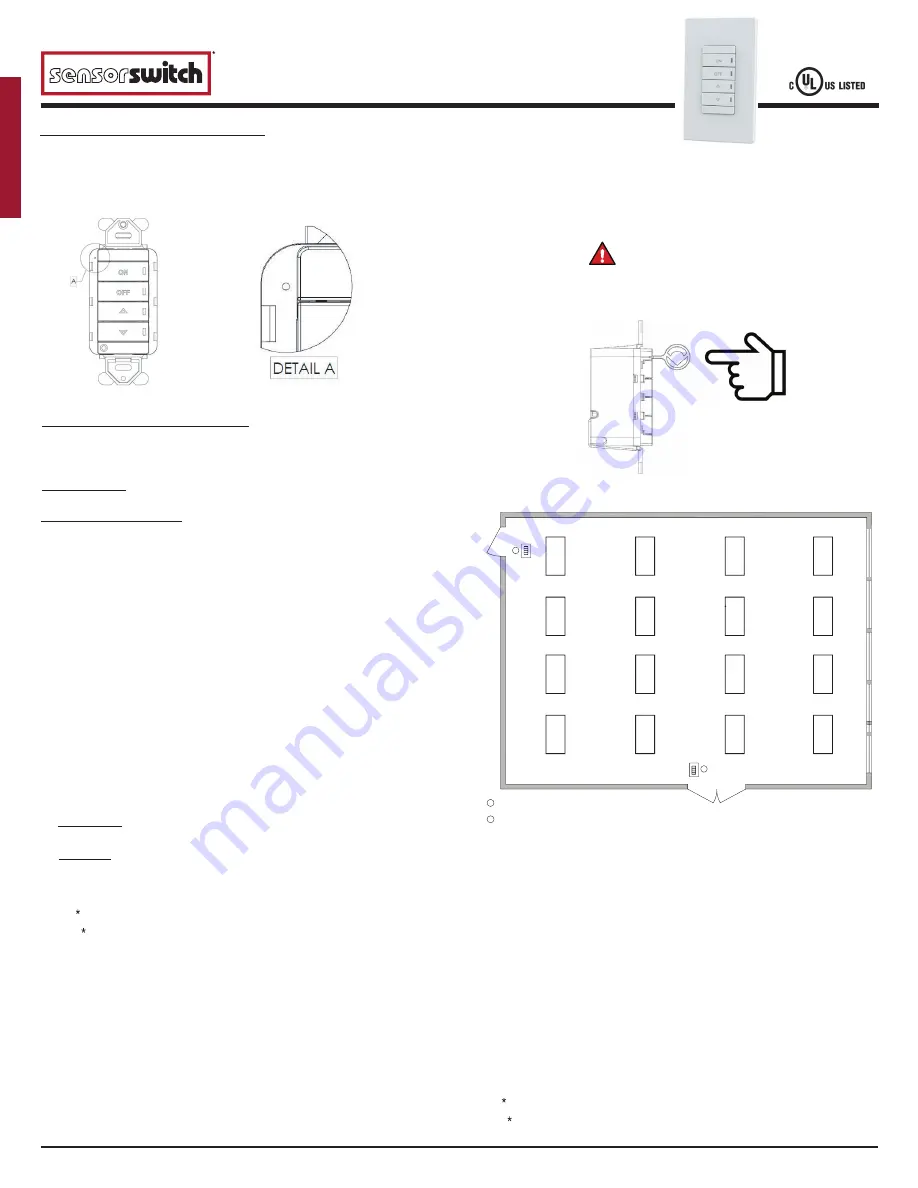
After JOT enabled luminaries and wall stations are installed and powered, locate
the “pin hole” as shown below.
For app-free pairing, fixtures must be placed
downstream from the wall switch.
Insert JOT tool then press / hold any front button for 6 seconds. Once LED begin
blinking rapidly, remove tool from device. All branch circuit luminaries will power cycle
and begin to self-pair one at a time indicated by a 10% dim state. Once all luminaries
are paired, light level will transition from 10% to 100%.
WARNING
Only use pre-packaged JOT tool to start pairing process.
DO NOT INSERT METAL INTO PIN HOLE!
CONVERSION FROM GROUND ONLY
This product is pre-configured for wiring without a neutral; however, if connection to
neutral is required by code, the unit easily converts in seconds
by removing green sleeve
3-Way or (Multi-Way Application); similarly applies to neutral wiring
1
SPODMRA JOT
SPODMRA JOT
2
OPERATIONAL SETTINGS
JOT Tool must be inserted to perform any of the below operations. Press any button on
the front of the switch to enter mode.
2 = Occupancy Time Delay
The length of time an occupancy sensor will keep the lights on after it last detects
occupancy.
1 - Test Mode**
6 - 10.0 min*
11 - 22.5 min
**Test mode sets Occupancy Time
Delay to 30 seconds and increases
photocell transition rate in addition
to disabling the microphone on units
with Dual Technology
2 - 30 sec
7 - 12.5 min
12 - 25.0 min
3 - 2.5 min
8 - 15.0 min
13 - 27.5 min
4 - 5.0 min
9 - 17.5 min
14 - 30.0 min
5 - 7.5 min
10 - 20.0 min
Level of light output when occupancy
is initially detected. Not applicable in
Automatic Dimming Control (ADH) mode.
1 - 10%
4 - 40% 7 - 70%
10 - 100%*
2 - 20%
5 - 50%
8 - 80%
* DEFAULT
SETTING
3 - 30%
6 - 60%
9 - 90%
3 = Start Level
OUTPUT RATING
120VAC, 800W, 6.7A
,
277VAC, 1200W, 4.3A
,
347VAC, 1500W, 4.3A
SETTING CODE 6 (Join a Group)
SETTING CODE 7 (Accept New Device)
1
2
1 - 1%
4 - 30%
7 - 60%
10 - 90%
2 - 10%
5 - 40%
8 - 70%
11 - 100%
3 - 20%
6 - 50%
9 - 80%
9
= Re
set Pin
Un-paired device send request to join a group.
10
10 = Remove Local Device Only
1 - Do not remove 2 - Remove * and **
* If device is the configurator, the group will “Restore” all devices in the group back to
factory default. This action will un-pair all devices in the group.
** If device is not the configurator, the device will send a “Delete Node” message to the
configurator for itself and restore itself back to factory defaults and will no longer be
able to communicate with the group.
11 = Restore all Group Devices to Factory Default
1 - Do not remove 2 - Remove
12 = LOW TRIM SETTING (LOWEST DIM VALUE)
4 = On Mode
1 - Automatic On
Sensor automatically turns the light on when it detects occupancy.
2 - Manual On
Sensor requires pressing the button to turn the light on.
5 = HIGH TRIM SETTING (MAXIMAUM BRIGHTNESS LEVEL)
6 = Join Group (used in 3-way / multi-way applications)
Places an unpaired device into “Join Group” mode. This will allow the device to join an
existing group. Do this on the device that is new or an addition to the group, this needs
to be completed prior to putting the Configurator Device in “Accept New Device” mode.
7 = Accept New Device (used in 3-way / multi-way applications)
Places the new configurator device into "Accept New Device" mode. This is done after
setting up a new /additional device to be added in join group mode.
8 = Add Mobile Device (Clairity Pro)
Allow user to use mobile application of a pre-configured group.
1 - 1%
4 - 30%
7 - 60%
10 - 90%
2 - 10%
5 - 40%
8 - 70%
11 - 100%
3 - 20%
6 - 50%
9 - 80%


