Samsung SMX-K400BP, User Manual
The Samsung SMX-K400BP User Manual is available for free download on our website. This comprehensive manual provides detailed instructions and helpful tips to maximize your experience with this high-quality camcorder. Get your free manual now at manualshive.com to unlock the full potential of your Samsung SMX-K400BP.
Share
Download


Reviews:
No comments
Related manuals for SMX-K400BP

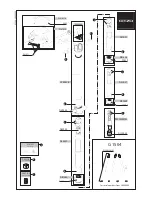
Classic Studex Mk2 G1326 G1326
Brand: Gitzo Pages: 1
Classic Tele Studex Mk2 G1504 G1504
Brand: Gitzo Pages: 1

XTRprod
Brand: AAton Pages: 109

CC6393
Brand: RCA Pages: 132

SUB-2000 Series
Brand: Samsung Pages: 21

VM-C1400
Brand: Samsung Pages: 118

4-20-193
Brand: Vision & Control Pages: 62

eclipse EXPLORER
Brand: AgfaPhoto Pages: 59

DVC 5024
Brand: Easypix Pages: 2

G2000 series
Brand: Canon Pages: 70

HC-V777
Brand: Panasonic Pages: 257

VP-D353
Brand: Samsung Pages: 168

HC-MDH2GC
Brand: Panasonic Pages: 171

HC-PV100
Brand: Panasonic Pages: 48

H1 - Toughbook - Atom Z540
Brand: Panasonic Pages: 164

HC-2X970M
Brand: Panasonic Pages: 256

HC-V10
Brand: Panasonic Pages: 124

HC-MDH3E
Brand: Panasonic Pages: 96


